Removing the head light assembly


Thread Starter
Join Date: Feb 2012
Location: Essex County, Ontario, Canada
Age: 41
Posts: 53
Likes: 0
Received 0 Likes
on
0 Posts
My lights are super gunked with crap. It makes the car look used. So I went out and bought the 99.999% Meth alcohol to clean them up. I've removed all of the bolts holding the head lamp assembly in place on the driver side (haven't yet attempted the passenger) but I can't get the thing removed from its spot or the wire harness to detach. Do I have to remove anything else?
Is there a step to step guide on how to do remove the head light assembly? Seems like it'd be a simple thing to do.
Is there a step to step guide on how to do remove the head light assembly? Seems like it'd be a simple thing to do.
REMOVAL
1. Disconnect the negative battery cable.
2. Remove the headlamp unit upper retaining bolts (1).
3. Open the access panel in the inner fender well.
4. Remove the lower headlamp unit retaining bolts (2).
5. Lift the headlamp unit from the front fascia and disconnect the harness connector and the front position lamp socket.
Last edited by turbomar; 09-15-2012 at 01:22 PM.

Join Date: Mar 2010
Location: Sun City West, AZ
Posts: 1,363
Likes: 0
Received 0 Likes
on
0 Posts
REMOVAL
1. Disconnect the negative battery cable.
2. Remove the headlamp unit upper retaining bolts (1).
3. Open the access panel in the inner fender well.
4. Remove the lower headlamp unit retaining bolts (2).
5. Lift the headlamp unit from the front fascia and disconnect the harness connector and the front position lamp socket.
1. Disconnect the negative battery cable.
2. Remove the headlamp unit upper retaining bolts (1).
3. Open the access panel in the inner fender well.
4. Remove the lower headlamp unit retaining bolts (2).
5. Lift the headlamp unit from the front fascia and disconnect the harness connector and the front position lamp socket.
Removing the side marker light will also give some room to work in. I will add this .... eventho you may get the headlamp assembly loose and ready to lift out. It is extremley difficult to work it around so it comes out. Most people have had to remove the front bumper fascia to get it out.l Just sayin ...
Last edited by IBLUBYU; 09-16-2012 at 05:27 AM.
My lights are super gunked with crap. It makes the car look used. So I went out and bought the 99.999% Meth alcohol to clean them up. I've removed all of the bolts holding the head lamp assembly in place on the driver side (haven't yet attempted the passenger) but I can't get the thing removed from its spot or the wire harness to detach. Do I have to remove anything else?
Is there a step to step guide on how to do remove the head light assembly? Seems like it'd be a simple thing to do.
Is there a step to step guide on how to do remove the head light assembly? Seems like it'd be a simple thing to do.
2. remove the 2 metal adjusters on the bottom to get a bit more clearance for removal.
3. wait till you can move the assembly around a bit before attempting to remove the running light. ( don't forget to put it back in before securing the unit !!! )
4. upon re-assembly, get the unit in, then start the 2 metal adjusters a couple of turns.
5. secure the unit with the upper 2 bolts.
6. screw the adjusters in until they just touch the lower mounting brackets, then replace the 2 lower bolts.
7. If you haven't already, re-connect the wiring connector.
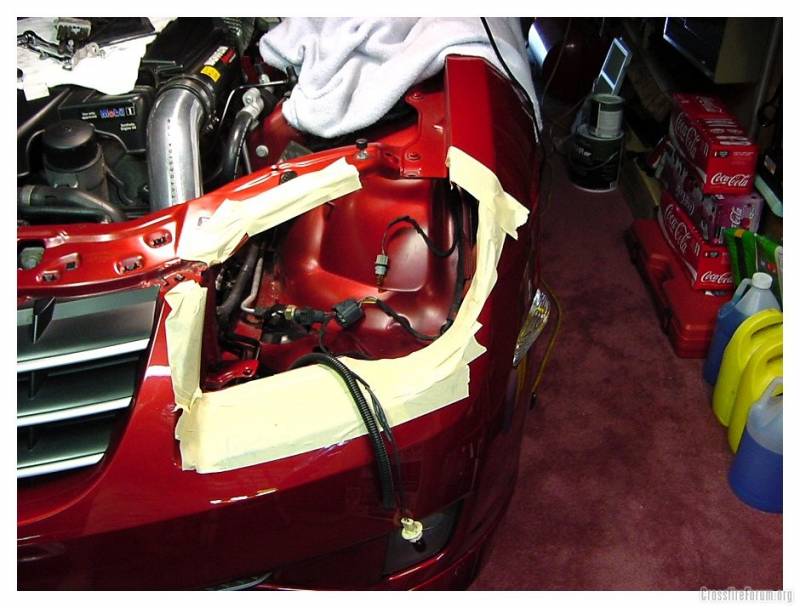
Remove the grille. Then remove one bolt that holds the front facia to core support. Using a small piece of wood, etc, slightly wedge it under the facia to hold it out of your way. Also use some masking tape to put all around the facia (bumper) to prevent scratches. Here is a pic, the grille was just sitting in there once the light assy was removed.
James
James
Last edited by James1549; 09-15-2012 at 09:54 PM.
Thread Starter
Join Date: Feb 2012
Location: Essex County, Ontario, Canada
Age: 41
Posts: 53
Likes: 0
Received 0 Likes
on
0 Posts
Senior Member

Thread
Thread Starter
Forum
Replies
Last Post
PNA
Crossfire Coupe
1
07-27-2015 12:28 PM
axnguyen
Cars For Sale - Archive
1
07-21-2015 11:41 AM
xfireon20z
Parts/Accessories for sale - Archive
3
07-20-2015 04:35 PM
joethejeweler
Troubleshooting & Technical Questions & Modifications
2
07-07-2015 08:58 PM
Currently Active Users Viewing This Thread: 1 (0 members and 1 guests)