Resealing the Recirculating Cover on M112s


Thread Starter
Join Date: Apr 2008
Location: Seattle, WA
Posts: 81
Likes: 0
Received 0 Likes
on
0 Posts
I posted this on mbworld, but this applies directly to the xf community's use of the M112 in both supercharged and naturally aspirated forms.
http://mbworld.org/forums/showthread...329&highlight=
http://mbworld.org/forums/showthread...329&highlight=
Originally Posted by TruTaing
The m112 motor has a cover that helps recirculate oil on top of each of the valve covers that often leaks and as a result the motor will lose oil and it will make your engine bay a mess.
Simple signs of this seal leaking are the smell of burning oil, the car losing excessive oil, and of course a very dirty set of valve covers and/or plugs and wires.
Unfortunately for the m112, there is no gasket that can simply be bought and replaced, but instead, we have to use a gasket maker to create a new seal.
Before I proceed with the basics of this process Id like to say that I am not a professional and that the process detailed is just my attempt to offer some insight for those who might have the problems I have found.
Tools Needed:
Permatex RVT Black Gasket Maker
E10 inverted star shaped bit
14mm star shaped bit. (i think)
Sensor Cleaner ( or something to help remove oil and engine grime)
A couple flat head screw drivers
Lots of cleaning rags/paper towels
Wire cutter (removing zip ties)
Zip ties
Time required - Two hours per cover
The steps are pretty simple:
Have the car parked in a garage/warm/dry place where you can work safely on the car after the engine has been parked for a while - to ensure very little oil is in these covers and that the headers are cool.
Remove the airbox + tubes that head to the air box + use something to cover the MAF.
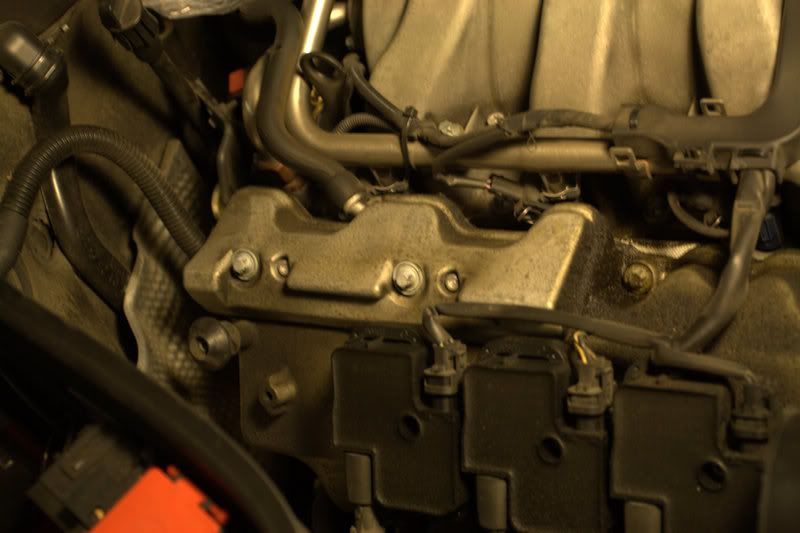
Use paper towels and engine cleaning supplies to clean off the valve covers and headers. Be sure to clean and remove the coil packs because a lot of oil can be hiding under them. Also, be sure to wipe down the bottom side of the headers also. Unplug the coil packs from the wires leading to them from above the motor. Take and leave the coil packs off and clean under them too. Try not to get dirt/grime into the plugs of the coil pack. (might have to use a wire cutter to remove a zip tie or two)
(Be very thorough so you can be sure that once you do replace the seal and fire up the motor that there is not any extra dirt/oil that might be getting on the header and giving you false signs that you are further leaking oil that is burning on the headers )
Once everything is cleaned up, go ahead and remove the bolts holding the recirculating valve covers down. There are two long bolts and two small bolts on the passenger side and there are three of each on the driver side.
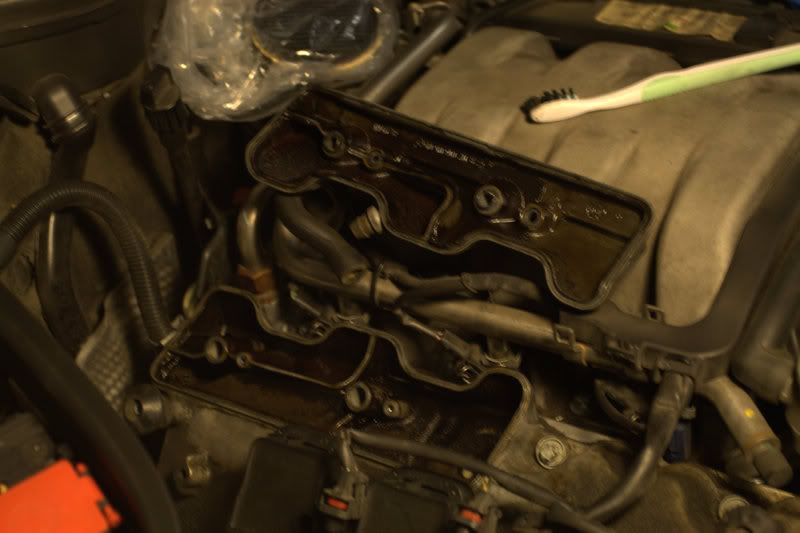
Use flat head screw drivers to gently pry up the passenger side cover. The passenger side cover has one hose that runs into it that can be easily pulled off. Remove the cover and clean it.
Use flat head screw drivers to gently pry up the driver side cover. The driver side cover has two hoses that run into the cover, but I was unable to remove these. I just covered up the exposed side of the valve cover and cleaned the recirculating cover on top of the engine.
While the covers are removed, be sure to avoid dripping oil onto the motor and if you do, just clean it off. Additionally, when the recirculating covers are removed, one can see the holes that lead directly into the valve cover. We do not want anything to fall in there other than oil.
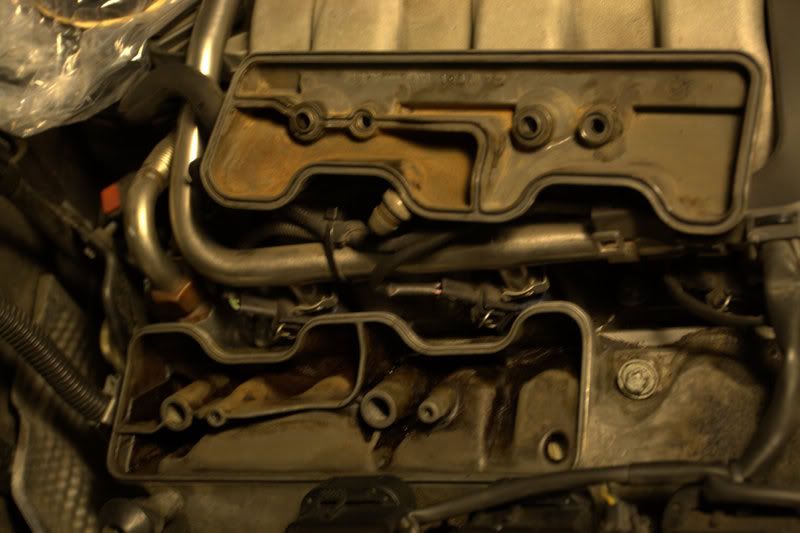
When cleaning play close attention to the areas that seal the oil in and make sure they are super clean. Each bolt that goes through the cover also had sealant around it w/in the cover.
When the covers are cleaned, apply the gasket maker appropriately and return the covers to their original position. Lightly tighten the bolts evenly and return an hour later, then fully tighten the bolts. The small bolts are prone to breaking - do not over torque them. (I could not find the torque specs for these bolts) Wait 24 hours for the sealant to fully cure, more if the weather is cold.
Reassemble the coil packs + the wires connecting them and the plugs + zip ties.
After the long wait... Fire up the car and make sure nothing is leaking out of there any more
PS - The pictures presented were arent quiet following the steps I provided. The steps provided are the steps I wish I would have taken now that I have done this once.
PSS - Many thanks to Erick Gunter, 1FASTC32, for replying quickly to emails and question and offering guidance throughout this process. Without his reassurances, this process would have been MUCH more difficult.
Simple signs of this seal leaking are the smell of burning oil, the car losing excessive oil, and of course a very dirty set of valve covers and/or plugs and wires.
Unfortunately for the m112, there is no gasket that can simply be bought and replaced, but instead, we have to use a gasket maker to create a new seal.
Before I proceed with the basics of this process Id like to say that I am not a professional and that the process detailed is just my attempt to offer some insight for those who might have the problems I have found.
Tools Needed:
Permatex RVT Black Gasket Maker
E10 inverted star shaped bit
14mm star shaped bit. (i think)
Sensor Cleaner ( or something to help remove oil and engine grime)
A couple flat head screw drivers
Lots of cleaning rags/paper towels
Wire cutter (removing zip ties)
Zip ties
Time required - Two hours per cover
The steps are pretty simple:
Have the car parked in a garage/warm/dry place where you can work safely on the car after the engine has been parked for a while - to ensure very little oil is in these covers and that the headers are cool.
Remove the airbox + tubes that head to the air box + use something to cover the MAF.
Use paper towels and engine cleaning supplies to clean off the valve covers and headers. Be sure to clean and remove the coil packs because a lot of oil can be hiding under them. Also, be sure to wipe down the bottom side of the headers also. Unplug the coil packs from the wires leading to them from above the motor. Take and leave the coil packs off and clean under them too. Try not to get dirt/grime into the plugs of the coil pack. (might have to use a wire cutter to remove a zip tie or two)
(Be very thorough so you can be sure that once you do replace the seal and fire up the motor that there is not any extra dirt/oil that might be getting on the header and giving you false signs that you are further leaking oil that is burning on the headers )
Once everything is cleaned up, go ahead and remove the bolts holding the recirculating valve covers down. There are two long bolts and two small bolts on the passenger side and there are three of each on the driver side.
Use flat head screw drivers to gently pry up the passenger side cover. The passenger side cover has one hose that runs into it that can be easily pulled off. Remove the cover and clean it.
Use flat head screw drivers to gently pry up the driver side cover. The driver side cover has two hoses that run into the cover, but I was unable to remove these. I just covered up the exposed side of the valve cover and cleaned the recirculating cover on top of the engine.
While the covers are removed, be sure to avoid dripping oil onto the motor and if you do, just clean it off. Additionally, when the recirculating covers are removed, one can see the holes that lead directly into the valve cover. We do not want anything to fall in there other than oil.
When cleaning play close attention to the areas that seal the oil in and make sure they are super clean. Each bolt that goes through the cover also had sealant around it w/in the cover.
When the covers are cleaned, apply the gasket maker appropriately and return the covers to their original position. Lightly tighten the bolts evenly and return an hour later, then fully tighten the bolts. The small bolts are prone to breaking - do not over torque them. (I could not find the torque specs for these bolts) Wait 24 hours for the sealant to fully cure, more if the weather is cold.
Reassemble the coil packs + the wires connecting them and the plugs + zip ties.
After the long wait... Fire up the car and make sure nothing is leaking out of there any more
PS - The pictures presented were arent quiet following the steps I provided. The steps provided are the steps I wish I would have taken now that I have done this once.
PSS - Many thanks to Erick Gunter, 1FASTC32, for replying quickly to emails and question and offering guidance throughout this process. Without his reassurances, this process would have been MUCH more difficult.

Forum Regular

Join Date: Mar 2008
Location: Boca Raton, FL
Age: 44
Posts: 435
Likes: 0
Received 0 Likes
on
0 Posts
Originally Posted by stlouistrucker
Does anyone have the part numbers for the small bolts that hold the recirculating covers on? If they tend to break I want to be prepared. I can't find them in the online parts catalogs.
Part no.
000000-004436
Price per bolt
$3.20
Forum Regular
Thank you Naudi90. I had gotten my answer on the Mercedes forum. However, the price I paid at the local Mercedes dealership ( BMW and Mercedes Benz of Bowling Green ) was $1.40 each. I also bought the sealant Part Number 003-989-98-20-10. It was in a really neat and easy to use but over priced tube. The sealant was $19.50. Thank you again for your response.
Originally Posted by stlouistrucker
Thank you Naudi90. I had gotten my answer on the Mercedes forum. However, the price I paid at the local Mercedes dealership ( BMW and Mercedes Benz of Bowling Green ) was $1.40 each. I also bought the sealant Part Number 003-989-98-20-10. It was in a really neat and easy to use but over priced tube. The sealant was $19.50. Thank you again for your response.
i did mine a couple weeks ago. the super black rtv was 6$ from autozone and of course i broke a bolt by barely applying pressure! i think the rtv filling the hole causing pressure broke the weak bolts. a quick trip to home depot found the same bolt in an allen head design (grade 5) and cost was .60 for 2 so i replaced all of the suckers for less than 2$

Thread
Thread Starter
Forum
Replies
Last Post
Currently Active Users Viewing This Thread: 1 (0 members and 1 guests)