When you click on links to various merchants on this site and make a purchase, this can result in this site earning a commission. Affiliate programs and affiliations include, but are not limited to, the eBay Partner Network.
After several years, what a surprise to get an email with update about a post in Crossfire Forum! I sold my Crossfire about 4 years ago to move to Japan. I now drive a Honda Life Dunk, 660cc inline-3 Turbo mini car! I miss my Crossfire so much :-(
I bet you do! Come on back to the states...you're sure to find a great deal on one.
Has anyone tried to use a wire saw to cut the driver's side knee bolster retainers off without having to unscrew anything? sort of like garroting the plastic retaining heads by sliding the wire saw behind the bolster and the pulling the handles so the wire heats and then melts the retainers? I hate the bolster and always have worn my seat belts since 1966 fer gosh sakes. I'm a bit too squeemish to slam a pry bar on my delicate beauty...
Has anyone tried to use a wire saw to cut the driver's side knee bolster retainers off without having to unscrew anything? sort of like garroting the plastic retaining heads by sliding the wire saw behind the bolster and the pulling the handles so the wire heats and then melts the retainers? I hate the bolster and always have worn my seat belts since 1966 fer gosh sakes. I'm a bit too squeemish to slam a pry bar on my delicate beauty...
It's nice to know that these things are so selective that they just burn through what you want, even when you can't see where the smoke is coming from.
What will they think of next.
It looks like something Tony Soprano could have used.
Are you saying this is a moronic idea? Just checking.
Originally Posted by onehundred80
It's nice to know that these things are so selective that they just burn through what you want, even when you can't see where the smoke is coming from.
What will they think of next.
It looks like something Tony Soprano could have used.
Be a little harder in my '07. the knee air bag is there. Personally have not noticed any problem now that the seat goes another 1.5" further back when reclined.
Would like the wheel lower, may space it down when I replace the gas gauge dash light. Have done that before but all my other cars now have tilts.
Since two earlier posters on this thread said they removed the knee bolsters with prybars, I thought "what the heck". Today I removed the knee bolster using a molding prybar.. It took 5 minutes total, and that's because I was going at near dead stop speeds due to my fears of damaging something. The curvature of the pry blade perfectly matched the dash curve. Came off eezey peezy w/no damage. For the very first time I can sit in perfect comfort as the original designer obviously intended. The knee bolster was clearly an afterthought kludge and I'm over the MOON happy that it's gone!
To late - it's gooone. However, If you look at the picture of the pry bar, you'll notice that it's wide and has a slight curvature. This curve matches the curve in the seam/gap between the bolster and the bolster mounting points on the dash. This wide curve helps minimize scratching.
Starting about 2 inches to the left of the steering column, slip the pry bar between the dash and bolster, pushing it down gently until the thin area of the bar is fully behind the bolster. The sharp edge of the prybar should be facing toward the front of the car, matching the curve of the dash. Then, taking a standard hammer, tap on the bar to get it nicely seated. Then gently but firmly pull the top of the pry bar toward yourself and also push it down so it doesn't slide up/out - until you hear a "snap" sound. That will be the sound of the plastic retaining post breaking. (while doing all this you will need to ensure that you don't smack/damage the cruise control or turn signal stalks). Once you hear the snap, the pry bar should be a bit looser behind the bolster.
Next, move the pry bar to the right side - about two inches to the right of the steering column. Again, slip pry bar behind the bolster, gently smack/seat the pry bar behind the bolster, pull the bar forward - hear the "snap" - and yet another retaining post bites the dust.
Now after removing the pry bar you should be able to pull the bolster forward/away from the main dashboard a little bit.
Then with the driver's side door wide open, move the prybar to the bottom left of the bolster and insert and tap it in near the bottom of the bolster at about a 60 degree angle (closer to horizontal relative to the floor) when the thin curved part of the bar is fully behind the bolster pull the bar away from the dash toward the driver's seat till "snap" happens.
At this point, I put my hands behind the bolster on either side of the steering wheel and gently, gradually pulled the bolster down towards the floor until the remaining posts gave up the ghost.
I make no guarantees, but it worked for me and it is fantabulous having that stinking thing gone from my life. Again, always wear your seat belt and don't forget to floss :-)
With a few photos and emails exchanged with Adrian_X I got the confidence to remove mine the "easy way" too.
I just used a flat metal scraper with a microfiber towel wrapped around the blade and tapped it in between the Knee Bolster and the dash and carefully pried downward and it popped right off and did no damage to the dash at all.
Of course this method will not allow the bolster to be re-attached but I have no intention to ever put it back on anyway
Now all I need to do is find four 1/2 inch plastic plugs to insert into the holes left behind.
I'm gonna be looking for gray ones but black will do otherwise.
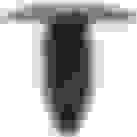
Here is my before and after pic and the 1/2 inch plugs I will be using to fill the holes where it was attached
Also added a couple pics from another Crossfire illustrating the fasteners from a inside view
Yes, the knee airbag must be removed (lowered and set aside unless you remove wiring). It is under a cover that is part of the lower instrument panel, remove 4 screws and fold down towards seat. Then remove 2 bolts that hold airbag assembly to dash frame (disconnect battery before playing with airbag). Some of the screws for the lower instrument panel are hidden beneath bolster that is attached with spring clips to the plastic panel. After fighting with clips and air bag removal, I discovered that I could remove seat relay through the left AC vent hole by removing screws from headlight control and lowering the control inside dash. (sorry no pictures). Made easier because I knew what I was looking for and small hands. My relay is good but seem to have bad connection in relay socket under dash!
Yes, the knee airbag must be removed (lowered and set aside unless you remove wiring). It is under a cover that is part of the lower instrument panel, remove 4 screws and fold down towards seat. Then remove 2 bolts that hold airbag assembly to dash frame (disconnect battery before playing with airbag). Some of the screws for the lower instrument panel are hidden beneath bolster that is attached with spring clips to the plastic panel. After fighting with clips and air bag removal, I discovered that I could remove seat relay through the left AC vent hole by removing screws from headlight control and lowering the control inside dash. (sorry no pictures). Made easier because I knew what I was looking for and small hands. My relay is good but seem to have bad connection in relay socket under dash!