Sick of hazy headlights?


This is retarded that we're dealing with this on EVERY model out there...Manufacturers can prevent this but they don't want to. The deterioration is just a way to make you feel like your car is crap and helps convince you need a new car.
When I come to power, I will require all cars be made with yellow-crack proof headlights and easily removable doors for beach days!!
When I come to power, I will require all cars be made with yellow-crack proof headlights and easily removable doors for beach days!!

Originally Posted by the.Santorini
Are there any recommendations for protective UV films or any other form of UV protection for the plastic that can be applied once the lenses are clean? Reason I ask is on my LHS, I had cleaned the headlights but they turned yellow again in a fraction of the time it took the first time they changed. I would imagine the plastic is coated with some form of UV protection in the factory during manufacturing. It would make sense whatever compound they apply breaks down over time and as a result, yellow and cracks form.
I did this process on my Neon two years ago, and after I did, I used an acrylic enamel clear coat on them, followed by 1000-2000 grit wet sanding and buffing to get rid of the orange peel. They are still in excellent condition two years and 70k+ miles later (I will take pictures and post them this weekend). It's important that you use an enamel-based, not a lacquer-based product, as lacquer will soften the plastic and ruin the lens. However, I was unable to find an acrylic enamel clear coat this time, so I have tried another product on our Town & Country (it's my guinea pig) and will be wet sanding and buffing it this weekend to see how it turned out.
Originally Posted by the.Santorini
For what it's worth, the kit referred to above averages in the ball park of $330+.
Originally Posted by the.Santorini
vipr1ab - Do you mind putting together some instructions on the steps you took including tools and materials you used and posting them? I am very impressed by your final product. Better job than some detailers I've seen in Tampa.
Last edited by vipr1ab; 06-05-2009 at 06:29 PM.
Forum Regular
Join Date: Sep 2007
Location: Coventry uk
Age: 63
Posts: 440
Likes: 0
Received 0 Likes
on
0 Posts

Read my post #59?
These are American products, but the DIY kits are very reasonable.
You seem to be a very capable guy.
These are American products, but the DIY kits are very reasonable.
You seem to be a very capable guy.
Originally Posted by ZeroZero
Hi all
Is there any one that produces a plastic lens cover for the Xfire , So to protect from stone chip etc , I know you can tints but not sure they would be strong enough .
Cheers
Andy
Is there any one that produces a plastic lens cover for the Xfire , So to protect from stone chip etc , I know you can tints but not sure they would be strong enough .
Cheers
Andy

Forum Regular
Join Date: Oct 2008
Location: Chicago Suburbs (Wood Dale)
Posts: 767
Likes: 0
Received 0 Likes
on
0 Posts
Originally Posted by vipr1ab
Mine were in pretty bad shape. I've done this repair on other cars before. I start by wet sanding by hand. The first pass takes the longest since you need to make sure you get through all the damaged plastic. I started with 220 grit, then 400 > 600 > 800 > 1000 > 1500, then finish up with 2000 grit. Once I'm satisfied with the sanding, I get my cordless drill with a sponge buffing pad and make several passes using 3M� Perfect-It � Rubbing Compound.
Originally Posted by vipr1ab
Mine were in pretty bad shape. I've done this repair on other cars before. I start by wet sanding by hand. The first pass takes the longest since you need to make sure you get through all the damaged plastic. I started with 220 grit, then 400 > 600 > 800 > 1000 > 1500, then finish up with 2000 grit. Once I'm satisfied with the sanding, I get my cordless drill with a sponge buffing pad and make several passes using 3M™ Perfect-It ™ Rubbing Compound.
I'm pretty sure that he wetsanded ALL of these grits.
Originally Posted by maxcichon
I'm pretty sure that he wet sanded ALL of these grits.
It's been a busy weekend, so I haven't had time to do a detailed write-up. Here is the list of materials:

- 3M Imperial Wetordry sanding sheets 220, 400, 600, 800, 1000, 1500, 2000 grit
- 3M Scotch 2" Masking Tape
- 3M Perfect It II Rubbing Compound
- Microfiber Cloth
- Cordless Drill
- Polishing Pad
- Water
You can either remove your headlight assembly or simply mask off the areas around your lens. Start wet sanding with a grit that's appropriate for the level of damage your lens has sustained, but keep in mind the higher the grit you start with, the more sanding you'll need to do to cut through the damage. On the other hand, the lower the grit you start with, the more levels of grit you'll need to go through. Work with the first grit until you are confident you have removed all the damaged plastic. When moving onto the next grit, you will want to sand until you have removed all the sanding marks from the previous grit.
After finishing sanding, make a few passes using the cordless drill, polishing pad and rubbing compound.
That's about it. Should take about 2 hours per lens.
For the final step, in the past, I have used an acrylic enamel clear coat. However, I am trying another product--KRYLON Fusion for Plastic - UV Resistant Clear Coat--but I don't know how it holds up long-term.
Results - acrylic enamel clear coat
June 2007
June 2009
The attachments are of our Town & Country, renewed using the process above and finished with 5 coats of KRYLON UV Resistant Clear Coat, wet sanded with 1000 to 2000 grit, then buffed with rubbing compound to make it smooth as glass.

Originally Posted by SNAKEWOLF
- 1 � 3" Soft Interface Pad
- 6 � 3" P500 Sanding Discs
- 4 � 3" P800 Finishing Discs
- 1 � 3" P3000 Trizact� Disc
- 1 � 3" Disc Pad Holder
- 1 � Headlight Lens Polish, 1 oz.
- 1 � 3" Buffing Pad
- Step by Step Directions Brochure
Join Date: Jun 2009
Location: S. Ontario, Canada
Age: 63
Posts: 116
Likes: 0
Received 0 Likes
on
0 Posts
Originally Posted by patpur
I keep telling you guys, buy a Porter Cable Polisher and you can do the same thing, without the sand paper in 5 minutes tops. And you have an idiot proof buffer for your car.
Pat
Pat
Join Date: Jun 2009
Location: S. Ontario, Canada
Age: 63
Posts: 116
Likes: 0
Received 0 Likes
on
0 Posts
Just an update on my situation for whatever help it might be~ I started out with Blue Magic headlight restorer and after the first go-round found that it did a very nice job on the "good" areas - which really made the problem areas look much worse.
Since then, I've tried it a couple more times - not any long term polishing, just 5 minutes or so when I wash the car. I will say that with each try it's showing improvement so there's something to be said for patience and perseverance.
My last experience was when I was polishing the Xfire with the Swirl Remover 2.0 and a LC white pad, I figured what the heck, and did the lights, too. Huge improvement and again, I didn't spend too long on them.
So, I could see that with a more aggressive pad and polish it might be possible to get this done without wet sanding.

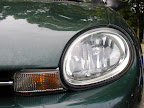
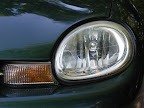
I had the foggy hazy headlights. They felt rough and crackled. I found the 3M Headlight restoration kit and they look like new now. This was for the outside though, not inside.
Not bad for $20 kit and 2 hours of time. Pickup up kit at Autozone but saw it at Walmart too.
Here's a link to the kit and video by 3M: Restoring a Headlight 3M
Here's some before and after photos. The overcast day put a grainy look to the after shots but they're shiny and way better than before!

Not bad for $20 kit and 2 hours of time. Pickup up kit at Autozone but saw it at Walmart too.
Here's a link to the kit and video by 3M: Restoring a Headlight 3M
Here's some before and after photos. The overcast day put a grainy look to the after shots but they're shiny and way better than before!
Forum Regular
I had the foggy hazy headlights. They felt rough and crackled. I found the 3M Headlight restoration kit and they look like new now. This was for the outside though, not inside.
Not bad for $20 kit and 2 hours of time. Pickup up kit at Autozone but saw it at Walmart too.
Here's a link to the kit and video by 3M: Restoring a Headlight 3M
Here's some before and after photos. The overcast day put a grainy look to the after shots but they're shiny and way better than before!
Not bad for $20 kit and 2 hours of time. Pickup up kit at Autozone but saw it at Walmart too.
Here's a link to the kit and video by 3M: Restoring a Headlight 3M
Here's some before and after photos. The overcast day put a grainy look to the after shots but they're shiny and way better than before!


Forum Regular
Join Date: Oct 2012
Location: Hartland, Vermont
Age: 71
Posts: 561
Likes: 0
Received 0 Likes
on
0 Posts