Detailing - start to finish (pic heavy)


Ok. over the entire course of the weekend I have been detailing my crossfire. I was going based off of this guide: Meguiar's 5-Step Paint Care Cycle - Updated! - Car Care Forums: Meguiar's Online
The car came to me relatively swirl free. It had some, but it wasn't bad. I tried to keep it that way. Well recently someone washed it and dried it with very old cotton bath towels, and it destroyed the paint (I won't say who in case my dad reads this Love ya dad!!) Fortunately I had just bought a meguiars dual action polisher, so I set out to fix the paint. I took pictures after every step so you could follow me along. Unfortunately I couldn't get the sun to stay in the same place over the entire process, and some of the pictures are at different angles, but I tried to get the sun reflecting off of whatever I took a picture of.
First on the 5 step was washing. Nothing extraordinary here, just did a basic wash job like I would any other time. Soft microfiber wash mitt, two buckets, and meguiars gold class car wash. The car was very clean, but the swirls were... well you see.
100_2289.jpg
100_2291.jpg
100_2288.jpg
Spoiler:
100_2290.jpg
Plus there was this weird spot on the back that looked like something had been set on the bumper:
100_2293.jpg
Next step was to clay the car. I did with meguiars clay kit, and took pictures, but there's not point in putting them up. I clay it very frequently, and the car was very clean on top of the paint. There was almost nothing that came off onto the clay over the entire car so it really didn't end up looking different. (but if you are doing this and haven't clayed your car, definitely do it, first time took a ton of stuff off)
The car came to me relatively swirl free. It had some, but it wasn't bad. I tried to keep it that way. Well recently someone washed it and dried it with very old cotton bath towels, and it destroyed the paint (I won't say who in case my dad reads this
First on the 5 step was washing. Nothing extraordinary here, just did a basic wash job like I would any other time. Soft microfiber wash mitt, two buckets, and meguiars gold class car wash. The car was very clean, but the swirls were... well you see.
100_2289.jpg
100_2291.jpg
100_2288.jpg
Spoiler:
100_2290.jpg
Plus there was this weird spot on the back that looked like something had been set on the bumper:
100_2293.jpg
Next step was to clay the car. I did with meguiars clay kit, and took pictures, but there's not point in putting them up. I clay it very frequently, and the car was very clean on top of the paint. There was almost nothing that came off onto the clay over the entire car so it really didn't end up looking different. (but if you are doing this and haven't clayed your car, definitely do it, first time took a ton of stuff off)
After that came actually buffing out the swirls. First off let me say HOLY CRAP the clearcoat is tough!!! It took me what felt like forever. I thought it would be a quick thing to do this, but I was wrong. Some spots took many times of going over it before the swirls were gone. I would have never gotten this done by hand. The machine acted up on me once which slowed me down by a few hours, but after it got going again everything worked out. I ran out of sunlight saturday, so I had to quit and continue this today. I used up an entire bottle of meguiars ultimate compound, but I eventually got it. 
100_2303.jpg
100_2302.jpg
100_2301.jpg
100_2308.jpg
And whatever the bumper thing was came out nicely!
100_2306.jpg
100_2303.jpg
100_2302.jpg
100_2301.jpg
100_2308.jpg
And whatever the bumper thing was came out nicely!
100_2306.jpg
Step number 3 was a polish. I used meguiars deep crystal polish, put on by hand with a microfiber applicator. For a dark car, this should be made a mandatory step. It gave the car a deep gloss that looked very nice. This was an easy thing to do, just put on and take off, but it made a big difference.
100_2310.jpg
100_2312.jpg
100_2313.jpg
And because a very similar picture was on the guide, I decided to take this one:
100_2314.jpg
100_2310.jpg
100_2312.jpg
100_2313.jpg
And because a very similar picture was on the guide, I decided to take this one:
100_2314.jpg
And after all of that was done, I waxed the car with 2 layers of nxt 2.0 tech wax. For the large areas I put the wax on with the polishing machine, and for the smaller areas I used another microfiber applicator. I let the wax dry for about a half hour before I took it off and applied the second layer. During this time I also cleaned out the inside of the car, but it stays clean so there wasn't much to that. After I wiped off the second coat, I took some finishing shots.
100_2315.jpg
100_2317.jpg
100_2316.jpg
100_2321.jpg
Back with a few of the products used:
100_2319.jpg
Side with almost everything I used (minus microfiber towels other pads on the machine, wash mitt and ultimate quick detailer for future use. )
100_2326.jpg
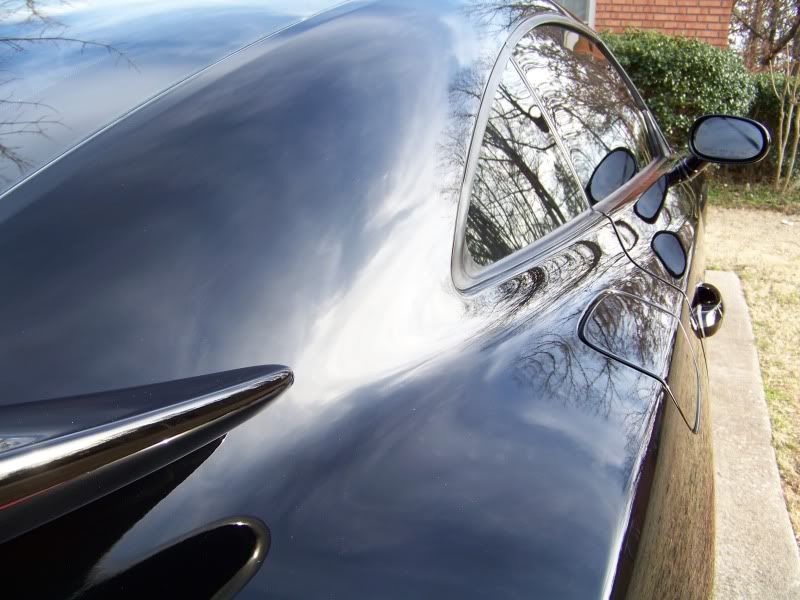
Like a mirror!!!
100_2328.jpg
I owe pretty much all of this to my "sponsors" Mike-in-orange and maxcichon. Without those two none of this would be possible, nor would I be as obsessed with the car as I am without their misdirection. So, can't thank you guys enough!! I owe ya.
I'm exhausted now, but it was totally worth it. It's awesome to have it looking so clean. I had about 10 people comment on how nice it looked and how well I take care of it. Even my roomate, who had previously made fun of me for cleaning off swirls and said no one could see them, was amazed at the difference. Even before I got them all off he came out and looked at it and said, "holy crap, I can actually see exactly what you were talking about!" I knew it would make a difference, but until I finished I didn't realize exactly how much. For anyone who is thinking about doing this, do it. Set aside a weekend and make your baby look like new!
I'm in love all over again!
100_2315.jpg
100_2317.jpg
100_2316.jpg
100_2321.jpg
Back with a few of the products used:
100_2319.jpg
Side with almost everything I used (minus microfiber towels other pads on the machine, wash mitt and ultimate quick detailer for future use.
100_2326.jpg
Like a mirror!!!
100_2328.jpg
I owe pretty much all of this to my "sponsors" Mike-in-orange and maxcichon. Without those two none of this would be possible, nor would I be as obsessed with the car as I am without their misdirection.
I'm exhausted now, but it was totally worth it. It's awesome to have it looking so clean. I had about 10 people comment on how nice it looked and how well I take care of it. Even my roomate, who had previously made fun of me for cleaning off swirls and said no one could see them, was amazed at the difference. Even before I got them all off he came out and looked at it and said, "holy crap, I can actually see exactly what you were talking about!" I knew it would make a difference, but until I finished I didn't realize exactly how much. For anyone who is thinking about doing this, do it. Set aside a weekend and make your baby look like new!
I'm in love all over again!

Join Date: Jan 2007
Location: Miami, Florida
Age: 69
Posts: 2,117
Likes: 0
Received 0 Likes
on
0 Posts
What can we say? Awesome job. I just waxed my baby. I didn't claybar it, but it needs it in the reare area where the wing sets. The wax was done by hand. I buff her every month or so, but the buffer doesn't get in that area very well.
Again great job. And 100 atta-boys.
Again great job. And 100 atta-boys.
Senior Member

Very nicely done...I have been putting this off til the last snow melts seeing as one day in slush and it would seem as though all my work would go down the drain.
When I bought my first crossfire, I bought it new and washed/waxed it religiously. When I bought my SRT it already had some swirls and I wasn't confident in my detailing abilities with a PC or any other dual-action polisher... so it definitely did not get waxed as often... Now, I am going to do it...I need to set aside a weekend, but seeiung as my garage at my apartment complex has no water supply, I will have to take it to the nearest self wash (about 1mile) and then back home to clay it, etc... which is kinda depressing...
This weekend I saw a buddy's SL600 that he had just had paint correction done on it... Now I admit that there is no way I will do a $1000 job like he had done myself, but I am definitely looking forward to the improvement...
You definitely gave me a confidence boost reading this...now I just have to find a weekend I'm free...or force myself to be free one of these weekends coming up...
Thanks again for the write-up and great job...


Join Date: Sep 2007
Location: Athens, Texas
Posts: 1,020
Likes: 0
Received 0 Likes
on
0 Posts
Thanks everybody!!
One thing else the buffing did nicely was get rid (at least mostly) of some scratches on the car. I had a couple that were deep enough to feel with my fingernail. I didn't think there was anything I could do about it, seemed to deep to buff out, so I didn't pay much attention to it. But looking over the car after I finished I noticed that some of the scratches had almost completely disappeared. So it did more than I thought it would. Of course it should have, I spent a lot of hours on it.
I think I'm just going to have to give my dad some microfiber towels and burn the old cotton ones he uses, that should prevent a lot of marks.
Oh, and mike, let me know what the guys think. If you need any high-res pics to start using in advertisements just let me know.
Almost forgot to mention. When I started buffing I had the machine set on 5 as the speed setting. It just wasn't getting it done, but once I cranked it up to 6 it started working much faster. So if you can't get rid of the swirls, crank the speed up.
One thing else the buffing did nicely was get rid (at least mostly) of some scratches on the car. I had a couple that were deep enough to feel with my fingernail. I didn't think there was anything I could do about it, seemed to deep to buff out, so I didn't pay much attention to it. But looking over the car after I finished I noticed that some of the scratches had almost completely disappeared. So it did more than I thought it would. Of course it should have, I spent a lot of hours on it.
I think I'm just going to have to give my dad some microfiber towels and burn the old cotton ones he uses, that should prevent a lot of marks.
Oh, and mike, let me know what the guys think.
Almost forgot to mention. When I started buffing I had the machine set on 5 as the speed setting. It just wasn't getting it done, but once I cranked it up to 6 it started working much faster. So if you can't get rid of the swirls, crank the speed up.
Last edited by mr-lama; 03-07-2010 at 10:49 PM.
Join Date: Sep 2007
Location: Athens, Texas
Posts: 1,020
Likes: 0
Received 0 Likes
on
0 Posts
Forum Regular
Senior Member
Join Date: Aug 2006
Location: Colorado Springs, CO
Posts: 1,053
Likes: 0
Received 0 Likes
on
0 Posts
NICE JOB - mr-lama! You did good!
I never realized how much time and work it takes to get flawless paint until I joined this forum and actually did the work for the first time.
Kudos to members like Mike, Andrew, Golfdude and many others for sharing their years of expertise and knowledge and helping us rookies along.
I never realized how much time and work it takes to get flawless paint until I joined this forum and actually did the work for the first time.
Kudos to members like Mike, Andrew, Golfdude and many others for sharing their years of expertise and knowledge and helping us rookies along.
Senior Member
Thanks a bunch! That's awesome my car was shown in a Meguiar's meeting. I feel famous!! Thanks again for your help. Couldn't have done it without you. Tell the Ultimate Compound's product manager that I love his stuff!
There's no better feeling than walking to my car after school, sun at my back, and passing all of the cars that have swirls all down the side, and coming to mine at the end of the lot, out by itself, and seeing nothing but a perfect reflection of the lot in the side. )
So thanks to you and all the guys at Meguiar's!
Oh, and Maxcichon wanted me to make sure you know that he got me started. He's just trying to steal credit for making the car look better.") Thanks Max.
Thanks Max.
There's no better feeling than walking to my car after school, sun at my back, and passing all of the cars that have swirls all down the side, and coming to mine at the end of the lot, out by itself, and seeing nothing but a perfect reflection of the lot in the side.
So thanks to you and all the guys at Meguiar's!
Oh, and Maxcichon wanted me to make sure you know that he got me started. He's just trying to steal credit for making the car look better.
Senior Member
Originally Posted by mr-lama
Thanks a bunch! That's awesome my car was shown in a Meguiar's meeting. I feel famous!! Thanks again for your help. Couldn't have done it without you. Tell the Ultimate Compound's product manager that I love his stuff!
There's no better feeling than walking to my car after school, sun at my back, and passing all of the cars that have swirls all down the side, and coming to mine at the end of the lot, out by itself, and seeing nothing but a perfect reflection of the lot in the side.
So thanks to you and all the guys at Meguiar's!
Oh, and Maxcichon wanted me to make sure you know that he got me started. He's just trying to steal credit for making the car look better. Thanks Max.
There's no better feeling than walking to my car after school, sun at my back, and passing all of the cars that have swirls all down the side, and coming to mine at the end of the lot, out by itself, and seeing nothing but a perfect reflection of the lot in the side.
So thanks to you and all the guys at Meguiar's!
Oh, and Maxcichon wanted me to make sure you know that he got me started. He's just trying to steal credit for making the car look better.