How to make your own low profile car ramps


Super easy to do, I made mine about 4 years ago and they still look like new. They could support a house they are so strong and are a heck of a lot cheaper than buying "race ramps".
Just an option for you to have. If you do not like it, then do not build it.

http://www.mustangworld.com/ourpics/...amps/index.htm
If your stang is lowered more than 2 inches, or you just find it a PITA to lift the front of your car then you might need to make yourself some MW ramps :-)
(DIY means "Do it yourself" of course)
Just an option for you to have. If you do not like it, then do not build it.
http://www.mustangworld.com/ourpics/...amps/index.htm
For slammed stangs and the DIY'er
If your stang is lowered more than 2 inches, or you just find it a PITA to lift the front of your car then you might need to make yourself some MW ramps :-)
(DIY means "Do it yourself" of course)
Our stock 2000 on the ramps.
One of the key things in getting motivated to do your own oil changes or modding your stang is being able to easily, quickly and safely lift your stang. If it's going to take 15 minutes for you to jack up the front end of your stang one side at a time with a jack and jack stands, chances are you won't be too motivated to install that supercharger you had sitting in your garage for the past 5 months :-)
The next problem is if your stang is already slammed (lowered), then you have a real challenge lifting the front end with probably only 1" - 2" of clearance.
Other Ramps
We reviewed Rhino Ramps a few years back which is probably the best store bought alternative (for the price), but the things we don't like about them and other ramps were that on a lowered stang, you still scrape the black lower portion, and most ramps are a single incline ramp, which means any mishap and that stang is rolling down to the ground in one shot. Also most store ramps are very light weight, which means they can slide on a smooth floor when trying to drive up onto them.
We wanted ramps that addressed all these problems that were the same price or less to make than some store bought ramps.
Let's Build

MW Ramps sketch. Cost to make: Around $30 in wood
Materials: 2" x 10" x 10 foot (two), 2" x 10" x 8 foot (two) and a 2" x 3" x 10" piece.
This isn't New Yankee Workshop, so just a quick overview.. :-)


One of the key things in getting motivated to do your own oil changes or modding your stang is being able to easily, quickly and safely lift your stang. If it's going to take 15 minutes for you to jack up the front end of your stang one side at a time with a jack and jack stands, chances are you won't be too motivated to install that supercharger you had sitting in your garage for the past 5 months :-)
The next problem is if your stang is already slammed (lowered), then you have a real challenge lifting the front end with probably only 1" - 2" of clearance.
Other Ramps
We reviewed Rhino Ramps a few years back which is probably the best store bought alternative (for the price), but the things we don't like about them and other ramps were that on a lowered stang, you still scrape the black lower portion, and most ramps are a single incline ramp, which means any mishap and that stang is rolling down to the ground in one shot. Also most store ramps are very light weight, which means they can slide on a smooth floor when trying to drive up onto them.
We wanted ramps that addressed all these problems that were the same price or less to make than some store bought ramps.
Let's Build
MW Ramps sketch. Cost to make: Around $30 in wood
Materials: 2" x 10" x 10 foot (two), 2" x 10" x 8 foot (two) and a 2" x 3" x 10" piece.
This isn't New Yankee Workshop, so just a quick overview.. :-)


Go to your local lumber store and buy the pieces of wood mentioned above. You can get them in different lengths. Try to find dry wood that's not warped. You might buy 20 foot long pieces and cut them according to our sketch. We made at least an 18" stretch between steps to accommodate the stang's long nose and to avoid scraping ground effects on most slammed stangs. Building is easy, simply nail the pieces together as shown, taking care to pre-drill a slightly smaller hole for the nails, so you don't run the risk of splitting the wood. Bend the nails over at the bottom of each ramp if they stick out.. You may also glue the parts together to boot.

Finished Ramps.
10" wide is good for wide tires.. Got wider ? You can get 2 x 11's if need be.

This is with the stock springs, but you can see plenty of room.
Drive on up
ON A FLAT LEVEL SURFACE, just drive up the ramps. The stopper piece will prevent you from driving off and each step is easily rolled onto. Then lay a wheel stop "behind" the front wheels and you are ready to work. Each ramp weighs enough so they should not slide when driven onto slowly.
If you are on an uneven surface, you might need to shim the ramps to get them level and to ensure they lay flat. You can also place jackstands as a backup if you wish.
What kind of lift
It raises the stang about 6" (a little higher than rhino ramps as an example) and it's high enough to do most under chassis engine / h-pipe work. Need higher ? You can add an extra step (before the rear tire hits the ramps even).


10" wide is good for wide tires.. Got wider ? You can get 2 x 11's if need be.
This is with the stock springs, but you can see plenty of room.
Drive on up
ON A FLAT LEVEL SURFACE, just drive up the ramps. The stopper piece will prevent you from driving off and each step is easily rolled onto. Then lay a wheel stop "behind" the front wheels and you are ready to work. Each ramp weighs enough so they should not slide when driven onto slowly.
If you are on an uneven surface, you might need to shim the ramps to get them level and to ensure they lay flat. You can also place jackstands as a backup if you wish.
What kind of lift
It raises the stang about 6" (a little higher than rhino ramps as an example) and it's high enough to do most under chassis engine / h-pipe work. Need higher ? You can add an extra step (before the rear tire hits the ramps even).


Access is from the front. You can swap an H-pipe and easily access the lower engine. For more space or for oil changes you can lift the rear to level out the stang. You can also now lift one side of the stang at a time up front (a tiny amount) easily with a floor jack for changing the front tires for example.
Is wood strong enough ?Let just say laid flat the wood can lift your entire house (many tons) with no worry. The only worry we have (way back in our minds) is wood splitting, but if you pre-drilled your nails and / or glued your wood together, you should have absolutely no problems.
The "stepped" nature of the ramps
The stepped nature of the ramps also means that if for some reason you forgot to put a wheel stop behind your tires and you start jacking up the rear, your stang may only roll down one step, NOT roll down the entire ramp. Most other store ramps are single incline or 2 piece ramps, not stepped like these home made units :-)
Only 1.5" clearance needed
For most lowered stangs (or other cars) lifting is no problem, because we only need 1.5" in front of the tires. We have 18" of space before each step which covers the lower edges on many body kits. If you need more room, you can extend the step interval to 20+ inches. You can see there is plenty of room left before the ramps hit our rear tires.

The bottom line...
If you could not find yourself the "right" set of ramps in stores or are tired of jacking up the front end one side at a time or bending your center crossmember with your jack, or can't get a jack under your front end... you can see making a set of home ramps is fairly easy and you can make them to your very own specs.
The cost of the wood can vary, so these are not really "poor mans" ramps in some cases home made may cost a few dollars more, but since it's to your own specs, we like that :-)
We gave our ramps a coat of paint after these shots were taken.
Extra notes:
These ramps will weigh 30 - 40 pounds each depending on how dry the wood is, so they are mainly for home use (not really portable). We still have all our other ramps (Rhino, metal, 2 stage, etc) and use them when we can for different jobs.


Join Date: Apr 2008
Location: Fort Belvoir, Virginia
Posts: 27
Likes: 0
Received 0 Likes
on
0 Posts
Last edited by boricua1; 08-20-2011 at 12:50 PM.

Originally Posted by GDC-SRT
WOW!
I bet you could even angle cut each step front, @ say 30 degree,and make driving on easier!
Good post Photodude!
I bet you could even angle cut each step front, @ say 30 degree,and make driving on easier!
Good post Photodude!
Just to stir things up, check out this link: http://www.classic1800.com/ramp-pit-plans/
I don't know if I'd want to try it myself, but it is an interesting idea.
I don't know if I'd want to try it myself, but it is an interesting idea.

Senior Member
Originally Posted by Serendip
Just to stir things up, check out this link: http://www.classic1800.com/ramp-pit-plans/
I don't know if I'd want to try it myself, but it is an interesting idea.
Perfection in design is achieved not when there is nothing left to add, but when there is nothing left to take away.
Antoine de Saint-Exupery
I don't know if I'd want to try it myself, but it is an interesting idea.
Perfection in design is achieved not when there is nothing left to add, but when there is nothing left to take away.
Antoine de Saint-Exupery
I like your quote in the signature, as a tool designer I try to live by that rule, its great for keeping costs down as well.

another DIY ramp project
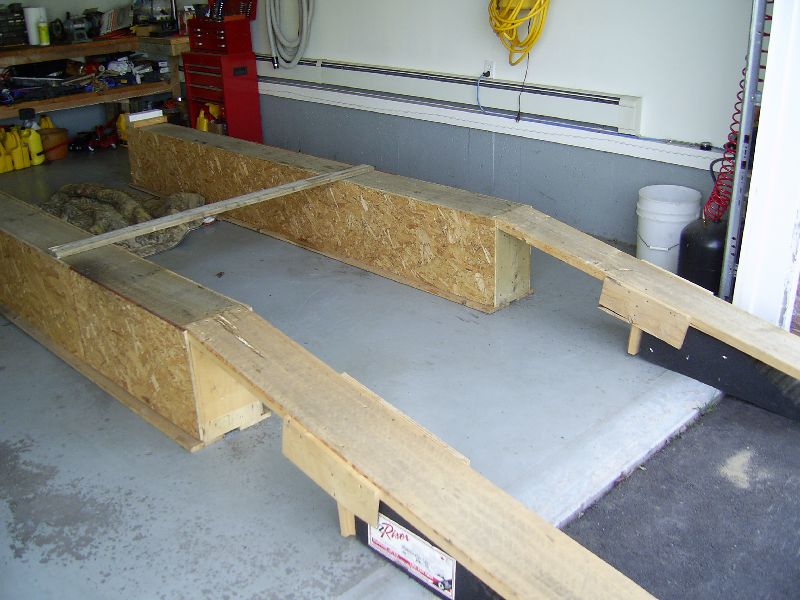
The ramps are indeed easy to build. Both sections are built identical. The ramps are 10'9" in length. You can construct them from 2"x10" or 2"x12". In this set I used 2"x10" and then nailed a couple of lengths of 1"x6" on each side on the bottom to give some extra lateral support. (If you use 2"x12" you will have more room to place a hydraulic jack under the frame in case you need to place jack stands under the frame). The top and bottom are 2"x10" or 12" with 2"X10" or 12" uprights on 16" centers. You will need 2 sheets of 1/2" plywood or wafer board for the sides. Rip each sheet of plywood into 3 strips 16" wide. It will take one sheet per ramp. Use 2 1/2" spiral nails or 2" drywall screws to attach the side pieces to your framework. Use 3 1/2" spiral on the actual framework. On the ends where the car comes up, attach another piece of 2" x 10" to support the planks for driving the car up on. These 2 planks only need to be about 7' long with a couple supports under them. I used a couple of rubber ramps to support the planks. With that short a length my side pipes still clear fine. You can mount a couple of permanent lights and a 110v receptacle on the inner sides of the supports if you wish. That makes it much easier than fighting power cords. If you have a good level floor they will be very stable and will support a bulldozer. I can almost sit on the floor under the car but not quite. I mark the floor with a felt marker so that each time it only takes me about 5 minutes to place them and drive the car up on them.
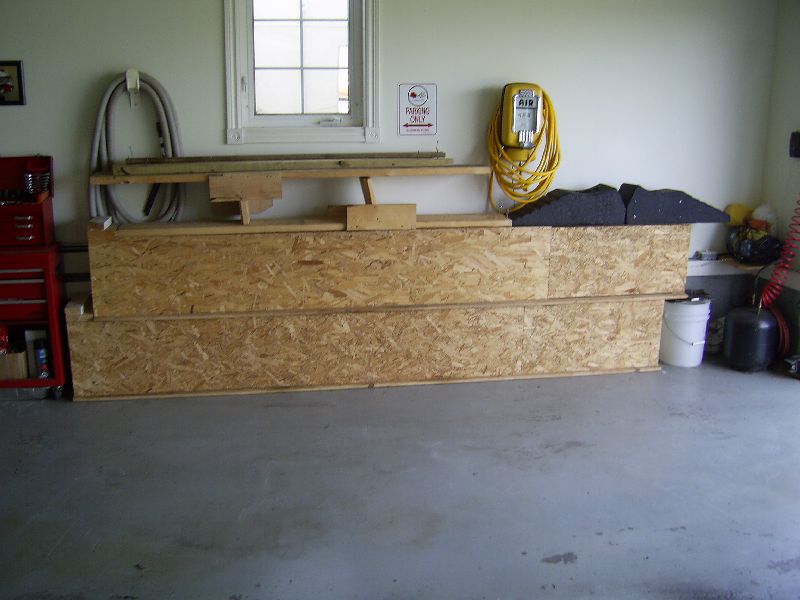
Here are some pictures of what your finished product will resemble.


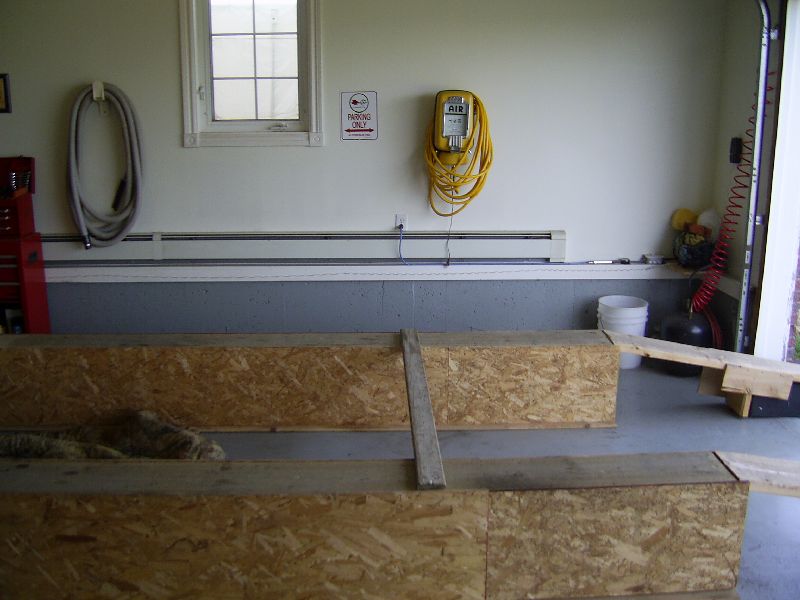
Build Ramps for your C2 or C3 Corvette
(An excellent alternative to expensive car hoists and car lifts)
Have you ever wished there was an easy way to get your Corvette up in the air so you could comfortably work under it? Here is a safe and inexpensive way to construct a set of portable ramps. Instructions: The ramps are indeed easy to build. Both sections are built identical. The ramps are 10'9" in length. You can construct them from 2"x10" or 2"x12". In this set I used 2"x10" and then nailed a couple of lengths of 1"x6" on each side on the bottom to give some extra lateral support. (If you use 2"x12" you will have more room to place a hydraulic jack under the frame in case you need to place jack stands under the frame). The top and bottom are 2"x10" or 12" with 2"X10" or 12" uprights on 16" centers. You will need 2 sheets of 1/2" plywood or wafer board for the sides. Rip each sheet of plywood into 3 strips 16" wide. It will take one sheet per ramp. Use 2 1/2" spiral nails or 2" drywall screws to attach the side pieces to your framework. Use 3 1/2" spiral on the actual framework. On the ends where the car comes up, attach another piece of 2" x 10" to support the planks for driving the car up on. These 2 planks only need to be about 7' long with a couple supports under them. I used a couple of rubber ramps to support the planks. With that short a length my side pipes still clear fine. You can mount a couple of permanent lights and a 110v receptacle on the inner sides of the supports if you wish. That makes it much easier than fighting power cords. If you have a good level floor they will be very stable and will support a bulldozer. I can almost sit on the floor under the car but not quite. I mark the floor with a felt marker so that each time it only takes me about 5 minutes to place them and drive the car up on them.
Here are some pictures of what your finished product will resemble.
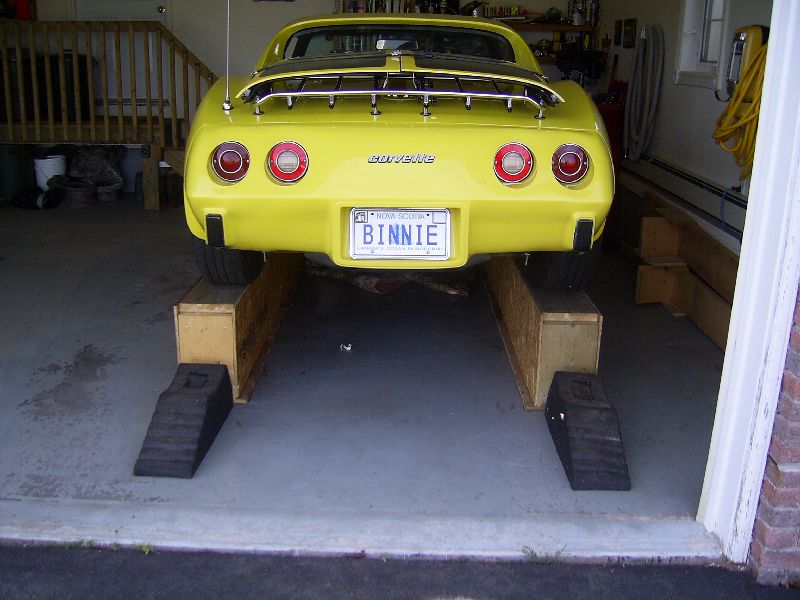
Car parked on ramps awaiting the blocks behind the rear wheels.
Ramps 2" wider than these will give you more room to place jack stands.
Note the blocks spiked up front for wheel stops.
You might want to place blocks behind the rear wheels if the car is going to be in neutral.
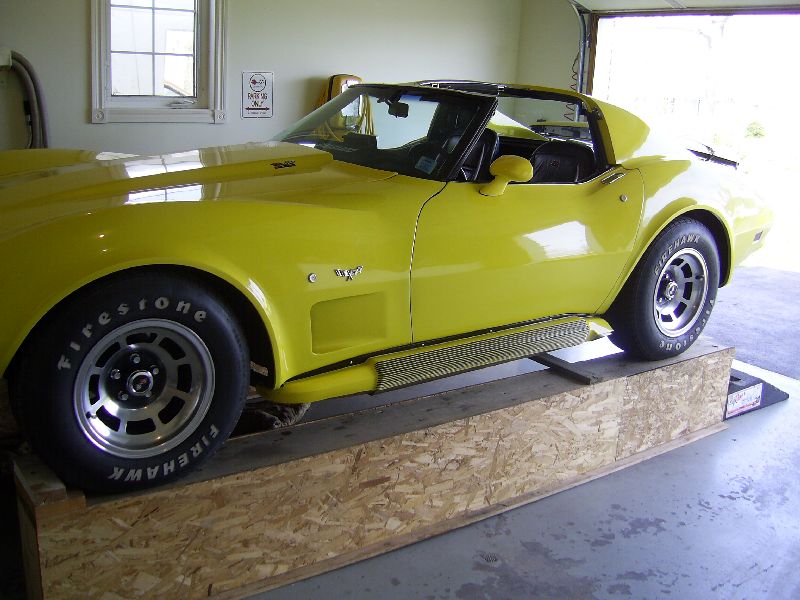
This gives you some idea of the height you have for working.
An old sleeping bag makes a nice pad for lying on when under the car.
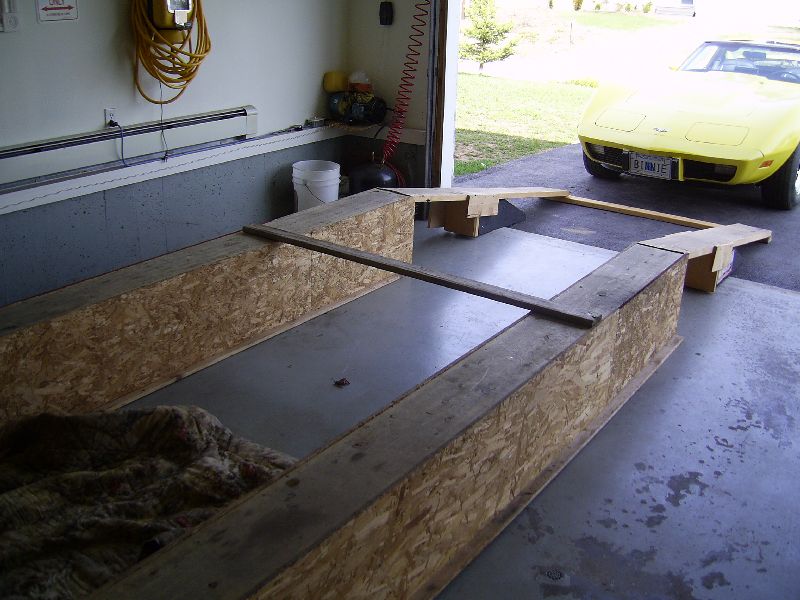
You can see the rubber pads that I use for extra support for driving up and down.
I sometimes attach a board to keep the ramps aligned when I drive up on them.
You can store the ramps along the wall of your shop when not in use.