I'll try to make this short, but detailed.
pdf file now attached here: HID Installation Instructions.pdf
Tools I used:
45 deg Needle Nosed Pliers
7/8" Socket (for cutting Caps)
10mm Deep Wall socket w/ratchet
Wire Stripper/Crimper
Materials I used:
4 Male spade connectors
2 1/4" Stainless washers
2 M6 Stainless Locknuts
Preparation
- Every bulb assembly I've seen comes with a grommet integrated. There are 2 types of wires involved: High Voltage (to the bulb) and Low Voltage (to the OEM connector). They all seem to have 2 extra unfinished holes for the 12VDC wires to reach the connector inside the headlight housing. Use a 1/16" drill bit to complete these holes.
- The Radiator overflow tank must be moved to gain access to the passenger side housing. It is very easy to move. Remove the 2 M6 nuts with a 10mm deep wall socket.
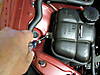 Remove the Washer Fluid Level connector on the bottom. The release tab is on the side of the connector.
 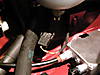 It can be stiff, just don't twist! Pull sraight back. The tank itself is held in place with a barb on the bottom which engages a rubber grommet. Once the nuts are removed, just put your hands underneath and pull/twist/rock the thing until the barb is free. It can seem very hard to do, but it DOES come off. Unclip the hose and move the tank to the center of the engine bay.Remove the caps from the back of the headlight housings you plan to install your HID's in. Clean them using WD40 or equivalent. Measure the INNER diameter: the size at the inside of the slot (NOT the outside of the whole grommet) of the pre-installed grommets on your new bulbs. (See Pictures). Mine were exactly 1". (See Pictures). Using an Exacto knife and an appropriate sized socket or other round object, cut a circular hole in the CENTER of the cap. (See Pictures). This will provide a watertight and attractive seal for the wires.
Removal of old bulbs
- First, and some find difficult, is pulling the connector from the back of the bulbs. If you look closely, you will see an "H" shaped area. I used a medium sized 45 deg bent-nosed needle pliers to grab the center of this "H" and pulled straight back with a little rocking action. DO NOT TWIST! DO NOT PULL ON THE WIRES! It comes off, but can fight a little.
- Next, undoing the bulb retaining clips is for some a bit baffling. On the low beams, the clip clamps at the bottom and swings UP. Press the very bottom of the clip and push to the side to unhook it from the retainer. Remove the bulb. Repeat for other side.
Installation of new bulbs
- To take advantage of the nice watertight grommets provided, one must thread the 2 High Voltage wires AND the grommet through the bulb retaining clip. This takes a little patience, but it works. for the low beam bulbs, you will be threading them UP through the clip.
 First, remove the protective plastic jar from the bulb. It is fragile, so don't bang it around. Slide the grommet all the way to the bulb end of the wires. Then, one at a time, push the connectors through the clip being careful not to unhinge the clip itself. When both wires are through, slide the grommet about mid-way up the wires. Push the grommet through just like a coin in a slot machine. It fits easily. If you have touched the bulb, even with the back of your hand, clean it gently with a cotton ball and alcohol.
- Seating the bulbs can be a challenge. On the low beams, the "tab" points straight DOWN. It really doesn't "fall into place" like some say, it just sits a bit more flush. My tab was aligned with the wires so when the blue wire was up, it seated properly. Engage the retainer clip.
- Now we get to use the 2nd pair of little holes in the grommet. There is no way to push the male spade connectors through the little 1/16" holes without tearing the rubber, so I cut the connectors off, pushed the wires through, and installed new connectors.
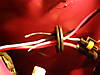 Basic stuff, but some may just want to cut small slits for them to push through. The male spade connectors push into the connector that you pulled from the back of the OEM bulb. RED (+) to SINGLE WIRE and BLACK (-) to DOUBLE WIRE. (See Pictures).Install modified cap on the grommet, sliding the edges of the hole in the cap into the slot around the edge of the grommet. Slide this assembly up the wires, push the OEM connector into a space inside the housing, and replace the cap as original.
Mounting the Ballasts
- I took some pictures showing a double (lows and fogs) installation of the ballasts. On the drivers side, this stack can, with a bit of hassle, be installed below the headlamp housing. There are even 2 holes that match the bracket perfectly. It would involve 2 people, one to work from below (through the foglight access panel in the wheelwell), and the other working in the engine bay. For a single (lows only) installation, I used the M6 stud on the wheelwell. On the passenger side, they can be stacked under the now removed Radiator Overflow tank. An M6 stud is provided.(See Pictures). Mine was a single. Pictures provided. In my gallery, they are labeled "HID Install".
Follow the HID suppliers directions for connections.
I would be glad to answer any questions.
Here is a decent explanation of HID's and Halogens:
intellexual net � m k i v
Daniel Stern Lighting Consultancy and Supply