Here's the step by step for rear end removal:
- If you're doing this the old fashioned way in your driveway with a jack and jack stands like I did, the first thing you'll want to do is turn off the tow alarm. If you've got a lift, well, I'm jealous...LOL! And you can skip this step and the next.
- Next, jack the rear of the car up and support it with jack stands.
- Now remove the rear wheels and you're ready to get to the real action.
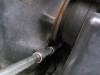
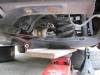
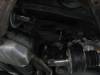
- The first item that needs to be removed is the plastic fuel pump/filter cover. It's just in front of the passenger side axle and is held on by three 10mm nuts. Two of them are obvious, but one is hidden up above the passenger side axle. This first picture is the long extension setup I used for going after that hidden nut above the axle and the second picture is what the shield looks like once it's out:
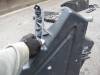
- Next, remove the lower inner control arm/alignment bar bolts (I have highlighted them in the pics). The nuts/bolts are 18mm and 19mm and the adjuster bolt head is a large torx. I didn't have a torx bit large enough so I'm not sure of the exact size, but I got by using a large hex wrench (I think it was 10mm). I would recommend getting the correct torx bit to avoid stripping out the adjuster head - my guess is it's a T50 or T55:
- Notice how I have a jack supporting the lower control arm in the second picture above- this is very important! You'll never get the bolt hightlighted in that pic out with all the pressure of the coil spring on it. So use a jack to relieve the pressure, and to safely and slowly lower the control arm once you get the bolt out. The shock holds it all together, so don't worry about the spring coming flying out or anything like that.
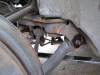
- The pic below shows the jack being used to slowly lower the lower control arm. You have to pull the hub assembly a little to the outboard of the car so that the control arm clears the brace. I have highlighted where brace and control arm will hang up on each other. I did not take pics of the drivers side control arm removal, but I found that I did not have enough movement to lower the control arm past the brace. That's OK though - you can get the rear end out without dropping that control arm all the way past the brace:
- As I said, I did not take pictures of the drivers side disassemble, but it's the same three bolts that have to come out.
- The next step is to unbolt the driveshaft from the rear end. There are six bolts that hold it on - three of them bolt to the driveshaft and three of them bolt to the rear end. You will only need to remove the three that bolt to the rear end. The nuts are 15mm. Here's a pic:

- You only want to remove the bolts for now. There's a pin in the rear end that slides into the driveshaft (you can see the hole for it in the center of the driveshaft in the pic above). You will not have enough room to pull the driveshaft away from that pin until the rear end is unbolted and dropped down.
- OK, almost there. The last step is to remove the three bolts that hold the rear end in place. Put a support jack under the rear end. Then remove the front bolt (pretty sure I used the same hex wrench - 10mm maybe?). I did not take a picture of the bolt position on the rear end, but it's on the passenger side up towards the front of the rear end. I could not remove this bolt with a ratchet because the top nut was spinning inside the frame. However, it zipped right off with my impact gun. Good luck on this step if you don't have a speed tool to zip it out! The bolt itself can be seen in the pic below where I show the rear end out - it's just above the right hand side axle.
- Now remove the two 18mm bolts that go through the rear frame into the back of the rear end:

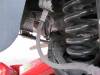
- Last step - remove the axles and lower the rear end down. This isn't as easy as it sounds! Here's the easiest way I found to get them out: lower the rear end down a couple inches and go for the passenger side first, then slide the rear over towards the passenger side and the drivers side is a piece of cake to get out. Be aware that the axles snap into the diff, so it takes some force to snap them out. I used a huge screw driver between the rear end and axle to pry on them. Once you get the axle separated about an inch, it should slide the rest of the way out fairly easily. You will have to give a pretty good pull on the hub assembly towards the outboard of the car to give you enough clearance to get the first axle out so be ready for that as well. I placed my foot on the back of the hub and used my leg to push out on the hub assembly, while using my hands to pull the axle away from the rear end. Be careful for that last inch you pull the axle out - the splines on the axle can easily damage the rubber seal on the outside of the rear end. If the axle rubs it, you should be OK - you just don't want to try to yank the axle out in a position where the splines are taring at the seal.
- Lastly, you'll have to maneuver the rear end around to get it to separate from the driveshaft before you can drop it down. I found that raising the rear back up and moving it to the side allowed me to separate them fairly easily. Here's a pic of it removed:
- Here she is - in all her blown up glory...LOL:

- Installation is the reverse of removal. Getting the pin into the driveshaft and keeping it in place while getting the axles in and getting the three rear end mounting bolts in is the hardest part. Once you tackle that, buttoning up the rest is a 20 minute job. I found getting the pin in was easiest if I raised the rear end way up to the floor of the car and wiggled it around until I got the pin to slide into place. Then pop in one driveshaft bolt loosely to hold it together, but still allow for easy movement of the rear end. Next, go for the drivers side axle and then the passenger side axle. Don't worry about getting the axles seated all the way into the rear end at this point - just get them in slid in most of the way and wait until you get it all mounted in bolted back up to seat them into the diff. You'll need to hammer them in - I used a large plastic mallet to get them to lock back into the diff.
That's about it!
Like I said - it took me just under two hours to get it out and just about three hours to get it back in. I think about 45 minutes to an hour were wasted on fumbling around trying to find the secrets on the removal and about the same time was wasted on the install. I'm pretty sure if I had to do it again, I could have it out in about an hour and installed in about two hours.
Have fun!
Jon