


Extreme Makeover: Engine Edition


Thread Starter
|
Forum Regular
Joined: Jan 2009
Posts: 578
Likes: 0
From: South Jersey
 Extreme Makeover: Engine Edition
Chris and I took the day to install the parts I recently ordered from Rob (Needswings), sans the supercooler. Mods installed: Retrofit Dual CAI, Manis, Coated Valve Covers, Ported Y-Pipe, and a Catch Can. Everything was silver teflon coated.
The install went relatively smooth but wasn't without several snag that set us back (combined) a few hours.
The first difficult thing we encountered was replacing the power steering cooling line. It wasn't so much of a snag as much as just a long messy process. A large part of my lower engine bay is still caked with oil. :P
Next up with the driver's side valve cover. We couldn't remove it due to a fuel line that connects in the rear of the engine to the fuel rail. This had to be removed and bled.
We had to re-use and relocate the oil filler cap which ended up actually being a snag for us. We weren't quite sure how to remove it and didn't want to apply too much force and crack it. We ended up having to call Rob yet again, lol, who got back to us after lunch with the VERY SIMPLE directions on how to remove it. For anyone who is doing the coated valve covers all you have to do is lift the tab facing the rear of the engine and rotate counter-clockwise. It came off smooth as butter- I wanted to hit myself with a wrench....sorry Rob!
The catch can was cake because everything was already taken apart.
Then on to the y-pipe which is a given to be a pain so I'll just leave it at that. Finally we finished up with the dual CAI. The passenger side was simple- as it was the first time around installing it however the driver's side was a PITA. It starts out at the same pipe diameter, but has coupler/reducer to fit a smaller pass through tube. In front the the radiator it's got the same thing but reversed to bring the size back up to fit the K&N filter.
We had some difficulty trying to find the best sequence in which to install all these items. Finally we found it was easiest to install the pass-through tube on it's own from the front through into the engine bay. Then install the elbow and various couplers on from there.
We could only get one horn to fit back on as well. I barely squeezed the passenger side one on which has more lateral room that the driver's. I couldn't get the driver's side filter and piping to budge to the right and further.
Started her up and she sounded just as she did before the mods (which is a good thing I suppose). Granny drove her for about 5 miles before getting on it and didn't quite notice a huge difference yet however some time at the track will truly tell. It did feel like it was breaking loose quite a bit easier down low which would coincide with what Waldig mentioned about the extra power down low.
I haven't a clue what my boost or a/f is doing so those are on my list for VERY NEXT mods. I will be switching to the In-Motion Mani Tune asap! Chris and I just have call James over at InMotion and see if we can get the laptop rented for both of our cars simultaneously.
Total time all of these installs was approximately 7 hours, however that's with snags and two hacks dropping tools through the engine on to the lower tray and requiring contortionist arm movements to fish them out, oh and a lunch break to boot.
Next up Chris's car. Same thing, plus meth....all black! We may hit the track tomorrow night and report back with our results. Chris and I wanted to also thank Rob for going the extra mile. He worked his butt off getting all these parts to us in a timely manner. Plus he stayed patient with our incessant ridiculous phone calls with our various "snags".
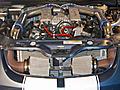
Here's a shot of the results:


The install went relatively smooth but wasn't without several snag that set us back (combined) a few hours.
The first difficult thing we encountered was replacing the power steering cooling line. It wasn't so much of a snag as much as just a long messy process. A large part of my lower engine bay is still caked with oil. :P
Next up with the driver's side valve cover. We couldn't remove it due to a fuel line that connects in the rear of the engine to the fuel rail. This had to be removed and bled.
We had to re-use and relocate the oil filler cap which ended up actually being a snag for us.
We weren't quite sure how to remove it and didn't want to apply too much force and crack it. We ended up having to call Rob yet again, lol, who got back to us after lunch with the VERY SIMPLE directions on how to remove it. For anyone who is doing the coated valve covers all you have to do is lift the tab facing the rear of the engine and rotate counter-clockwise. It came off smooth as butter- I wanted to hit myself with a wrench....sorry Rob! The catch can was cake because everything was already taken apart.
Then on to the y-pipe which is a given to be a pain so I'll just leave it at that. Finally we finished up with the dual CAI. The passenger side was simple- as it was the first time around installing it however the driver's side was a PITA. It starts out at the same pipe diameter, but has coupler/reducer to fit a smaller pass through tube. In front the the radiator it's got the same thing but reversed to bring the size back up to fit the K&N filter.
We had some difficulty trying to find the best sequence in which to install all these items. Finally we found it was easiest to install the pass-through tube on it's own from the front through into the engine bay. Then install the elbow and various couplers on from there.
We could only get one horn to fit back on as well. I barely squeezed the passenger side one on which has more lateral room that the driver's. I couldn't get the driver's side filter and piping to budge to the right and further.
Started her up and she sounded just as she did before the mods (which is a good thing I suppose). Granny drove her for about 5 miles before getting on it and didn't quite notice a huge difference yet however some time at the track will truly tell. It did feel like it was breaking loose quite a bit easier down low which would coincide with what Waldig mentioned about the extra power down low.
I haven't a clue what my boost or a/f is doing so those are on my list for VERY NEXT mods. I will be switching to the In-Motion Mani Tune asap! Chris and I just have call James over at InMotion and see if we can get the laptop rented for both of our cars simultaneously.
Total time all of these installs was approximately 7 hours, however that's with snags and two hacks dropping tools through the engine on to the lower tray and requiring contortionist arm movements to fish them out, oh and a lunch break to boot.
Next up Chris's car. Same thing, plus meth....all black! We may hit the track tomorrow night and report back with our results. Chris and I wanted to also thank Rob for going the extra mile. He worked his butt off getting all these parts to us in a timely manner. Plus he stayed patient with our incessant ridiculous phone calls with our various "snags".
Here's a shot of the results:
Last edited by cross><hair; May 11, 2009 at 09:48 PM.


 Re: Extreme Makeover: Engine Edition
Makes that mighty lil' supercharger look dirty. Everything is so nice looking, you may have to pull it and get it polished now !



Senior Member
Joined: Jul 2008
Posts: 4,525
Likes: 29
From: Puerto Rico
Re: Extreme Makeover: Engine Edition
Amazing how great those valve covers look ... along with the rest of the mods. Why is it you have the same splotch of whatever it is on the supercharger?
Les
Les


 Re: Extreme Makeover: Engine Edition

Senior Member
Joined: Jun 2006
Posts: 1,613
Likes: 1
From: Lakeville, MN/ River Falls, WI
Re: Extreme Makeover: Engine Edition
Originally Posted by j-fire
awesome!!!!
I'll Be Posting My Same Exact Setup But All Black Tomorrow!!!!!
I'll Be Posting My Same Exact Setup But All Black Tomorrow!!!!!
J-fire I had to beat you to the punch with the all black, you guys gotta get the gotta get that supercharger done..... I am still waiting on some extra ching to get the manis.
Rob by the looks of it I need to place another order for a catch can and Intake to replace Rudys. (round two
hopefully he has better luck this time)
Last edited by jonnyangel04; May 12, 2009 at 10:12 AM.


Senior Member
Joined: Apr 2009
Posts: 5,349
Likes: 4
From: murfreesboro,tn
Re: Extreme Makeover: Engine Edition
i love all that you fellas have done.
not wanting to rain on anyones parade but polishing the engine parts may look amazing it actually increases the temp of the part polished. the rough surfaces allow the air to cross the surface and absorb heat while the polished smooth parts dont. look at any harley forum regarding polishing the cases and the heat build up after . the same principle applies to powdercoating dark colors on metal engine parts. SORRY!
not wanting to rain on anyones parade but polishing the engine parts may look amazing it actually increases the temp of the part polished. the rough surfaces allow the air to cross the surface and absorb heat while the polished smooth parts dont. look at any harley forum regarding polishing the cases and the heat build up after . the same principle applies to powdercoating dark colors on metal engine parts. SORRY!
Senior Member
Joined: Oct 2007
Posts: 1,271
Likes: 1
From: Great Falls, Montana ( Big Sky Country)
Re: Extreme Makeover: Engine Edition
Well Crosshair, I have to admit it no longer looks factory!
Looks really good in silver. I am not a fan of black under the hood. I guess I have seen to many Painted cast Iron parts in my day.
Once again, Looks Great.
Mike
Looks really good in silver. I am not a fan of black under the hood. I guess I have seen to many Painted cast Iron parts in my day.
Once again, Looks Great.
Mike
Senior Member
Joined: Oct 2007
Posts: 1,271
Likes: 1
From: Great Falls, Montana ( Big Sky Country)
Re: Extreme Makeover: Engine Edition
Cross hairs.
What air filters are those? They look like K&N's cloth/fiber but what model?
Thanks
Mike
What air filters are those? They look like K&N's cloth/fiber but what model?
Thanks
Mike

Senior Member

Joined: Sep 2007
Posts: 1,794
Likes: 1
From: Texas Hill Country
Re: Extreme Makeover: Engine Edition
A quick and easy fix for the horns would be to mount them on the cross member just in front of the condensor. No brackets or wire extending is needed just two self tapping sheet metal screws !
Clean install ! I like it !
Just my Dos Centavos
Clean install ! I like it !
Just my Dos Centavos

Forum Regular
Joined: Aug 2008
Posts: 689
Likes: 3
From: iowa.
Re: Extreme Makeover: Engine Edition
Originally Posted by jonnyangel04
crosshair I am jealous that silver looks sooooooooo clean
J-fire I had to beat you to the punch with the all black, you guys gotta get the gotta get that supercharger done..... I am still waiting on some extra ching to get the manis.
J-fire I had to beat you to the punch with the all black, you guys gotta get the gotta get that supercharger done..... I am still waiting on some extra ching to get the manis.
LOL! looks great johnnyangel!!!!
Last edited by j-fire; May 12, 2009 at 01:14 PM.


