
Angel Eyes/Halos and HIDs Installed

Thread Starter
|
Forum Regular
Joined: Aug 2010
Posts: 320
Likes: 3
From: Indianapolis
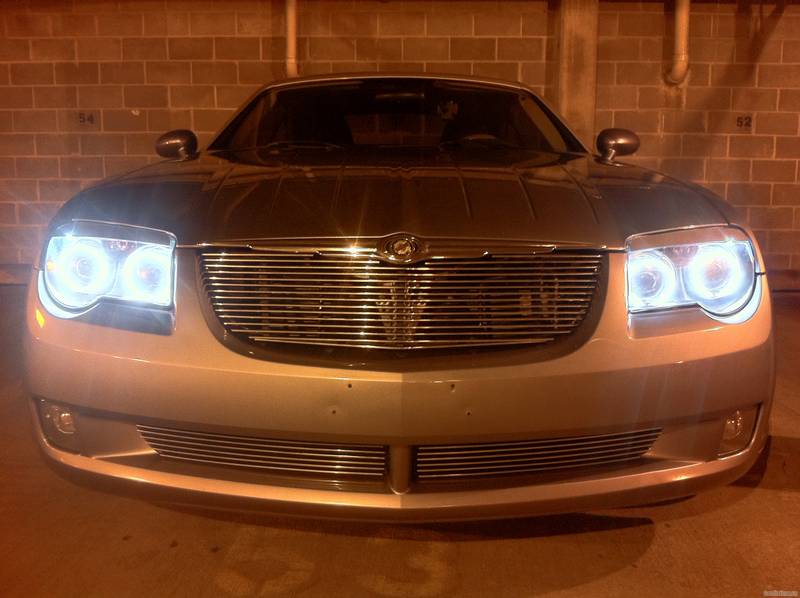
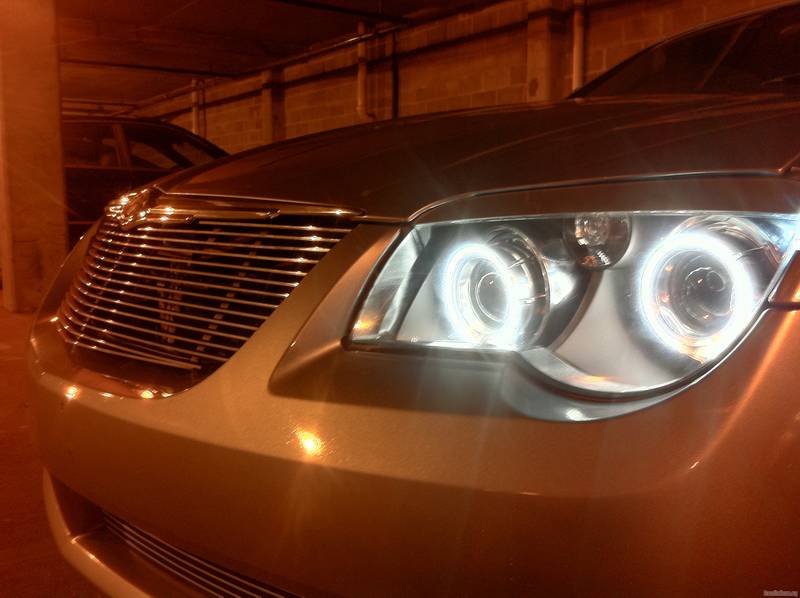
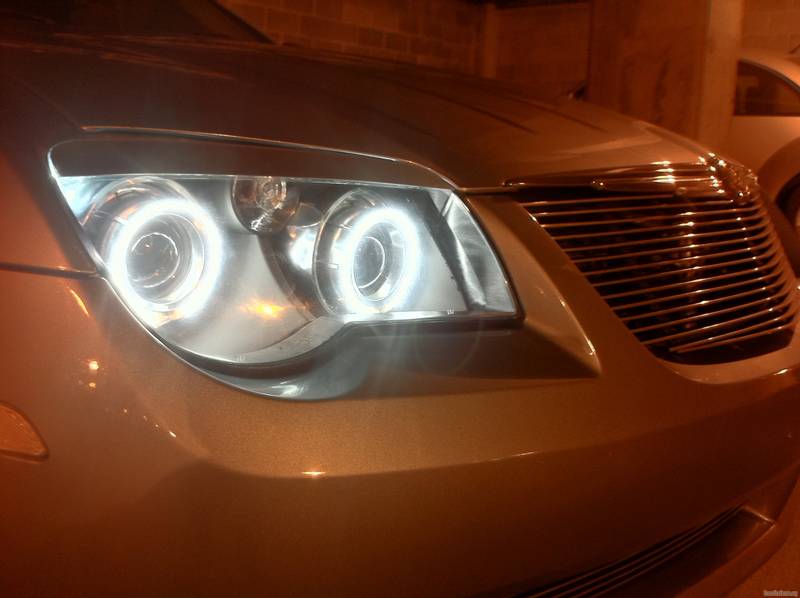
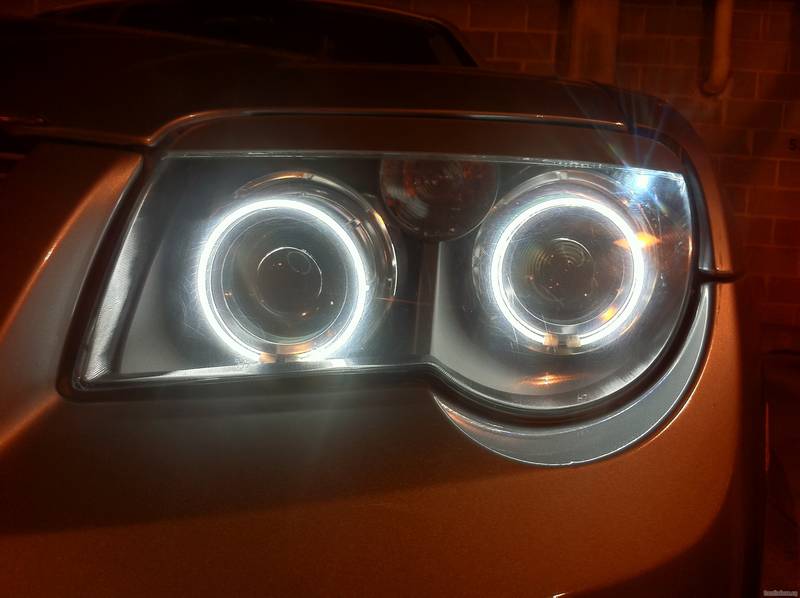
Well, today was the day, and the install for the Angel Eyes and HID lights went off without a hitch. Even learned a few interesting things along the way to help others out in the future. But enough delay, here is what everyone wants to see, the PICS!
Just a note, all these pics were taken inside my parking garage, but I'll take some good night shots tonight.
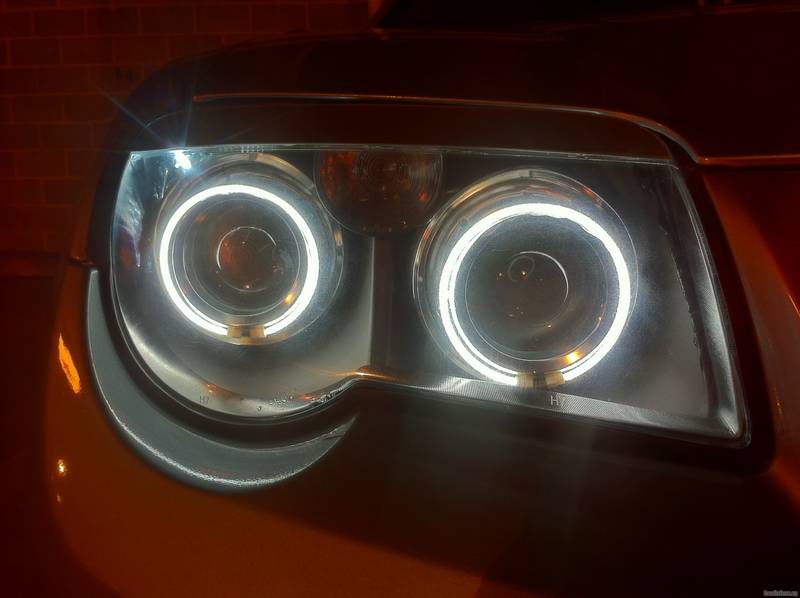
Okay, so now that the fun part is out of the way, on to the neat little trick I learned during the install. I don't know if anyone else has found this out before, but there is an extremely easy way to get to the 2 bolts on the bottom of the headlamp assembly. Instead of jacking the car up and removing the wheels, if you simply pop out the side marker light assembly, you can reach in with a wrench through the space where it goes and easily access the bolts for removal and replacement.
All in all the installation for both the headlamp assemblies and the HID install took a total of maybe 2 1/2 hours, and I'm definitely pleased with the results.
And if you're wondering where my license plate and bracket went, I took it off today to see how it looks before I take it to the car show tomorrow. The holes for the bracket are a bit unsightly, but possibly less unsightly than the bracket and plate itself...
Just a note, all these pics were taken inside my parking garage, but I'll take some good night shots tonight.
Okay, so now that the fun part is out of the way, on to the neat little trick I learned during the install. I don't know if anyone else has found this out before, but there is an extremely easy way to get to the 2 bolts on the bottom of the headlamp assembly. Instead of jacking the car up and removing the wheels, if you simply pop out the side marker light assembly, you can reach in with a wrench through the space where it goes and easily access the bolts for removal and replacement.
All in all the installation for both the headlamp assemblies and the HID install took a total of maybe 2 1/2 hours, and I'm definitely pleased with the results.
And if you're wondering where my license plate and bracket went, I took it off today to see how it looks before I take it to the car show tomorrow. The holes for the bracket are a bit unsightly, but possibly less unsightly than the bracket and plate itself...
Senior Member
Joined: Mar 2008
Posts: 14,606
Likes: 39
From: IN

Originally Posted by InfernoRedXfire
That looks great! Nice job on the install.
Thread Starter
|
Forum Regular
Joined: Aug 2010
Posts: 320
Likes: 3
From: Indianapolis
Originally Posted by oledoc2u
put the plate back on.....the thin blue line sticks together....and in this case, hides the holes...lol

Senior Member
Joined: Jul 2007
Posts: 7,951
Likes: 9
From: Dallas, the Republic of Texas
Originally Posted by No_Dominion
I probably will, just figured I'd let my eyes adjust to it without it there and then make a decision. I wish I had some way of filling those holes in, but oh well.
Thread Starter
|
Forum Regular
Joined: Aug 2010
Posts: 320
Likes: 3
From: Indianapolis
Originally Posted by InfernoRedXfire
Bumper plugs can be found with a simple websearch or some auto parts stores sell them.That's what I did and they are hardly noticeable.


Senior Member
Joined: Jul 2007
Posts: 7,951
Likes: 9
From: Dallas, the Republic of Texas
Originally Posted by joejet
I got my plugs at ACE Hardware. They look pretty good.
That's meant in a good way.
Senior Member
Joined: Jul 2006
Posts: 3,610
Likes: 3
From: Lebanon, Tennessee
Originally Posted by No_Dominion
Hmm, thanks for the tip, I didn't think anyone would make something like that, I'll have to check it out. Sad that the car got marred up by having a plate bracket installed when we don't have to have front plates in Indiana, but oh well.
Thread Starter
|
Forum Regular
Joined: Aug 2010
Posts: 320
Likes: 3
From: Indianapolis
Originally Posted by Thirteendog
It's time for an srt6 bumper ;-)
Thread Starter
|
Forum Regular
Joined: Aug 2010
Posts: 320
Likes: 3
From: Indianapolis
I just wanted to thank everyone for all the compliments on the Angel Eyes. This is the first time I've ever undertaken such a complicated and labor intensive modification, so I'm glad it turned out well (and that it works, haha.)
And once again I owe thanks to JonnyAngel04 for providing me with the replacement headlamp assemblies. Without them, I wouldn't have been able to complete this project.
And once again I owe thanks to JonnyAngel04 for providing me with the replacement headlamp assemblies. Without them, I wouldn't have been able to complete this project.
Joined: Mar 2009
Posts: 113
Likes: 0
From: Chatham Illinois
I've got mine all done!!! I love the look, and would like to thank you for the tip of removing the marker lights. By far the hardest part is removing the lens from the headlight assembly!!
Thread Starter
|
Forum Regular
Joined: Aug 2010
Posts: 320
Likes: 3
From: Indianapolis
Originally Posted by G&T1stxfire
I've got mine all done!!! I love the look, and would like to thank you for the tip of removing the marker lights. By far the hardest part is removing the lens from the headlight assembly!!
Forum Regular
Joined: Sep 2007
Posts: 440
Likes: 0
From: Coventry uk
Hi No Dom
Loving your work , thats looks like just how i did mine , but i put extra clips arond the halos just in case the glue broken down over time . They just look like they are factory fitted mate . welcome to the xfire/Angel eyes club .
Cheers
Andy
Loving your work , thats looks like just how i did mine , but i put extra clips arond the halos just in case the glue broken down over time . They just look like they are factory fitted mate . welcome to the xfire/Angel eyes club .
Cheers
Andy
Joined: Dec 2011
Posts: 17
Likes: 0
From: cusseta, al.
thanks to no dominion for your advice on removing the headlight bolts by popping out the side marker lights. you saved me so much time and hard work. i went with LED halo rings. i think it looks good. thanks again. more pics of my baby are in my gallery if anyone cares to take a peek. thanks for the forum!
Forum Regular
Joined: May 2010
Posts: 488
Likes: 5
From: Austin, TX
What color temp did you go with?
Well, today was the day, and the install for the Angel Eyes and HID lights went off without a hitch. Even learned a few interesting things along the way to help others out in the future. But enough delay, here is what everyone wants to see, the PICS!
Just a note, all these pics were taken inside my parking garage, but I'll take some good night shots tonight.
Okay, so now that the fun part is out of the way, on to the neat little trick I learned during the install. I don't know if anyone else has found this out before, but there is an extremely easy way to get to the 2 bolts on the bottom of the headlamp assembly. Instead of jacking the car up and removing the wheels, if you simply pop out the side marker light assembly, you can reach in with a wrench through the space where it goes and easily access the bolts for removal and replacement.
All in all the installation for both the headlamp assemblies and the HID install took a total of maybe 2 1/2 hours, and I'm definitely pleased with the results.
And if you're wondering where my license plate and bracket went, I took it off today to see how it looks before I take it to the car show tomorrow. The holes for the bracket are a bit unsightly, but possibly less unsightly than the bracket and plate itself...

