
What did you do to your Crossfire today?

Joined: Jul 2011
Posts: 31
Likes: 0
From: Tampa FL
I blacked out my tail lights side lights debadged it and painted the rims gloss black, wow hell of a difference . now im waiting for batman emblems what ya guys think? i want input ill put better pics up tommorow
from this crossfire1.png
to this
myblackcrossfire.jpgnightrider.png
from this crossfire1.png
to this
myblackcrossfire.jpgnightrider.png
Last edited by odoherty79; Jul 21, 2011 at 02:07 PM.

Forum Regular

Joined: Mar 2008
Posts: 567
Likes: 0
From: Oklahoma City
Last week I installed a Pioneer 4300 HU in about an hour. Very easy once I figured out how to take out the original.
Yesterday I changed my cabin air and put in a new carbon filter. about 20 min. Nice to be small but hard when your 66. Now its on to CAA.
Yesterday I changed my cabin air and put in a new carbon filter. about 20 min. Nice to be small but hard when your 66. Now its on to CAA.


Senior Member
Joined: Sep 2007
Posts: 8,014
Likes: 14
From: MOFN, AL, 70 miles from George

Yesterday, I rode her hard and put it away wet.
Literally. Mixed rain and sun for 100 out of 400 miles. Went to watch an AutoX event in B'ham (2 SRT's entered, 2 Red Roadster Limiteds spectators) and had lunch with #1 daughter. Took the long/scenic route home. Considering a full buff and then wax after washing, or the sissy way out: wash and Instant Kwik Detailer?
Met 2 of 3 xFire owners.
Senior Member
Joined: Mar 2008
Posts: 14,606
Likes: 39
From: IN
installing diffusers on the rear of the coupe today. Measuring for new t-clamps on all my hoses, and a place for the tank that will hold meth mixture. Roadster is getting it's front bumper cover taken off this evening if it cools down a bit...
Senior Member
Joined: Jan 2009
Posts: 6,285
Likes: 5
From: Carmel, In.
Bought a new cabin filter. If anyone needs one, I would recommend this ebay seller. Although it is not listed as such, it is a premium, activated charcoal Bosch filter.
I have seen these pretty high, $25 shipped is a great price, and the turn around was only a few days...
Bosch C3870 Cabin Air Filter | eBay
I have seen these pretty high, $25 shipped is a great price, and the turn around was only a few days...
Bosch C3870 Cabin Air Filter | eBay
Senior Member
Joined: Dec 2006
Posts: 6,349
Likes: 17
From: Murfreesboro, TN
Originally Posted by BoilerUpXFire
Bought a new cabin filter. If anyone needs one, I would recommend this ebay seller. Although it is not listed as such, it is a premium, activated charcoal Bosch filter.
I have seen these pretty high, $25 shipped is a great price, and the turn around was only a few days...
Bosch C3870 Cabin Air Filter | eBay
I have seen these pretty high, $25 shipped is a great price, and the turn around was only a few days...
Bosch C3870 Cabin Air Filter | eBay
Senior Member
Joined: Jan 2009
Posts: 6,285
Likes: 5
From: Carmel, In.
Originally Posted by JHM2K
Nice find, thanks for the heads-up. It's something I keep meaning to do, but keep forgetting to. I'm probably due a new one, with 53,000 on the original 
Administrator / Senior Member / Retired
Joined: Jul 2007
Posts: 18,129
Likes: 1,612
From: Aurora , ILL
Thread Starter
|
Senior Member
Joined: Mar 2011
Posts: 3,906
Likes: 15
From: TN
A while back I had a stainless manifold bolt seize in my supercharger. I tried to get crafty removing it and ended up breaking it off. 
I drove over to Steve's and even he was unable to remove it without likely breaking an easy-out off into it and making things worse.
Well, today (actually a couple days ago) I finally got off my a$$ and decided to fix it.
I went out and bought a tap-and-die set but was unable to find a long enough drill bit to drill through the manifold into the supercharger. I did some head scratching and came up with an alternative.
I used the manifold gasket to transfer the bolt locations onto a metal template. After drilling the holes into the metal, I had to improvise a bit (stacks of washers) to secure the template in place on the supercharger. After securing the template I drilled out the hole with a 7/32" bit and taped it to a 1/4" FT. Hopefully I'll find a new bolt without too much aggrevation.
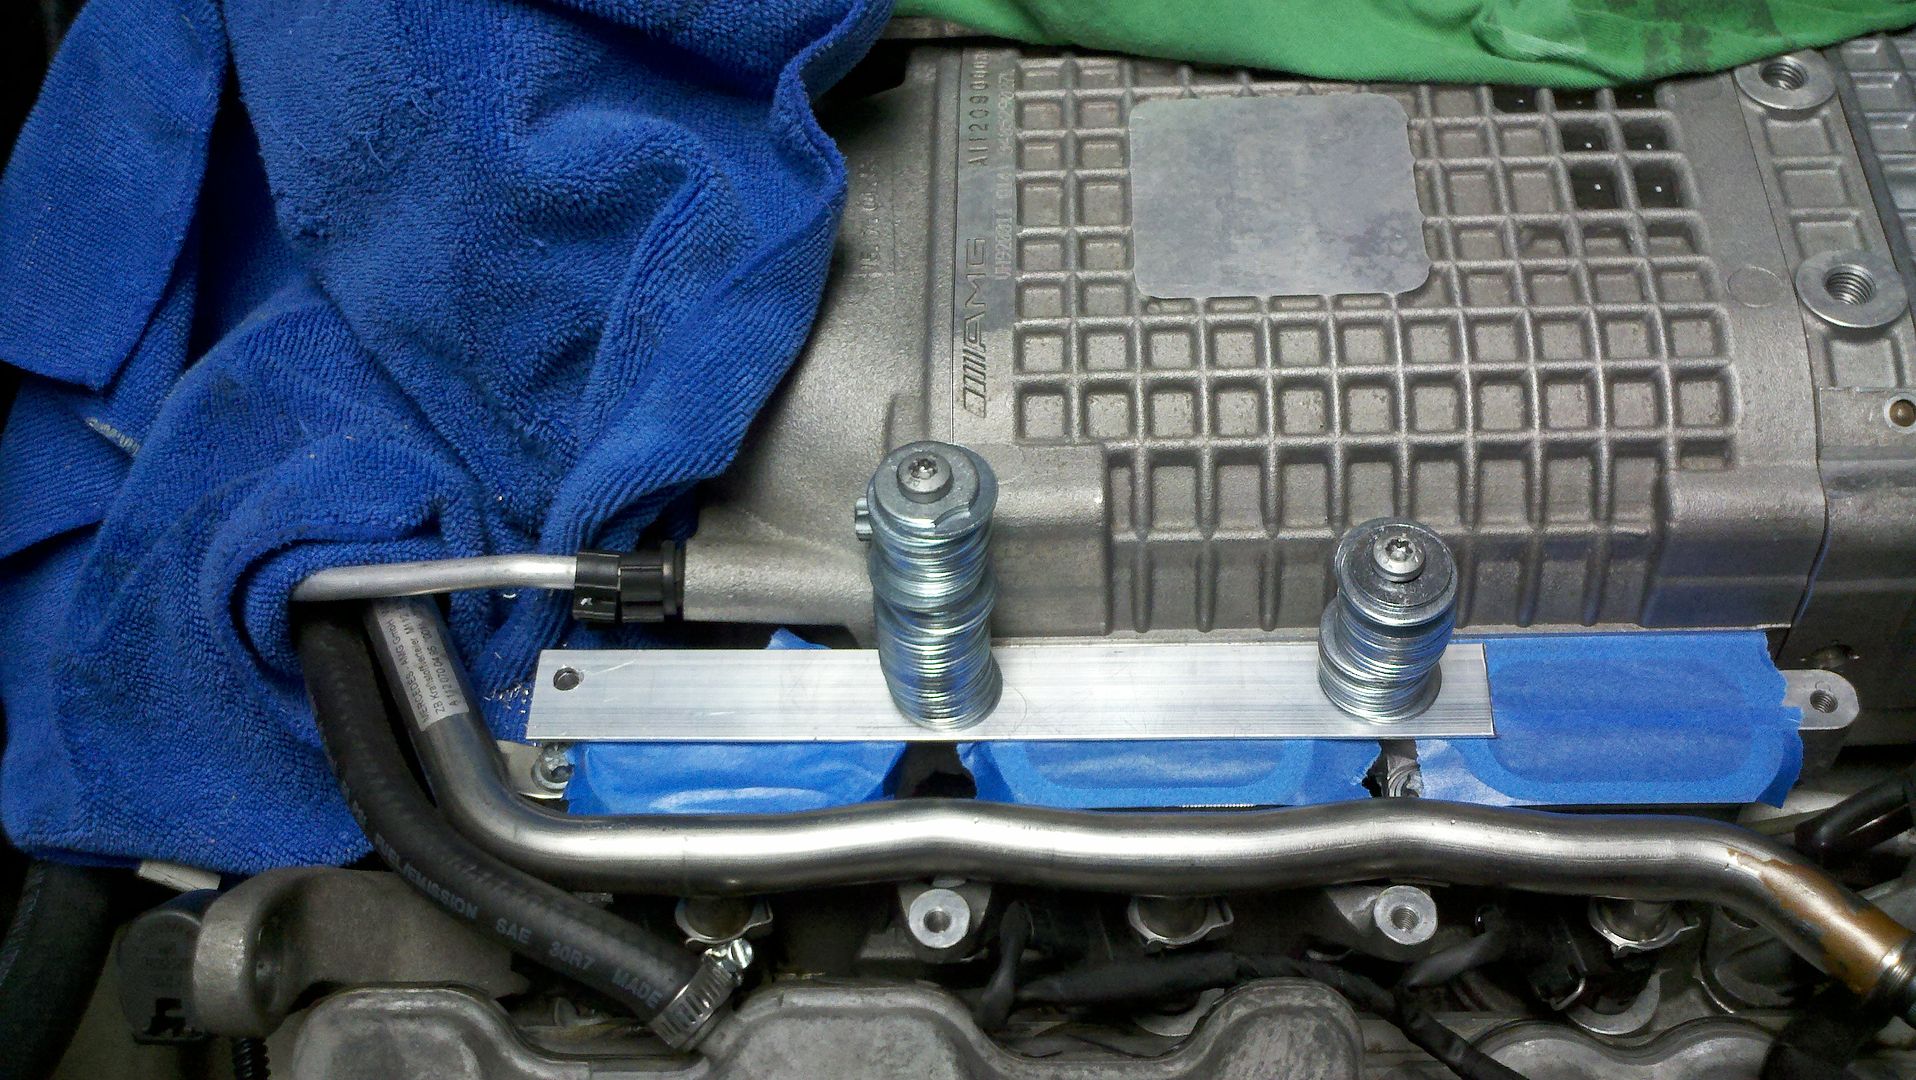
2011-07-23_16-41-51_559.jpg
UPDATE: I installed a heli-coil and I'm now using the stock bolt.
I drove over to Steve's and even he was unable to remove it without likely breaking an easy-out off into it and making things worse.
Well, today (actually a couple days ago) I finally got off my a$$ and decided to fix it.
I went out and bought a tap-and-die set but was unable to find a long enough drill bit to drill through the manifold into the supercharger. I did some head scratching and came up with an alternative.
I used the manifold gasket to transfer the bolt locations onto a metal template. After drilling the holes into the metal, I had to improvise a bit (stacks of washers) to secure the template in place on the supercharger. After securing the template I drilled out the hole with a 7/32" bit and taped it to a 1/4" FT. Hopefully I'll find a new bolt without too much aggrevation.
2011-07-23_16-41-51_559.jpg
UPDATE: I installed a heli-coil and I'm now using the stock bolt.
Last edited by grip grip; Jul 25, 2011 at 09:41 PM.
Senior Member
Joined: Aug 2008
Posts: 3,175
Likes: 16
From: Niagara Falls, Ontario, Canada
All put up on ramps and stands, dropped the exhaust, takeing out the rear end but I can't get ONE bolt out... everything else is out or loose but ONE bolt. 
I will try again tomorrow
I will try again tomorrow

Forum Regular
Joined: Nov 2008
Posts: 511
Likes: 0
From: Central Indiana
Got a tune from Eurocharged. When I purchased the tune in March, Clint could not get the computers to cooperate so I could either mail my ECU in or go to a tune day or go to Chicago. I swung by Eurocharged in Chicago and within 20 minutes Jake had me taken care of. Cannot ask for a better group to support our cars!
Thread Starter
|
Senior Member
Joined: Mar 2011
Posts: 3,906
Likes: 15
From: TN
I originally painted the NW intake with plasti-dip paint, but I found out the intake gets too hot for the paint to maintain it's texture. As a result I repainted the intake with flat black standard paint. Here are the results.
2011-07-28_21-46-14_472.jpg
2011-07-28_21-46-19_140.jpg
2011-07-28_21-46-26_907.jpg
2011-07-28_21-46-14_472.jpg
2011-07-28_21-46-19_140.jpg
2011-07-28_21-46-26_907.jpg
Thread Starter
|
Senior Member
Joined: Mar 2011
Posts: 3,906
Likes: 15
From: TN
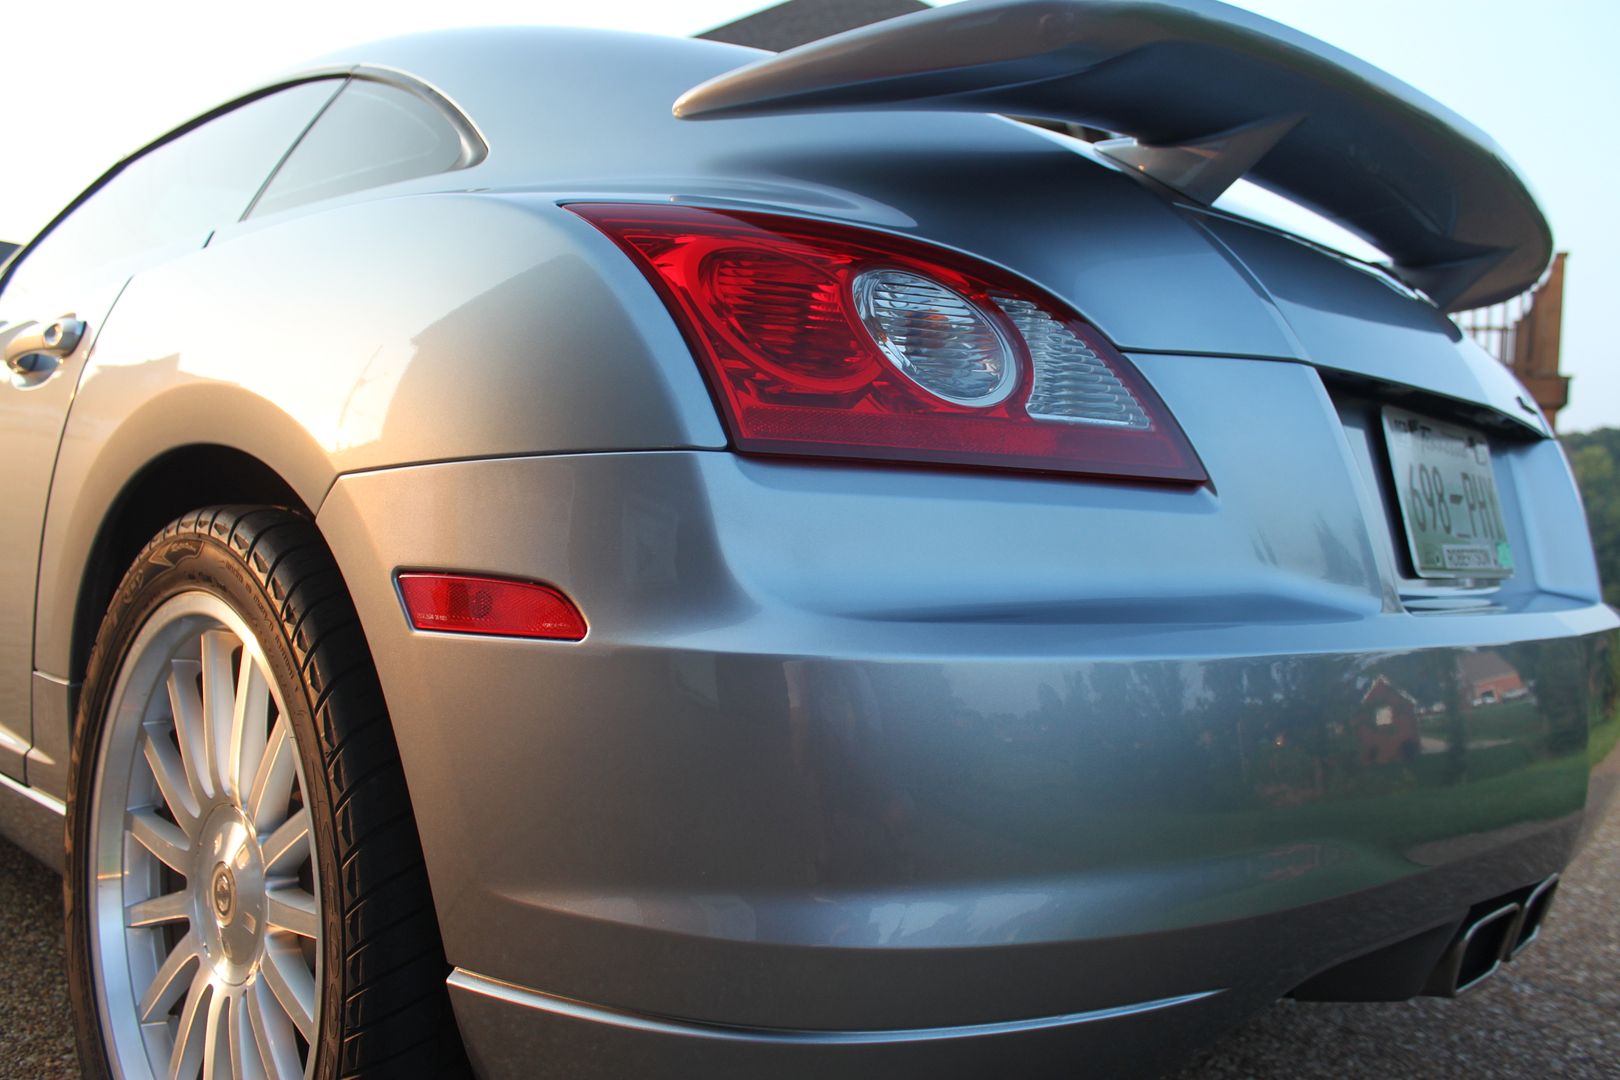
I've never used a clay bar before, but today I broke down and gave it a shot. I'm glad I did. Afterwards I waxed her up good for a spanking, I mean photo-op. 
c20f284d.jpg
3e3f19a7.jpg
988a7289.jpg
79f2c281.jpg
7b13feb0.jpg
a8b9d88f.jpg
97ea29b3.jpg
4ba00652.jpg
cc06d459.jpg
c20f284d.jpg
3e3f19a7.jpg
988a7289.jpg
79f2c281.jpg
7b13feb0.jpg
a8b9d88f.jpg
97ea29b3.jpg
4ba00652.jpg
cc06d459.jpg
Thread Starter
|
Senior Member
Joined: Mar 2011
Posts: 3,906
Likes: 15
From: TN
Here are a few more photos of the detail work.
9789bbd9.jpg
8b9ec242.jpg
ee84734a.jpg
748626ed.jpg
7a53e89d.jpg
f6cc9d30.jpg
caa656d6.jpg
bfbfa3bc.jpg
97b35483.jpg
0271030d.jpg
9789bbd9.jpg
8b9ec242.jpg
ee84734a.jpg
748626ed.jpg
7a53e89d.jpg
f6cc9d30.jpg
caa656d6.jpg
bfbfa3bc.jpg
97b35483.jpg
0271030d.jpg
Thread Starter
|
Senior Member
Joined: Mar 2011
Posts: 3,906
Likes: 15
From: TN
Originally Posted by JHM2K
Lovely shot with the sunlight hitting the wheels... SSB is an awesome color
Thanks! It took a lot of work that day to make that shot happen. I must have taken over 200 photos with the wife's SLR.

Joined: May 2011
Posts: 23
Likes: 0
From: ASHLAND OH
Originally Posted by green-ghost
installed a back up camera. Doesnt help an awful lot but still have some tweeking to do. For $49 couldnt pass it up. Thinking of mounting the 2.4 inch monitor over by the passenger a pillar. BTW, I previously wired up a switch which allows me to turn on my rear euro fog light. This also poweres my back cam so I can see when driving too
Senior Member
Joined: Apr 2008
Posts: 6,723
Likes: 463
From: Indialantic Fl./blairsville Ga
well it wasn't today but it was yesterday that I customized my center caps on my AMG wheels. see them here
https://www.crossfireforum.org/forum...o-u-think.html
https://www.crossfireforum.org/forum...o-u-think.html