
Show Me Your Box!


Joined: Jan 2009
Posts: 297
Likes: 0
From: Erie Pa
Originally Posted by soundcreationsaz
All that planning and design...why in earth did you use OSB? It looks awesome don't get me wrong..but OSB? You definitely sacrificed a lot of sound quality by using OSB as a box building material. Anyhow kudos on the looks!

Thread Starter
Joined: Jan 2009
Posts: 96
Likes: 0
Originally Posted by BoilerUpXFire
I would use a nice thick MDF for your application
Sorry all for the delay in writing, ill have it done soon with all the back up photos.
PS if you want to see the build photos, they are all in my gallery.
Thanks again for you patience.
Thread Starter
Joined: Jan 2009
Posts: 96
Likes: 0
Ok everyone, I will now try to explain how i built this thing. please hang with me as i may forget a few things, and there for i will be putting this into parts, so if anyone has questions they can simply say what part they are referring to, or just quote if its a small bit.
Day 1
Part 1:
Starting with a stock trunk, i measured the depth, width, and the height i wanted the box to come up to. The first problem was that the subs needed .60CF (not the .75 i was calculating earlier) so I had a depth and width that could not move out more the 35"w and 23"D, so that meant that the height would need to come up to meet the needed Cubic Footage. so i found that a high of 5 inches would make the INSIDE dimensions correct.
Next cut the wood...
Part 2:
I talked with a local auto sound place, (that i trust) Nevada Auto Sound, (btw any one in the Reno, Sparks area, if you need anything mobile audio then they are the guys to go to!) and asked them a ton of question about the wood they like and why. with there recommendations i went with a 5/8 inch MDF. now as far as the question of why the 5/8 over th3/4 ill get to that in a bit... But now that i was thinking of wood i realised that i did not figure in the witdh of the wood in making my desgin of the box... i would then have to cut the width and depth to fit the wood and still have the correct CF on the inside. so up goes the height... there for the pick of 5/8 over 3/4, remember i want to have as much storage space in my trunk as i can fit... so height is everything! so although the 3/4 is better i was assured that the 5/8 would be fine. and it has been!
So I had this grand plan of cutting all the wood my self and just when i was about to pull this sheet of 5/8 of the rack a Home Depot assistant says he can help me get the wood done and as i was telling him about the build i realized that he can cut the wood on the wall saw... i had him cut it all! SAVES SO MUCH TIME!

Part 3:
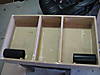
Assembly started with fitting the base to make sure it fits... now to be sure i didn't have Home Depot cut the wood to small i had they cut it over sized by about 3 inches, this said i had a bit of cutting. i cut the base to size and made sure i had the space for the walls to fit on the oust die of the base. again assuring the height to be as low as possible.
With wood glue and self tapping screws i put the walls up with a bit of help from a friend standing on the base as i screwed in the walls. Its not pretty and does not have to be.
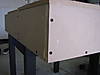
With the walls dry it was time to seal them, i used a white to clear silicone, i don't remember the exact brand but any silicone will do...
after that it was later and time to stop.
Day 2
Part 4:
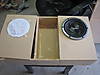
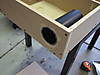
Cutting the holes for the subs was not hard. Each sub came new in box and with them was an instructions sheet with a hole cutting template. most if not all new subs will come with this. next was too find out where i wanted the hole in my box, i had two options, mount them toward the back , or to the front, well i wanted to port the box. So the port would to have a places to draw and push air but not directly to the sub. it had to be on the bottom and the sub on the top, forward part of the box. so i messured a center line and a distiance for each side, left, top, and, right that was the same so it would look centered. I cut and mounted the template onto the wood. i them used a good ballpoint pen to trace the template and make my marks for cutting. Next was to cut the hole, with a 5/8 drill and my hand held jigsaw i slowly cut out the mounting holes!
Part 5:
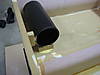
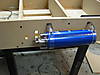
Now that i knew where the ports were going it was easy to cut the port holes using a 3 1/2" hole saw, and then mounting them. i used wood glue to hold the pipe to the outside wall and then found a few scraps to hold up the end of the pipe that was in the box. the pipe is a black plumbing pipe (i have no idea what its really called...) 3 inch inside diameter, 3 1/2 inch outside diameter. Its perfect for porting because its not heavy, but it has a 1/4 think wall so its not going to fail under heavy vibrations.
Day 1
Part 1:
Starting with a stock trunk, i measured the depth, width, and the height i wanted the box to come up to. The first problem was that the subs needed .60CF (not the .75 i was calculating earlier) so I had a depth and width that could not move out more the 35"w and 23"D, so that meant that the height would need to come up to meet the needed Cubic Footage. so i found that a high of 5 inches would make the INSIDE dimensions correct.
Next cut the wood...
Part 2:
I talked with a local auto sound place, (that i trust) Nevada Auto Sound, (btw any one in the Reno, Sparks area, if you need anything mobile audio then they are the guys to go to!) and asked them a ton of question about the wood they like and why. with there recommendations i went with a 5/8 inch MDF. now as far as the question of why the 5/8 over th3/4 ill get to that in a bit... But now that i was thinking of wood i realised that i did not figure in the witdh of the wood in making my desgin of the box... i would then have to cut the width and depth to fit the wood and still have the correct CF on the inside. so up goes the height... there for the pick of 5/8 over 3/4, remember i want to have as much storage space in my trunk as i can fit... so height is everything! so although the 3/4 is better i was assured that the 5/8 would be fine. and it has been!
So I had this grand plan of cutting all the wood my self and just when i was about to pull this sheet of 5/8 of the rack a Home Depot assistant says he can help me get the wood done and as i was telling him about the build i realized that he can cut the wood on the wall saw... i had him cut it all! SAVES SO MUCH TIME!
Part 3:
Assembly started with fitting the base to make sure it fits... now to be sure i didn't have Home Depot cut the wood to small i had they cut it over sized by about 3 inches, this said i had a bit of cutting. i cut the base to size and made sure i had the space for the walls to fit on the oust die of the base. again assuring the height to be as low as possible.
With wood glue and self tapping screws i put the walls up with a bit of help from a friend standing on the base as i screwed in the walls. Its not pretty and does not have to be.
With the walls dry it was time to seal them, i used a white to clear silicone, i don't remember the exact brand but any silicone will do...
after that it was later and time to stop.
Day 2
Part 4:
Cutting the holes for the subs was not hard. Each sub came new in box and with them was an instructions sheet with a hole cutting template. most if not all new subs will come with this. next was too find out where i wanted the hole in my box, i had two options, mount them toward the back , or to the front, well i wanted to port the box. So the port would to have a places to draw and push air but not directly to the sub. it had to be on the bottom and the sub on the top, forward part of the box. so i messured a center line and a distiance for each side, left, top, and, right that was the same so it would look centered. I cut and mounted the template onto the wood. i them used a good ballpoint pen to trace the template and make my marks for cutting. Next was to cut the hole, with a 5/8 drill and my hand held jigsaw i slowly cut out the mounting holes!
Part 5:
Now that i knew where the ports were going it was easy to cut the port holes using a 3 1/2" hole saw, and then mounting them. i used wood glue to hold the pipe to the outside wall and then found a few scraps to hold up the end of the pipe that was in the box. the pipe is a black plumbing pipe (i have no idea what its really called...) 3 inch inside diameter, 3 1/2 inch outside diameter. Its perfect for porting because its not heavy, but it has a 1/4 think wall so its not going to fail under heavy vibrations.
Thread Starter
Joined: Jan 2009
Posts: 96
Likes: 0
Part 6:
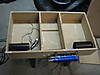
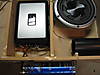
One of the hardest things with this build was finding a practial and hiden place for the capacitor. i wanted to be able to easily see it when i opened up the trunk and yet hidden... so i found that if i push the box fully up to the front as it will go, i have about 3-4 inches of space in a hole next to the hatch latch. (I don't have a photo of this but can take one if anyone is interested) So i mounted the cap on the outside of the box, drilled hols for all the wires and there she sat!
Part 7:
it was then time to mount and wire the amp, cap and box. i added two stilts for the amps feet so that the screws i had would not go all the way threw when holding the amp down. i ran the wires for power and then tested it with out a fully mounted sub, just to see if i have problems!
Part 8:
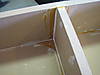
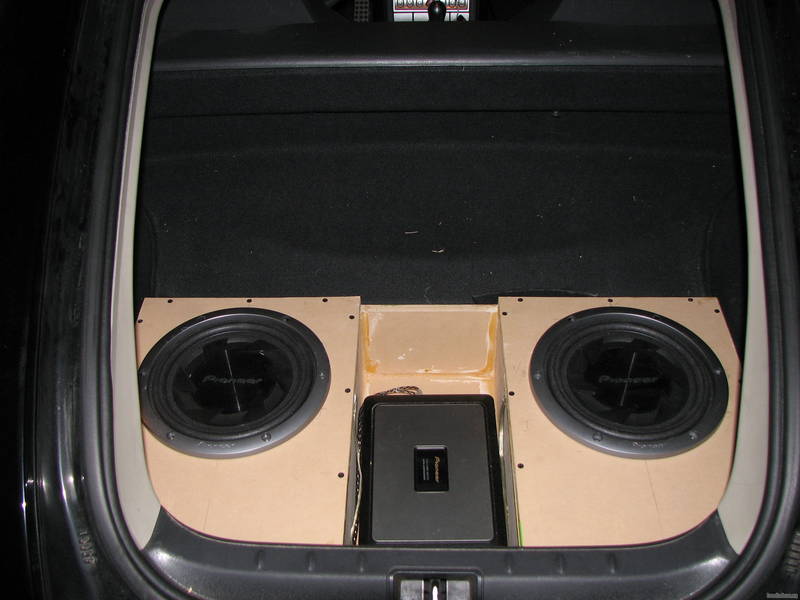
Mounting the subs to complete the boxes. this was a bit different then just adding glue and screws, i had to add the silicone to the joint. i added silicone to the walls earlier when the joint was dry but this time i cant get my silicone gun into the box. so i had wood glue on the top, sub mounting side of the joint and then silicone on the box side, smashed it all together and screwed down the top. as you can see from the following photo i added some foam strips around the mounting hole to add a gasket for a tight seal.
[url=https://www.crossfireforum.org/gallery/showphoto.php/photo/49865]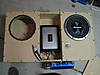 [
[
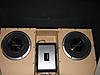
Part 9: mount the box in the car and test. sure enough it has some rattles coming from the amp but i have fixed that with some sound dettoning foam strips and i filled in the area under the amp where the stilts did not fill. now no rattle only bass!
So as far as a top, i have some really nice laminate flooring on order to built it, so ill have that done in a few weeks.
How you all like this but this is what i have done, please comment, ask questions, anything!
Thank for all the help to all! (Beaner) and ideas but lets keep this going!
Show me more!
F117NH
One of the hardest things with this build was finding a practial and hiden place for the capacitor. i wanted to be able to easily see it when i opened up the trunk and yet hidden... so i found that if i push the box fully up to the front as it will go, i have about 3-4 inches of space in a hole next to the hatch latch. (I don't have a photo of this but can take one if anyone is interested) So i mounted the cap on the outside of the box, drilled hols for all the wires and there she sat!
Part 7:
it was then time to mount and wire the amp, cap and box. i added two stilts for the amps feet so that the screws i had would not go all the way threw when holding the amp down. i ran the wires for power and then tested it with out a fully mounted sub, just to see if i have problems!
Part 8:
Mounting the subs to complete the boxes. this was a bit different then just adding glue and screws, i had to add the silicone to the joint. i added silicone to the walls earlier when the joint was dry but this time i cant get my silicone gun into the box. so i had wood glue on the top, sub mounting side of the joint and then silicone on the box side, smashed it all together and screwed down the top. as you can see from the following photo i added some foam strips around the mounting hole to add a gasket for a tight seal.
[url=https://www.crossfireforum.org/gallery/showphoto.php/photo/49865]
[Part 9: mount the box in the car and test. sure enough it has some rattles coming from the amp but i have fixed that with some sound dettoning foam strips and i filled in the area under the amp where the stilts did not fill. now no rattle only bass!
So as far as a top, i have some really nice laminate flooring on order to built it, so ill have that done in a few weeks.
How you all like this but this is what i have done, please comment, ask questions, anything!
Thank for all the help to all! (Beaner) and ideas but lets keep this going!
Show me more!
F117NH
Forum Regular
Joined: Oct 2008
Posts: 415
Likes: 1
Originally Posted by arado
How fortunate I am that my stock radio presents my music to me at a beautiful level without being obnoxious to others. Viva Mozart. Gary
If you're that offended by the rattlebox cars, you should realize everyone in this forum hates them as much as you do. Try listening to Mozart in say... I forget who has the focals..boilerupxfire I think?
Anywho, listen to Mozart in his car. Alternatively, mine, they're not focals but a set of kicker QS components with some 6.5" coaxials for backfill and 2 10" subs sounds beautiful. Before you say anything about my hearing, I'm a translator, my hearing goes, so does my money, I get a yearly hearing test, and attempting to pick up on a 18kHz - 20kHz testtone sweep has only gotten easier as my ears get attuned to it.
You're not furthering the discussion at all.
Now back to me being on topic:
I'll take a few pics of my box when I get the plexiglass done, but long story short I wanted to be able to leave the interior in the car...for now
I'll take some pics later this week, someone remind me.
Notes about working with vinyl:
It's easy if it's going over MDF, just make sure you're cutting things that need to be cut , and in circle areas (for the subs for example) don't remove ANYTHING, simply start cutting radii out from the center point, stretch, staple, repeat. Trim the excess last. if you're mounting anything FLUSH with them, then cut much smaller than what you want out from the hole in the MDF, so you can get a snug fit.
PS - Viva l� Chopin.
")
Thread Starter
Joined: Jan 2009
Posts: 96
Likes: 0
@ brian_omeara07
sounds great! I cant wait to see the full thing!
as an update,
my box is coming along better now more then two weeks agoe, as the weather has gven me a few nice days in the sun. I have the lamanet flooring glued and cut. It fits well but i need to put strips of foam tape down, so that it has support and so it wont rattle. second ill drill pilot holes with counter sinks to make sure the screws are flat.
I have taken a few pics of the wood set on the box but ill have full pics of each step when i finish it. plus the damn forum gallery problem is not helping lol.
Ill keep you all updated. maybe ill have it done this week or week end.

Thread
Thread Starter
Forum
Replies
Last Post
Mackel
Parts/Accessories for sale - Archive
0
Sep 29, 2015 02:41 PM
Currently Active Users Viewing This Thread: 1 (0 members and 1 guests)