
Turtle Wax Headlight Polish Kit Review

Thread Starter
|
Forum Regular
Joined: Apr 2008
Posts: 716
Likes: 4
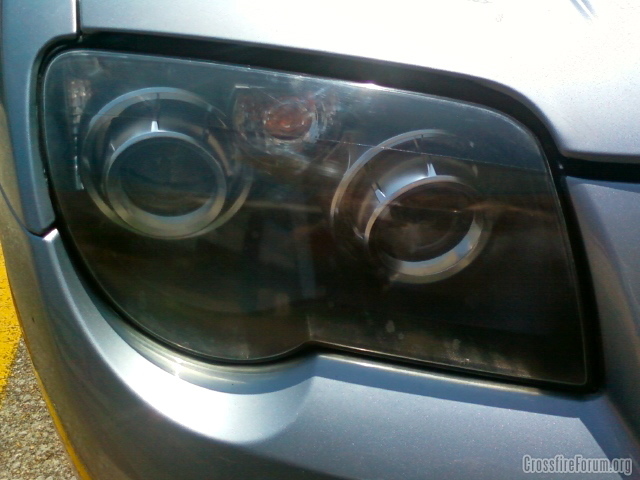
There is still a few light marks on the lenses but not bad overall. On the second headlight I used 800 grit wet dry sandpaper as the first step and reduced the sanding time with pad 1 ten fold. Great kit and great price.
Senior Member
Joined: May 2008
Posts: 10,458
Likes: 156
From: Cincinnati ( Delhi )
Great results! Looks fantastic. I am curious how long it will last before you have to do it again, if ever. I may try this on my Durango that sits outside in the elements.
My '04 lens still look brand new. Maybe because the previous owner had it garaged same as me? Anyone have any ideas to prevent this in the first place? I spray-wax them everytime I clean my car.
James
My '04 lens still look brand new. Maybe because the previous owner had it garaged same as me? Anyone have any ideas to prevent this in the first place? I spray-wax them everytime I clean my car.
James
Thread Starter
|
Forum Regular
Joined: Apr 2008
Posts: 716
Likes: 4
The kit came with a towelette that you wipe the lenses as a final step. It says it takes 24 hours for it to cure so hopefully just waxing them when I wax the car will be sufficient maintenance. Although if you look at the damage on the headlight pre polishing it looks like road debris is a large contributing factor to the condition of the lense. Sunlight will make them hazy but the debris is basically sandblasting them.

Joined: Jun 2010
Posts: 87
Likes: 0
That stuff does help make a difference if you are in a hurry, but it will wear off unfortunately. I have used it enough to know. There is a different solution. I won't say better because although it is more permanent, it is a bit more work and a little more money(although not bad at all). There is actually a professional kit to put the UV coating bacl on them and it lasts, in this case, typically longer than factory. It does require sanding, but the coating is actually sprayed on similar to a clear coat paint. The difference between this and clear coat however is that it will NOT dry without UV exposure, so it will have to be applied or rolled into sunlight to cure. This cures it to the lense and will not seperate like clear coat can or wear off and dull like polishing/buffing kits will. I have used the following method so often and swear by it. Most can be made to not only look good again, but look like they just came off the assembly line(depending on how fine a grit you use). If you want them to look new again, the depth of chips and scratches determines how you start off. If it is just hazing and few scratches, you can skip the 800 grit. Here it is.
1) tape off the area around the headlights and then cover the front of your car. I just use an old tarp and do the whole thing.
2) Starting with 800 grit sanpaper, sand the lense until it is uniform and there are no longer any deep scratches(note 800 actually puts scratches on hazed lenses, but don't worry)
3) Clean with water and then wet sand with 1200 grit paper
4) Clean with water and wet sand with 1500 grit
5) Clean with water and wet sand with 2000 grit!
Most kits stop at 800 and a few at 1200, but if you look close, you can see scratches left and even created by them. Going further with the grit just makes the finishing easier and better. It doesn't take but a few extra minutes and the sandpaper costs 50 cents or so for a sheet of paper!
After the final sanding of 2000 grit, clean the lenses thouroughly with a mild detergent and rinse VERY WELL with water. This is the most important part of the whole process! Now, with the new lenses clean and dry and sanded to 2000 grit, you should not be able to notice any scratches or blemished. you should just have a dull clear lens that looked great when you were cleaning it, but hazy when it dried.
6) spray the coating lightly over the lenses and put into the sun. repeat a couple of more times every 15 minutes until you are pleased it is covered well. Be sure not to spray it on so thick that is orange peels on you, unless you like that look(It actually looks pretty cool and is so shiny it looks like a factory lense mafe that way if it does happen though) When I got in a hurry and did one like this by mistake, I did the other the same way just because I likes it. I did my crossfires this way on purspose because it looks like an expensive upgraded light. LOL Finally, do not touch it for a couple of hours at least.
Depending on the kit, it will either come in an aeresol can, or just like paint from an auto shop will. If it does not come in an aeresol can, when you are at the paint store, pic up a disposable aeresol sprayer (made for this and minor touch up work for onsite fixes)for 6 bucks and use it. I literally cannot tell the difference in these and replacement lenses when attention is paid to the prep work. This is also a once and done treatment instead of the pastes and polishing kits that have to be constantly redone.
Another option is to call the paint store to see if they have the kits. When they tell you they do, ask them what body shops or detail shops they sell them to. LOL They will usually do all this for you for around 40 bucks, but I kinda think it is fun and I know that the lense was smooth to 2000 grit before it was applied. It makes a difference in how long it lasts, but a good prep guy can make 1500 grit look almost as good, sinced the coating fills in tiny scratches, but I like knowing it is smoother. Long story short, a shiny coated surface sanded with 800 grit looks pretty good from 5 feet away, 1500 grit will make you put your face down there to see imperfections and 2000 grit is undetectible to me at all in any light etc.
BTW, Simply following the above and clear coating them with standard clear coat will last for a long time too(I used to do this before the UV spray film was available), but not as long as the UV curing film. I have done both and both look spectacular. I just don't see the need in doing it again in 2 years or so, so I bought the real deal kit so to speak instead of clear coat. I hope this helps someone else as much as it has me!!! This is a once and done application instead of endless recoatings. It also looks better in the end.
BTW, if anyone else has done this, has anyone tried adding a touch of black pigment to the uv coating? I thought about trying it to smoke out the headlights. I just wasn't certain that it wouldn't affect the curing because it is a bit different than paint, but I doubt it would harm anything. I even thought about lightly airbrushing a flaming x on them with pigmented coatings(like some do for a crossfire logo), but thought that might be a bit over the top and if I got it too dark red, I might get harassed by a bored cop. LOL
Last edited by HellFire; Jul 4, 2010 at 09:17 PM.
Forum Regular

Joined: Mar 2008
Posts: 435
Likes: 0
From: Boca Raton, FL
Would applying 3M clear bra protection prevent this fading/fogging/scratching problem permanently? Applied after a cleaning of course.
Have any owners with the clear bra protection still had this problem?
Have any owners with the clear bra protection still had this problem?

Joined: Jul 2007
Posts: 157
Likes: 0
From: S.W. Ohio
I've had the 3M covers on my car since new in 06. Was offered the choice when the bra was installed & glad I did it. Lenses are still factory clear. No dings or road abuse anywhere. The 3M absorbs all road & UV abuse. My car is black & the front facia has no marks showing what so ever. Bugs wash off with very little pressure.

Joined: May 2011
Posts: 84
Likes: 0
Just finished doing my lens after reading this forum. I used the turtle wax kit. Only needed the polisher. I was hesitant to do this until reading the results here. Very easy, and took about 20 minutes total for both lens.

Joined: Jul 2011
Posts: 31
Likes: 0
I bought the Mothers kit and it was really bad. I have been working on these lights for two weeks now and they have not gotten any better. I will have to try the turtle wax kit. I like Mothers other products, they have a great wax,but their headlight refresh kit is bad
She can ride with me ;)
Joined: Sep 2007
Posts: 3,399
Likes: 3
From: Sharon, PA

I just completed both of mine with the 3M Headlight Restoration Kit ($19 at WalMart). One great thing about the 3M kit is the instructions. Any noob could follow them and get decent results. (I did!)
I think it did a fantastic job. After I was done, I did notice that Hellfire was talking about: some scratches/swirls still in the lens. I even had one spot that was still a little cloudy. So I just went back over it with the polishing compound and the foam buffing wheel and cleared them up. (The small cloudy spot is still there, but I'm starting to think it is on the inside.)
I think it did a fantastic job. After I was done, I did notice that Hellfire was talking about: some scratches/swirls still in the lens. I even had one spot that was still a little cloudy. So I just went back over it with the polishing compound and the foam buffing wheel and cleared them up. (The small cloudy spot is still there, but I'm starting to think it is on the inside.)
Senior Member
Joined: Aug 2009
Posts: 3,459
Likes: 12
From: Warner Robins, GA
Originally Posted by IndyFire
I bought the Mothers kit and it was really bad. I have been working on these lights for two weeks now and they have not gotten any better. I will have to try the turtle wax kit. I like Mothers other products, they have a great wax,but their headlight refresh kit is bad
Joined: Nov 2009
Posts: 141
Likes: 0
Do you have any "after" pictures of the left headlight?
i also purchased this kit and achieved success.
i also purchased this kit and achieved success.
Originally Posted by ChuckNorris
I think I officially had the roughest looking headlights on the forum.

Senior Member
Joined: Nov 2008
Posts: 8,488
Likes: 853
From: Upstate SC
The headlights on my 07 Coupe still look close to factory new. Both are clear and "fog-free". I do polish the lens covers (front & back) every 6 months. I typically use a cleaner/polish product - either Meguiar's "PlastX" or Blue Magic's "Headlight Lens Restorer". Both have given me good results.
In fact, Meguiar's PlastX is what I use on the plastic windows of my 1995 Jeep Wrangler Rio Grande. It always gives excellent results in keeping them "fog-free".
Later,
In fact, Meguiar's PlastX is what I use on the plastic windows of my 1995 Jeep Wrangler Rio Grande. It always gives excellent results in keeping them "fog-free".
Later,

Joined: Jul 2011
Posts: 30
Likes: 0
From: Tacoma Washington
This may sound strange but try rubbing a small amount of leather dressing from Red wing,pine pitch,mink oil and beeswax on the bad spots,I sort of stumbled on this when I had my crossfire limited, took my car to Griot't and they tried everything they have nothing worked. Just by trying aeverthing I had before replacing the lenses I tried the Leather dressing and I was amazed at how clear they got and I did it for a few days and it only got better. They remained greasy at first but after a few days they absorbed the grease. Saved me 1200.00 I was ready to replace them.")

Joined: Apr 2005
Posts: 3
Likes: 0
I have a great story. My headlights were so cloudy that I could barely see at night. I went to the dealer to get an estimate on replacing the lenses which came to about $1100. Coincidently my husband was with me and bought a new jeep. I mentioned it in passing and the service mananger told me to contact Chrysler Customer Service and to tell them that I had just bought a new jeep. Chrysler replaced my headlights and I only had to pay $100. My car had 40,000 miles at the time. I could not believe it. That was the best customer service ever.

Joined: Sep 2011
Posts: 4
Likes: 0
From: Grand Rapids, MI
I just got by 2005 coupe...love it. Now detailing, My headlights were fairly clear but scratched so I used the turtle was kit on one headlight and it really scrated it...afraid to do it again. Any advice? Also it appears that the lenses are foggy and dirty onthe inside...opital illusion? if not how can I clean them?

Thread
Thread Starter
Forum
Replies
Last Post
2005 Ragtop
Wheels, Brakes, Tires and Suspension
7
Oct 3, 2015 03:01 PM
Mackel
Parts/Accessories for sale - Archive
0
Sep 29, 2015 02:41 PM
Big Daddy
WTB - Items/Parts Wanted to Buy - Archive
0
Sep 10, 2015 10:21 PM
Currently Active Users Viewing This Thread: 1 (0 members and 1 guests)