
SRT6 Rear End Removal - Short Cuts?

Senior Member
Joined: Dec 2007
Posts: 1,685
Likes: 3
From: Las Vegas
Originally Posted by jonnyb
Yup - sorry to misquote who quoted the info...LOL!
I just re-ran the search and that info was posted by Moparrbust in Bulldogger's thread.
I'm heading outside shortly to begin the removal (if I could just get my mother to leave ). I'll be sure to take pics and post them. I doubt I'll figure out the absolute easiest way to get it out on the first try, so you guys can improve upon it when you start doing your installs.
Then I'll use the knowledge you all share after you do yours to do my next swap for the LSD install (hopefully) later this year
Jon
I just re-ran the search and that info was posted by Moparrbust in Bulldogger's thread.
I'm heading outside shortly to begin the removal (if I could just get my mother to leave
Then I'll use the knowledge you all share after you do yours to do my next swap for the LSD install (hopefully) later this year
Jon
Good quote...............that guy knows what he was talking about and seems to have pulled out the rear diff years ago.

Thread Starter
Joined: Jun 2010
Posts: 140
Likes: 0
From: CT
Originally Posted by 32krazy!
i think i have a couple carfax reports left. pm me the vin
Moparrbust - did you pull the axles all the way out, or just out of the rear end? If you just pulled them from the rear end and not all the way out of the wheel hubs and everything, did you do it without unbolting the rear first?
I was not able to get them out until I unbolted the rear and had room to slide it to the drivers side to pull the passenger axle, and then I slid it down and out from the drivers axle.
Jon
Senior Member
Joined: Apr 2008
Posts: 6,723
Likes: 463
From: Indialantic Fl./blairsville Ga
I personaliy have not pulled the rear end from my crossfire so i can't help much there ,,,,Rudy is the person to go to for info on that ,,now on this::
Quote:
Originally Posted by MikeR
Jonnyb, there is a SRT differential at LKQ in Birmingham for $350. Here is the link I used to find it..... I got one with 11K miles for $375 in SoCal and they drove it over to Unitrax for me...
Search Results
Please post your pics and how to.....
Be really careful with LKQ. I just tried to buy some parts based on their computers interchange and when I had the guy pull the part and read the part number (2004 E55 ECU) I stopped him after after the first three digits which were 112 so the ECU was for a V6. He tried to convince me it would work in a E55. He didn't have a clue. I am not sure you can tell a n/a from a SRT from the case number since the only difference in the rear ends is the gear ratio. also the limited comes with a small yoke on the rear end, where as the srt comes with the big one ,again Rudy can give us the size, of the two yoaks. jim
Thread Starter
Joined: Jun 2010
Posts: 140
Likes: 0
From: CT
As mentioned before, the 3.07 ratio is stamped on the case so that's one way to tell.
With that being said - the one I ordered yesterday showed up today! And - it has the 3.07 stamped on the case so I'm 99.9% sure I've got the correct part. Woohoo!
I'm going to pull it apart shortly to make sure all looks OK and to drain out the gear lube so I can clean it up and put fresh lube in there. I'm hoping to get it installed tomorrow night after work.
Oh, and FYI - I'm going to put the "how to" information together tonight and try to post it up here.
Jon
Senior Member
Joined: Apr 2008
Posts: 6,723
Likes: 463
From: Indialantic Fl./blairsville Ga
just make sure you put the correct oil into the diff.,, for a stock open rear use this
---------------------------------------------------------- Mopar
------------------------------------------------synthetic gear & axle
---------------------------------------------------------lubricant
------------------------------------------------------sae 75w-140
----------------------------------------------------lubricante sintetico
----------------------------------------------------de engranajes Y ejes
----------------------------------------------------------ms8985
----------------------------------------------------part number 04874469
----------------if used in Limited slipaxle,,add mopar limited slip additive 04318060ab

Thread Starter
Joined: Jun 2010
Posts: 140
Likes: 0
From: CT
Originally Posted by amx1397
just make sure you put the correct oil into the diff.,, for a stock open rear use this
---------------------------------------------------------- Mopar
------------------------------------------------synthetic gear & axle
---------------------------------------------------------lubricant
------------------------------------------------------sae 75w-140
----------------------------------------------------lubricante sintetico
----------------------------------------------------de engranajes Y ejes
----------------------------------------------------------ms8985
----------------------------------------------------part number 04874469
----------------if used in Limited slipaxle,,add mopar limited slip additive 04318060ab
---------------------------------------------------------- Mopar
------------------------------------------------synthetic gear & axle
---------------------------------------------------------lubricant
------------------------------------------------------sae 75w-140
----------------------------------------------------lubricante sintetico
----------------------------------------------------de engranajes Y ejes
----------------------------------------------------------ms8985
----------------------------------------------------part number 04874469
----------------if used in Limited slipaxle,,add mopar limited slip additive 04318060ab
I went with Valvoline Synthetic 80W-90, which is only a synthetic blend, but it meets the Military and API specs listed in the factory manuals. I'm hoping to procure an LSD in the next few months (fingers crossed) and rebuild my original rear end using that. This replacement rear end will hopefully only be used for a short time and then it comes back out, so I'm not too worried about the fluid.
Jon
Thread Starter
Joined: Jun 2010
Posts: 140
Likes: 0
From: CT
Here's the step by step for rear end removal:
- If you're doing this the old fashioned way in your driveway with a jack and jack stands like I did, the first thing you'll want to do is turn off the tow alarm. If you've got a lift, well, I'm jealous...LOL! And you can skip this step and the next.
- Next, jack the rear of the car up and support it with jack stands.
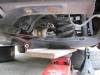
- Now remove the rear wheels and you're ready to get to the real action.
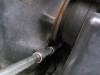
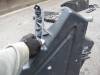
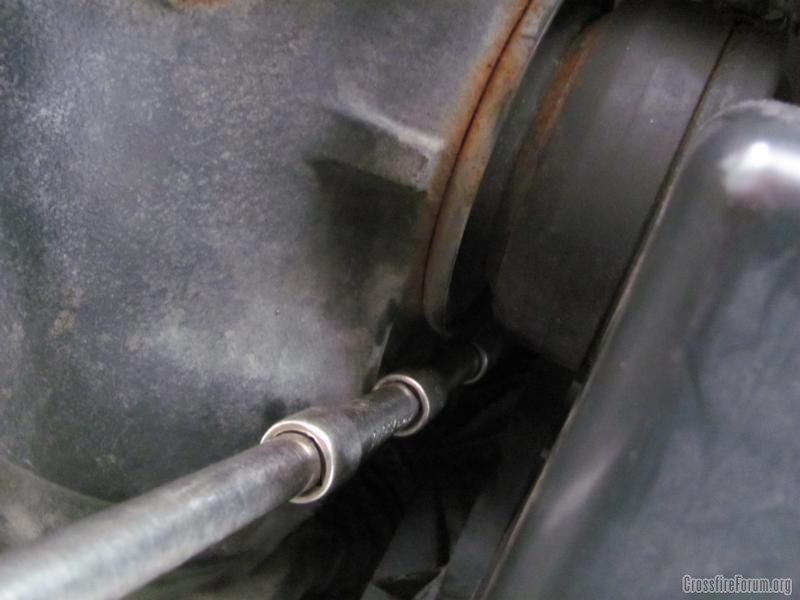
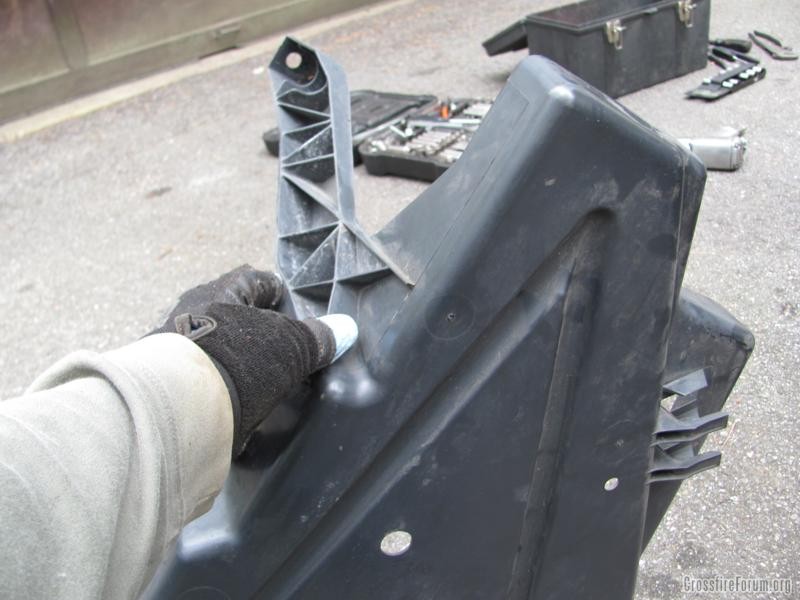
- The first item that needs to be removed is the plastic fuel pump/filter cover. It's just in front of the passenger side axle and is held on by three 10mm nuts. Two of them are obvious, but one is hidden up above the passenger side axle. This first picture is the long extension setup I used for going after that hidden nut above the axle and the second picture is what the shield looks like once it's out:
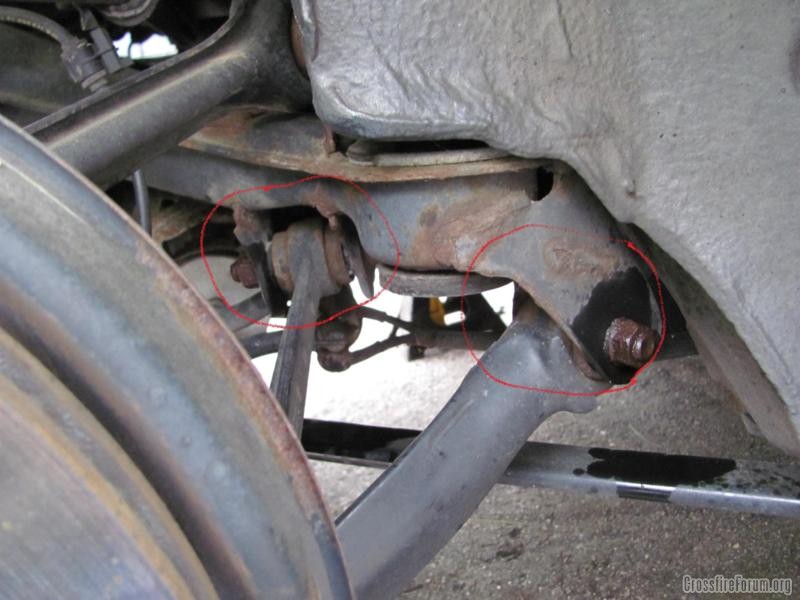
- Next, remove the lower inner control arm/alignment bar bolts (I have highlighted them in the pics). The nuts/bolts are 18mm and 19mm and the adjuster bolt head is a large torx. I didn't have a torx bit large enough so I'm not sure of the exact size, but I got by using a large hex wrench (I think it was 10mm). I would recommend getting the correct torx bit to avoid stripping out the adjuster head - my guess is it's a T50 or T55:
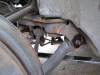
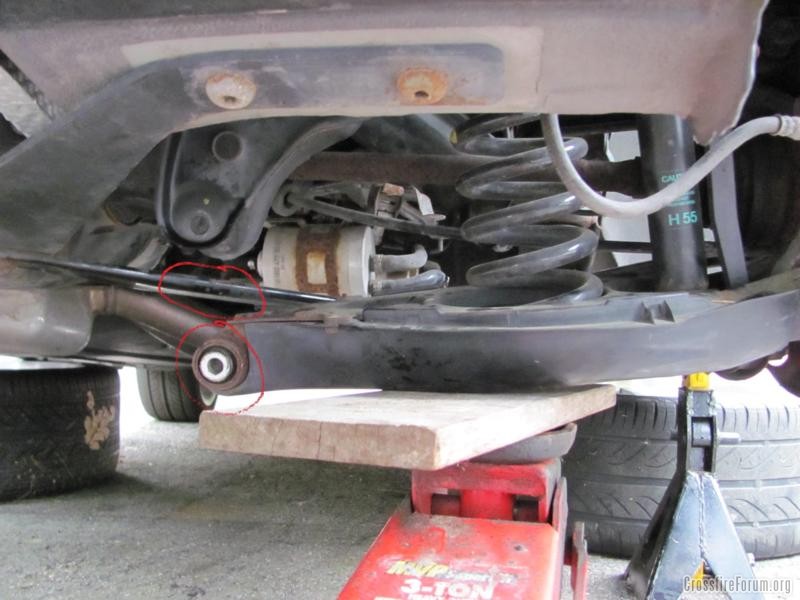
- Notice how I have a jack supporting the lower control arm in the second picture above- this is very important! You'll never get the bolt hightlighted in that pic out with all the pressure of the coil spring on it. So use a jack to relieve the pressure, and to safely and slowly lower the control arm once you get the bolt out. The shock holds it all together, so don't worry about the spring coming flying out or anything like that.
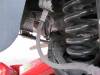
- The pic below shows the jack being used to slowly lower the lower control arm. You have to pull the hub assembly a little to the outboard of the car so that the control arm clears the brace. I have highlighted where brace and control arm will hang up on each other. I did not take pics of the drivers side control arm removal, but I found that I did not have enough movement to lower the control arm past the brace. That's OK though - you can get the rear end out without dropping that control arm all the way past the brace:
- As I said, I did not take pictures of the drivers side disassemble, but it's the same three bolts that have to come out.
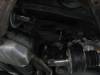
- The next step is to unbolt the driveshaft from the rear end. There are six bolts that hold it on - three of them bolt to the driveshaft and three of them bolt to the rear end. You will only need to remove the three that bolt to the rear end. The nuts are 15mm. Here's a pic:

- You only want to remove the bolts for now. There's a pin in the rear end that slides into the driveshaft (you can see the hole for it in the center of the driveshaft in the pic above). You will not have enough room to pull the driveshaft away from that pin until the rear end is unbolted and dropped down.
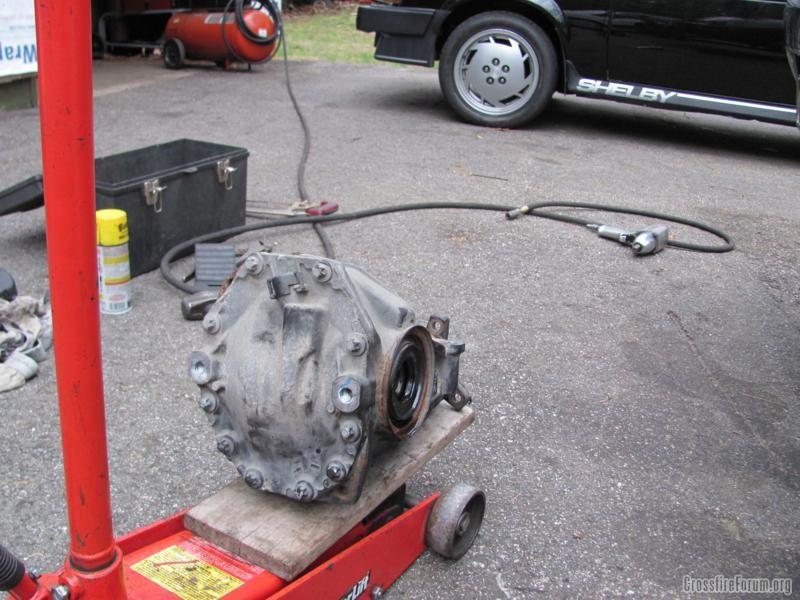
- OK, almost there. The last step is to remove the three bolts that hold the rear end in place. Put a support jack under the rear end. Then remove the front bolt (pretty sure I used the same hex wrench - 10mm maybe?). I did not take a picture of the bolt position on the rear end, but it's on the passenger side up towards the front of the rear end. I could not remove this bolt with a ratchet because the top nut was spinning inside the frame. However, it zipped right off with my impact gun. Good luck on this step if you don't have a speed tool to zip it out! The bolt itself can be seen in the pic below where I show the rear end out - it's just above the right hand side axle.
- Now remove the two 18mm bolts that go through the rear frame into the back of the rear end:

- Last step - remove the axles and lower the rear end down. This isn't as easy as it sounds! Here's the easiest way I found to get them out: lower the rear end down a couple inches and go for the passenger side first, then slide the rear over towards the passenger side and the drivers side is a piece of cake to get out. Be aware that the axles snap into the diff, so it takes some force to snap them out. I used a huge screw driver between the rear end and axle to pry on them. Once you get the axle separated about an inch, it should slide the rest of the way out fairly easily. You will have to give a pretty good pull on the hub assembly towards the outboard of the car to give you enough clearance to get the first axle out so be ready for that as well. I placed my foot on the back of the hub and used my leg to push out on the hub assembly, while using my hands to pull the axle away from the rear end. Be careful for that last inch you pull the axle out - the splines on the axle can easily damage the rubber seal on the outside of the rear end. If the axle rubs it, you should be OK - you just don't want to try to yank the axle out in a position where the splines are taring at the seal.
- Lastly, you'll have to maneuver the rear end around to get it to separate from the driveshaft before you can drop it down. I found that raising the rear back up and moving it to the side allowed me to separate them fairly easily. Here's a pic of it removed:
- Here she is - in all her blown up glory...LOL:

- Installation is the reverse of removal. Getting the pin into the driveshaft and keeping it in place while getting the axles in and getting the three rear end mounting bolts in is the hardest part. Once you tackle that, buttoning up the rest is a 20 minute job. I found getting the pin in was easiest if I raised the rear end way up to the floor of the car and wiggled it around until I got the pin to slide into place. Then pop in one driveshaft bolt loosely to hold it together, but still allow for easy movement of the rear end. Next, go for the drivers side axle and then the passenger side axle. Don't worry about getting the axles seated all the way into the rear end at this point - just get them in slid in most of the way and wait until you get it all mounted in bolted back up to seat them into the diff. You'll need to hammer them in - I used a large plastic mallet to get them to lock back into the diff.
That's about it!
Like I said - it took me just under two hours to get it out and just about three hours to get it back in. I think about 45 minutes to an hour were wasted on fumbling around trying to find the secrets on the removal and about the same time was wasted on the install. I'm pretty sure if I had to do it again, I could have it out in about an hour and installed in about two hours.
Have fun!
Jon
- If you're doing this the old fashioned way in your driveway with a jack and jack stands like I did, the first thing you'll want to do is turn off the tow alarm. If you've got a lift, well, I'm jealous...LOL! And you can skip this step and the next.
- Next, jack the rear of the car up and support it with jack stands.
- Now remove the rear wheels and you're ready to get to the real action.
- The first item that needs to be removed is the plastic fuel pump/filter cover. It's just in front of the passenger side axle and is held on by three 10mm nuts. Two of them are obvious, but one is hidden up above the passenger side axle. This first picture is the long extension setup I used for going after that hidden nut above the axle and the second picture is what the shield looks like once it's out:
- Next, remove the lower inner control arm/alignment bar bolts (I have highlighted them in the pics). The nuts/bolts are 18mm and 19mm and the adjuster bolt head is a large torx. I didn't have a torx bit large enough so I'm not sure of the exact size, but I got by using a large hex wrench (I think it was 10mm). I would recommend getting the correct torx bit to avoid stripping out the adjuster head - my guess is it's a T50 or T55:

- Notice how I have a jack supporting the lower control arm in the second picture above- this is very important! You'll never get the bolt hightlighted in that pic out with all the pressure of the coil spring on it. So use a jack to relieve the pressure, and to safely and slowly lower the control arm once you get the bolt out. The shock holds it all together, so don't worry about the spring coming flying out or anything like that.
- The pic below shows the jack being used to slowly lower the lower control arm. You have to pull the hub assembly a little to the outboard of the car so that the control arm clears the brace. I have highlighted where brace and control arm will hang up on each other. I did not take pics of the drivers side control arm removal, but I found that I did not have enough movement to lower the control arm past the brace. That's OK though - you can get the rear end out without dropping that control arm all the way past the brace:
- As I said, I did not take pictures of the drivers side disassemble, but it's the same three bolts that have to come out.
- The next step is to unbolt the driveshaft from the rear end. There are six bolts that hold it on - three of them bolt to the driveshaft and three of them bolt to the rear end. You will only need to remove the three that bolt to the rear end. The nuts are 15mm. Here's a pic:
- You only want to remove the bolts for now. There's a pin in the rear end that slides into the driveshaft (you can see the hole for it in the center of the driveshaft in the pic above). You will not have enough room to pull the driveshaft away from that pin until the rear end is unbolted and dropped down.
- OK, almost there. The last step is to remove the three bolts that hold the rear end in place. Put a support jack under the rear end. Then remove the front bolt (pretty sure I used the same hex wrench - 10mm maybe?). I did not take a picture of the bolt position on the rear end, but it's on the passenger side up towards the front of the rear end. I could not remove this bolt with a ratchet because the top nut was spinning inside the frame. However, it zipped right off with my impact gun. Good luck on this step if you don't have a speed tool to zip it out! The bolt itself can be seen in the pic below where I show the rear end out - it's just above the right hand side axle.
- Now remove the two 18mm bolts that go through the rear frame into the back of the rear end:

- Last step - remove the axles and lower the rear end down. This isn't as easy as it sounds! Here's the easiest way I found to get them out: lower the rear end down a couple inches and go for the passenger side first, then slide the rear over towards the passenger side and the drivers side is a piece of cake to get out. Be aware that the axles snap into the diff, so it takes some force to snap them out. I used a huge screw driver between the rear end and axle to pry on them. Once you get the axle separated about an inch, it should slide the rest of the way out fairly easily. You will have to give a pretty good pull on the hub assembly towards the outboard of the car to give you enough clearance to get the first axle out so be ready for that as well. I placed my foot on the back of the hub and used my leg to push out on the hub assembly, while using my hands to pull the axle away from the rear end. Be careful for that last inch you pull the axle out - the splines on the axle can easily damage the rubber seal on the outside of the rear end. If the axle rubs it, you should be OK - you just don't want to try to yank the axle out in a position where the splines are taring at the seal.
- Lastly, you'll have to maneuver the rear end around to get it to separate from the driveshaft before you can drop it down. I found that raising the rear back up and moving it to the side allowed me to separate them fairly easily. Here's a pic of it removed:
- Here she is - in all her blown up glory...LOL:
- Installation is the reverse of removal. Getting the pin into the driveshaft and keeping it in place while getting the axles in and getting the three rear end mounting bolts in is the hardest part. Once you tackle that, buttoning up the rest is a 20 minute job. I found getting the pin in was easiest if I raised the rear end way up to the floor of the car and wiggled it around until I got the pin to slide into place. Then pop in one driveshaft bolt loosely to hold it together, but still allow for easy movement of the rear end. Next, go for the drivers side axle and then the passenger side axle. Don't worry about getting the axles seated all the way into the rear end at this point - just get them in slid in most of the way and wait until you get it all mounted in bolted back up to seat them into the diff. You'll need to hammer them in - I used a large plastic mallet to get them to lock back into the diff.
That's about it!
Like I said - it took me just under two hours to get it out and just about three hours to get it back in. I think about 45 minutes to an hour were wasted on fumbling around trying to find the secrets on the removal and about the same time was wasted on the install. I'm pretty sure if I had to do it again, I could have it out in about an hour and installed in about two hours.
Have fun!
Jon
Last edited by jonnyb; May 14, 2011 at 11:49 AM.
Thread Starter
Joined: Jun 2010
Posts: 140
Likes: 0
From: CT
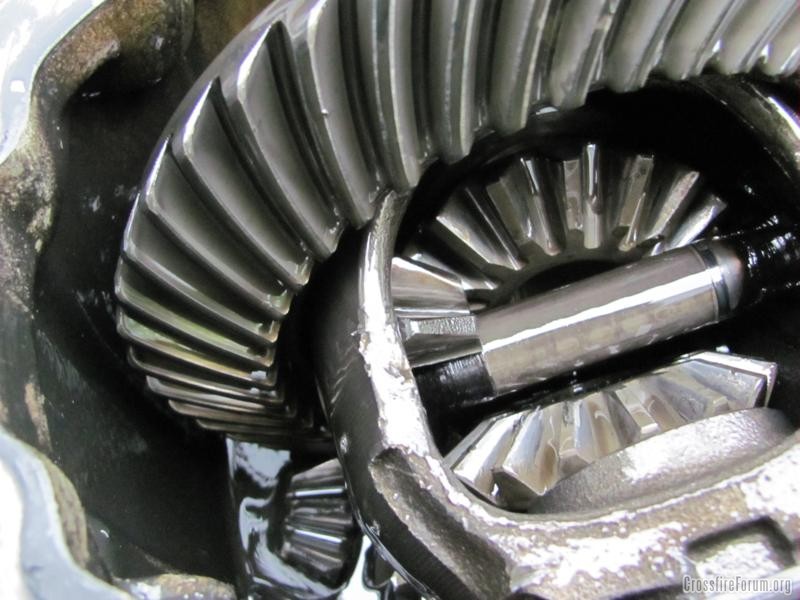
Since it only allowed me to include ten pics in my last post, here's another post with pics of the blown up part. Isn't it sweet
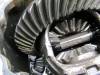


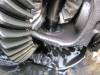

As you can see, there are two spider gears that shattered (you can see the remnants of one of them still in place and the other one laying in the gear oil near the pinion). I got lucky and it didn't really do any major damage except for taring up the rear end cover a little. The important parts - the ring, pinion and case are all OK, so all I need is a nice LSD to repair this puppy!
Jon
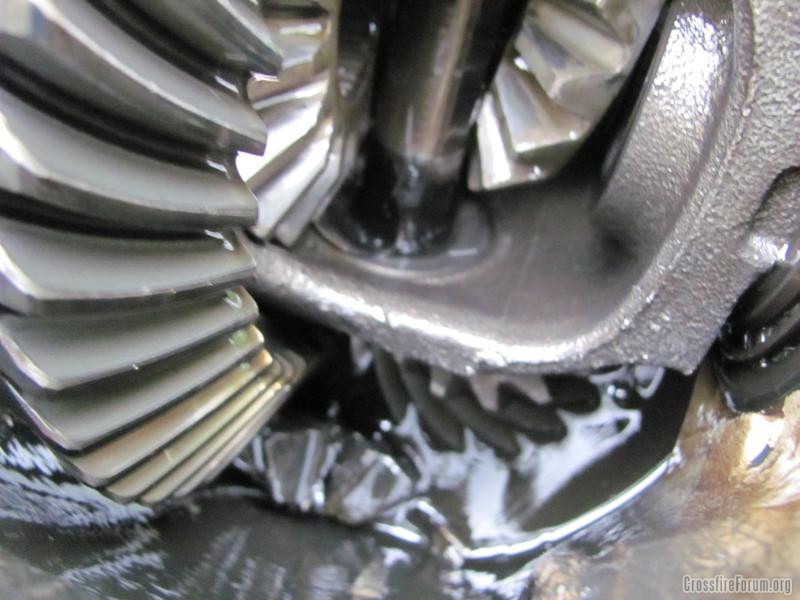
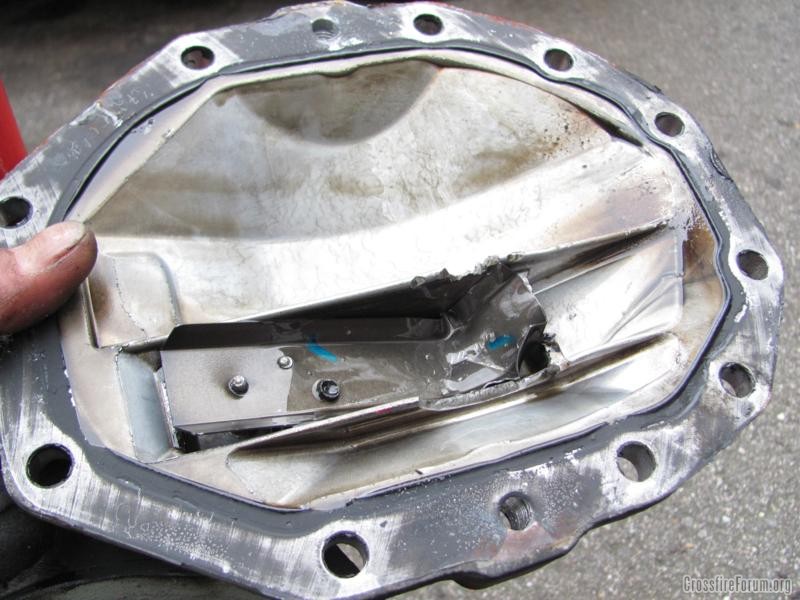
Last edited by jonnyb; May 14, 2011 at 07:49 AM. Reason: Lost 2 of the 3 pics I tried to include - hope they show up this time.
Senior Member
Joined: Apr 2009
Posts: 5,349
Likes: 4
From: murfreesboro,tn
mods can we make this a sticky? great writeup!! is there any way to make the fotos bigger? i would recommend replacing the seals while everything is apart. hate to have a leaking diff after its all together again.
Thread Starter
Joined: Jun 2010
Posts: 140
Likes: 0
From: CT
Can you see the 800x600 version when you click on them? If yes, and you want them bigger, the original resolution is 2272x1704, but they're pretty large file sizes. If you can't see the 800x600, I'll be bummed - it took a while using the website tool to get those in there 
I agree on the seals - might as well do it while you have it apart!
Jon
I agree on the seals - might as well do it while you have it apart!
Jon
Senior Member
Joined: Apr 2009
Posts: 5,349
Likes: 4
From: murfreesboro,tn
Originally Posted by jonnyb
Can you see the 800x600 version when you click on them? If yes, and you want them bigger, the original resolution is 2272x1704, but they're pretty large file sizes. If you can't see the 800x600, I'll be bummed - it took a while using the website tool to get those in there
I agree on the seals - might as well do it while you have it apart!
Jon
I agree on the seals - might as well do it while you have it apart!
Jon
Senior Member
Joined: Jul 2008
Posts: 4,525
Likes: 29
From: Puerto Rico
That doesn't look too hard. Perhaps I'll tackle the Wavetrac instal myself. I'll be waiting on tips from the first to do it. Thanks for taking all the pictures for the forum.
Les
Les
Thread Starter
Joined: Jun 2010
Posts: 140
Likes: 0
From: CT
OK - cool - glad clicking on them works!
I just edited the install information to make it a little clearer. I also tried putting a couple full size pics inline and it really cluttered up the post, so I left it with the thumbnails and links to fullsize ones.
Jon
I just edited the install information to make it a little clearer. I also tried putting a couple full size pics inline and it really cluttered up the post, so I left it with the thumbnails and links to fullsize ones.
Jon
Senior Member
Joined: May 2008
Posts: 10,460
Likes: 159
From: Cincinnati ( Delhi )
Thanks for taking the time to take pics during your repair. It will help everyone here to get a better idea of what needs to be done.
James
James
Joined: May 2010
Posts: 109
Likes: 0
From: Los Angeles
Holy cow JB, I'm just catching this thread, how'd do do that to your diff? Were you sporting slicks at the time ? Great write up on the dissasembly pics, very nice. I hope I don't have to actually use your write up
See you in a few weeks in Waukegan??
See you in a few weeks in Waukegan??
Joined: May 2010
Posts: 109
Likes: 0
From: Los Angeles
Originally Posted by Moparrbust
Good quote...............that guy knows what he was talking about and seems to have pulled out the rear diff years ago.
Thread Starter
Joined: Jun 2010
Posts: 140
Likes: 0
From: CT
Originally Posted by MrSix
Holy cow JB, I'm just catching this thread, how'd do do that to your diff? Were you sporting slicks at the time ? Great write up on the dissasembly pics, very nice. I hope I don't have to actually use your write up
That's just a little test of you basic math skills
I have new tires to remove one part of the equation, but I'll still have to go easy until I can solve the Open diff part. I'm hoping for one of the vendors to come through with a general public release (or second round of wavetrac) so that I can remove that part of the equation. Then it's time to have some fun with the car!
Originally Posted by MrSix
See you in a few weeks in Waukegan??
JB