
Photos of DIY Rear Spring R&R?

Thread Starter
|
Senior Member
Joined: Sep 2007
Posts: 8,015
Likes: 14
From: MOFN, AL, 70 miles from George

I'll be tackling this in the AM (weather permitting) and just am a visual kinda' guy. Anyone point me to a relevant thread?
Jack up the rear at the diff, put jackstands at the 2 rear pads and use the floor jack to support the inner ends of the lower control arms. Right?
Remove the through-bolts and lower the control arm/spring assembly? Right?
Remove the shocks to trim the bump stops. Right?
Reverse to reinstall? Right?")
Jack up the rear at the diff, put jackstands at the 2 rear pads and use the floor jack to support the inner ends of the lower control arms. Right?
Remove the through-bolts and lower the control arm/spring assembly? Right?
Remove the shocks to trim the bump stops. Right?
Reverse to reinstall? Right?
Sorry - no photo's - just link in my write up to basslover's procedures if it will help... very easy job..
https://www.crossfireforum.org/forum...5-srt-6-a.html
https://www.crossfireforum.org/forum...5-srt-6-a.html
Thread Starter
|
Senior Member
Joined: Sep 2007
Posts: 8,015
Likes: 14
From: MOFN, AL, 70 miles from George
Thanks, Mr. B! Any help is appreciated.
Weather isn't lookin' too good though. Heavy fog now, cloudy and showers all day.
Weather isn't lookin' too good though. Heavy fog now, cloudy and showers all day.
Senior Member
Joined: Apr 2009
Posts: 5,349
Likes: 4
From: murfreesboro,tn
rear is ez peazy max. jack it up and remove the lower 3 bolts in the lower control arm lower and take the tension of the spring. remove it and when you reinstall the easiest is to start with the shock. that holds everything in place then the other 2 tighten and do the other side.
Thread Starter
|
Senior Member
Joined: Sep 2007
Posts: 8,015
Likes: 14
From: MOFN, AL, 70 miles from George
I dropped a post in the "Thank You" thread in the General Forum. Everything went great and it looks like it should.
I'll post some photos when it settles and I get a chance to drive it in the dry. (it started raining right when I was finishing.
Thanks, everyone! Here's the Thanks post:
"...Two down and two to go...thanks to all who led me by the hand in installing my rear Eibachs and adjustable camber arms.
Steve
Brian
MikeR
George (Offered to come down or let me use HIS garage!)
DownwardSpiral
Howard
And everyone else for their time and thoughts.
I pre-loaded the camber arms to 3/16" extension to offset the excessive camber I started with. I haven't driven it yet-I cleaned all of the rear chassis components and it started raining when I was letting the the jack down after taking the stands out. Go figure.
Started with ~3-31/2 fingers of rear gap. Now it's ~ 2 fingers and looks great. Even Tina can notice it! Top of the tires are now closer to the top of the fender (tipped out more) due to reduced negative camber. Went great. First side ~ 3 hours. Second side 1 hour. I could now install rear springs in my friggin' sleep.
I guess it's because I have to figure out everything before I tear into it. A-R is me.
I now have ~ 3 fingers of Highland Park single malt by my side.
And after a shower, I do believe I'll have another..."
Senior Member
Joined: Apr 2009
Posts: 5,349
Likes: 4
From: murfreesboro,tn
if you want max cruise up to my place for the fronts. i have it down to less than 45 min per side. with the proper tools and a couple shortcuts its ez peazy!
Thread Starter
|
Senior Member
Joined: Sep 2007
Posts: 8,015
Likes: 14
From: MOFN, AL, 70 miles from George
Originally Posted by 32krazy!
if you want max cruise up to my place for the fronts. i have it down to less than 45 min per side. with the proper tools and a couple shortcuts its ez peazy!
I might just be taking you up on this offer. As weather goes-I'll keep in touch for that! Please PM me with your contact info? Telephone/email?
Thanks, buddy. We're talkin' my boy coming to the Dragon with me. 320 lbs. We'll see how it handles with that load!

Thread Starter
|
Senior Member
Joined: Sep 2007
Posts: 8,015
Likes: 14
From: MOFN, AL, 70 miles from George
Well, alaxfire stopped by today and forced...yes, FORCED me to get the rear camber adjusted on my new Eibach install. Pics:


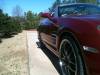
The front springs are NOT installed yet. Makes for some very tricky handling on long sweepers! The different spring rates make driving a little dicey.
I have the OEM 3 dot spring pads installed on the rears. I figure I have ~ 1 1/2" drop in the rear. I think the vertical match to the fender looks pretty close to the front end. Where I rubbed at the inside top before is greatly reduced, but still happens on big dips/bumps.
Overall, I'm happy I did this. When the fronts are installed and dialed in, I'll report back here.
Of course, when I get the fronts done, it'll probably mess up everything. Dang, one is just never done...
What do you'se guys think or suggest?
The front springs are NOT installed yet. Makes for some very tricky handling on long sweepers!
I have the OEM 3 dot spring pads installed on the rears. I figure I have ~ 1 1/2" drop in the rear. I think the vertical match to the fender looks pretty close to the front end. Where I rubbed at the inside top before is greatly reduced, but still happens on big dips/bumps.
Overall, I'm happy I did this. When the fronts are installed and dialed in, I'll report back here.
Of course, when I get the fronts done, it'll probably mess up everything. Dang, one is just never done...
What do you'se guys think or suggest?
Thread Starter
|
Senior Member
Joined: Sep 2007
Posts: 8,015
Likes: 14
From: MOFN, AL, 70 miles from George
I pre-determined that I was sitting on a very flat (no crown) piece of driveway and used a rafter square to see the difference from vertical at the top of the wheel and the bottom of the wheel. When the square was touching the bottom, I measure 3/8" gap at the top. Pretty much what I was shooting for. I started with 15/16" and 5/8" after installing the springs and my adjustable arms. I drove it a little bit and waited a week to let them all settle. And they did!
Senior Member
Joined: May 2008
Posts: 10,446
Likes: 151
From: Cincinnati ( Delhi )
Ok thanks Max. I did the same thing with the square. With my arms installed at 12"OC, I had about 1/8" at the topside of the rim. Just slightly neg of 0� is what I wanted.
James
James

Thread
Thread Starter
Forum
Replies
Last Post
velociabstract
Wheels, Brakes, Tires and Suspension
28
Oct 28, 2015 12:46 PM
tom2112
Parts/Accessories for sale - Archive
7
Jul 28, 2015 08:12 AM
turboomni08
WTB - Items/Parts Wanted to Buy - Archive
0
Jul 7, 2015 11:48 AM
Currently Active Users Viewing This Thread: 1 (0 members and 1 guests)