When you click on links to various merchants on this site and make a purchase, this can result in this site earning a commission. Affiliate programs and affiliations include, but are not limited to, the eBay Partner Network.
contacted the seller and said this is what i get
looks very much like the pic you sent showing the hole in the carpet. the black cylinder seems just the protection for the thread.
so i just have to enlarge the rubber bump stop i guess.
Who�s on first that�s what I want to know. This thread is quite comical.
The dust cover is not shown here, it is on the OEM shocks. The thread on the rod end of the OEM shocks is smaller in diameter than the Konis rod thread and therefore the hole in the OEM dust cover has to be made larger to fit the Konis rod thread.
The dust cover protects the rod from dirt and rain etc. It fits directly over the rod end and goes halfway down the cylinder.
There is no pin with these shocks just the adjustment **** and the hardware shown. All the adjustment is done with r
the **** on the threaded end of the rod, it just slips in place and you just turn it.
I did mine nine years ago so I may be in error in places.
The OEM dust cover on the new Koni shock. Photo by downwardspiral.
thanks for the pic and explanation. now i know what on earth is the dust cover. and, by the way, mine didnt have it when i removed the rear shocks last year, so dont have to worry about drilling nothing.
thanks for the pic and explanation. now i know what on earth is the dust cover. and, by the way, mine didnt have it when i removed the rear shocks last year, so dont have to worry about drilling nothing.
You need dust seals or road crap gets pushed against the pistons seals after every piston movement. I have a photo which shows the paint worn off the cylinder by a dust seal, that was slightly off centre, rubbed against it.
Last edited by onehundred80; May 14, 2021 at 12:00 PM.
thanks for the pic and explanation. now i know what on earth is the dust cover. and, by the way, mine didnt have it when i removed the rear shocks last year, so dont have to worry about drilling nothing.
You don't need the plastic dust cover per se, but you do need the top metal cup (which is the part that is drilled out) and associated rubber bushing pieces as it is what the bump stops rest against as well as the contact surface for the underbody body of the car. You won't be able to install the shocks without those pieces, but also your current shocks wouldn't work (assuming they're OEM) without those pieces.
The dust cover does help increase the life of the shocks as a whole to minimize contact with the shaft and reduce debris that may end up at the piston shaft entrance. The Konis do come with a plastic washer that sits right at the piston shaft entrance to reduce debris. I'm pretty sure someone on the forums did end up doing a Koni install without the dust cover.
My other vehicle does not have dust covers on its rear shocks, and its an offroad vehicle. The design is different though, with the shafts facing down rather than facing up. The shafts did needed to be replaced when the shocks were rebuilt due to pitting from road debris.
thank you very much for the great details. i understand that i can live without them, but if they exist and i can get them, will try to do so. now let me see if the supplier has them.
update: no they dont.
aftermarkets? any1? i havent found any yet.
Last edited by phil alvirez; May 14, 2021 at 01:47 PM.
got the shocks and have questions:
suppose i have the shock in place.
the dust cover in.
removed that black plastic cover on top
then,
how the fittings go? in what order? as they appear in the pic?
and the others that were before with the old 1?
that tubing...
thanks
ideally should be to have a pic...
Last edited by phil alvirez; May 21, 2021 at 10:57 AM.
still the question at post 29 prevails:
" how the fittings go? in what order? and the others that were before with the old 1? that tubing... thanks ideally should be to have a pic... "
will try and tell how it works.
still a pic is welcome
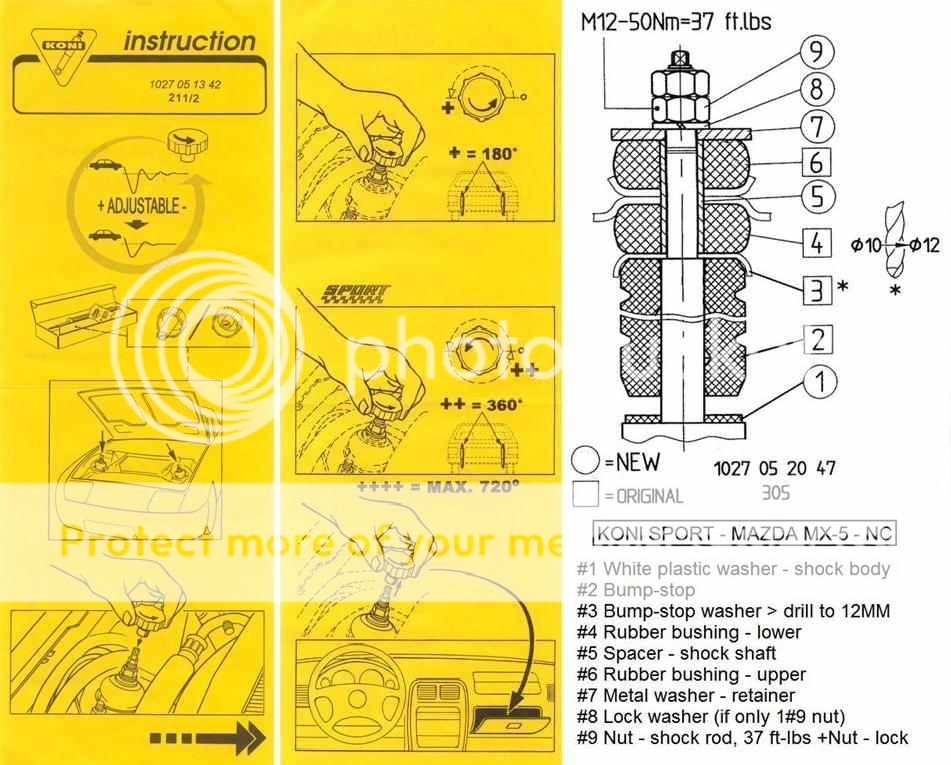
That paper should have come with your shocks. It shows what is new (circle) and what is from your old shocks (square).
For instance :
1 is the white plastic piece that came with the new shocks -- its to keep dust out of the shaft
2 is the bump stops from your old shocks
3 is the metal hat from your old shocks -- it also cites that you need to drill it out on the right (the star). I think it says 10mm or 12mm -- hard to read on your photo.
the plastic dust goes over the hat once its assembled
Note that the paper shows everything together -- the car itself is in middle of that -- I think around #5. I'm not 100% sure though, but it was pretty intuitive because it is setup like the OEM shocks you removed. I only did one shock at a time, and I disassembled and re-assembled everything the same way.
thank you very much for your valuable input.
i will go, as you say, intuitively. the cross sections of the parts in the paper are sort of funny, i would say, but will do my best to understand what they were meaning.
i will do as you did, disassembling the old and assembling the new in the same order, hopping all goes well.
will tell how i did and how it went.
thanks again.
i still believe that they should post a picture of the whole assembly so we could see all the parts where they fit. a pic as clear as yours of the hole for access to the shock.
i will try to do so and post here. if it works, at least others will know how to do it with all detail.
i must say that am amazed of the complexity of the design, and for the results, it works great, but the instructions are confusing, especially when they try to stuff all the variants in 1 set.
Last edited by phil alvirez; May 21, 2021 at 02:44 PM.
these are the parts that come with the shock :
1-plastic split washer; 5-tubing; 7-large metal washer, 8-metal split washer; 9-nut.
the old black rubber dust cover has to be drilled to 12mm dia (from 10mm).
at the paper i see where #5 line signals there is something that i believe is the cars frame, and directly on top of it sort of a metal dish (old part) where an old part rubber cushion (6) sits. this 2 have to be fitted once the shock has been inserted. but also under that frame there is another rubber cushion (4) that has to be fitted on top of the black rubber dust cover before installing the shock. the slotted plastic washer (1) fits just on top of the body of the shock and then what looks like a rubber cushion from the old shock (2) sits on top of it. this am just guessing. the washer is slotted because is the only way can be pushed in place.
now once the old parts are removed i will confirm this. but all is beginning to make sense at last. it just takes a lot of brainstorming trying to interpret the drawing, thats all.
but the parts shown on the picture are not in the right order. they should be. will take pics and show.
and, waxhell, i think you are right on the car being around #5.
Last edited by phil alvirez; May 21, 2021 at 06:34 PM.
the 1st thing to do, removing them, is very well detailed here: https://howtune.com/articles/333-rep...sler-crossfire
and before starting anything, we need a tool for enlarging the hole of the dust cover. ideally a 12mm drill, or a dremel to grind the hole to that size.
once having it, we can proceed to do the replacing. i think that now i got what we have to do to finish the job. will write the details once i finish doing the install.
bear with me. until then...
found these instructions that, although say "mazda", are identical to the 1s that come with the shocks. see the right hand side only.
for what i see, we insert the #1 washer on top of shock, then 2-3-4 5 before inserting the shock into the cars body from under,
then from the top, another metal dish shaped part (that is not mentioned) then 6-7-8-9. i have to confirm this when i remove the old shock.
also, mine came with #8 lock washer and not with 2 nuts.
but now i noticed something that is not exactly the same, and that is the #3. here seems a separate piece. it will not be until i disassemble the old shock that will know.
anyway, at the end of the day, what matters is that it needs to be enlarged. as all the others ( like #2, 4, and 6 in the drawing), and you need to know this in advance because you have to be prepared with larger drills. especially the larger (#2). there is nothing as annoying as having something disassembled and having to stop due to the lack of a tool. so beware.
Last edited by phil alvirez; May 28, 2021 at 01:07 AM.
results
eventually installed the shocks.
1st am going to tell you my experience on how the car feels (which is the reason why we are installing them).
as, according to the instructions, there are several positions where we can adjust for the kind of softness that feels best to our liking, i tried for the 1st time the extreme softness (full right turn) to see how it handles, to see the difference from the too hard for my liking of the original. i drove at a street that has lots of slots across (perfect for the test). the difference was, 1st, the noise: way noisier. this made me the impression that they still were too hard. but then i realized that it was due to being just loose in its run. practically as if there were no shocks ! so i turned the **** to the next position indicated in the instructions (1/2 half turn to the left) and drove again. still too loose for my taste. another 1/2 turn: now feels more to my liking. still will keep an eye on it for a few days and decide where i like it best permanently.
but, fellows, now it feels more like conventional cars, which is what i was aiming at. tailored to my way of driving.
then, i wonder about all this thing of turning the **** half a turn, as the instructions say...if there were stops, i understand, but as there are not, does it means that we may turn it to any number of degrees (or fractions of a turn) as we want? seems to me so. there are no stops that restrict the degrees we may want.
anyway, the results is: success !!!
will post details on the instal later (and pics). keep posted.
Last edited by phil alvirez; May 26, 2021 at 05:46 AM.