
Rearview / Backup Camera Installation Hints and Pictures

Thread Starter
Joined: May 2009
Posts: 275
Likes: 4
From: N.E., KS, USA
Well, I've finally, and successfully, installed mine! Thanks to all who posted comments on such -- there were many valuable tidbits. Here's some of my experiences, if you attempt similar to address the massive blind spot. If you can't view the pics here, go to my gallery:
I bought a new/sealed large-screen, wireless PEAK SafetyView PKC0RC, via eBay, for US$58 including shipping a little over a year ago. It has a seven inch color LCD screen, and can accept other AV inputs.
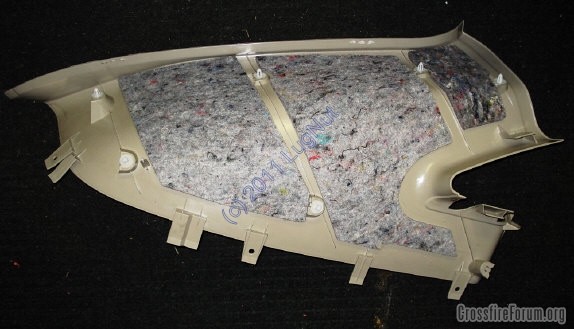
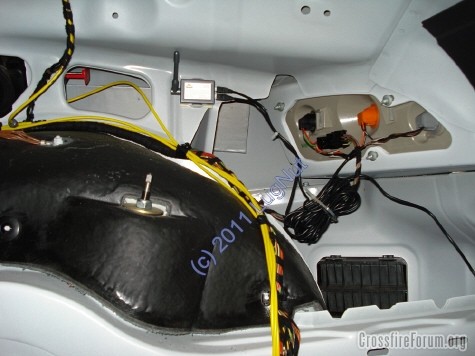
From readings I knew to tap into the right-rear wiring. Removing the right sail panel was necessary to get the rear center interior trim out, and it then gave me good access for installing the transmitter up high (later pic).
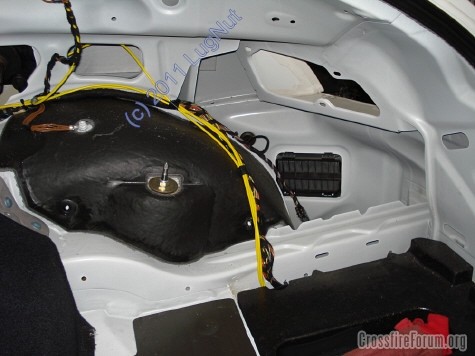
Here's the back side of the right-rear sail panel. It was a pain to remove, and install. The trim around the right seat belt must be removed first, as well as the cargo area's carpet and lower-right carpeted wall. Then it is ripped out with much more force than I would have liked to use, for a plastic piece. Reinstalling it was a pain too, and required that I climb into the cargo area (keeping my weight on the front metal pan, not the styrofoam to the rear.
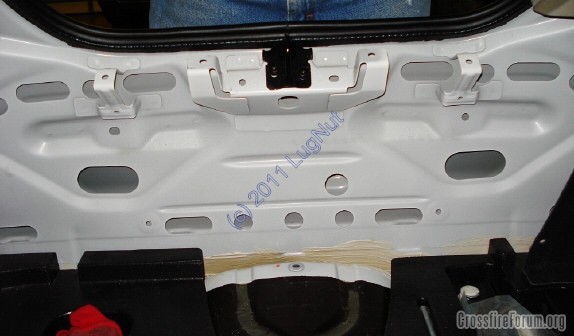
Here's the rear "transom", after the center trim was out. Note the little hand holes down low, especially to the left-of-picture-center -- they helped me feed the camera wire.
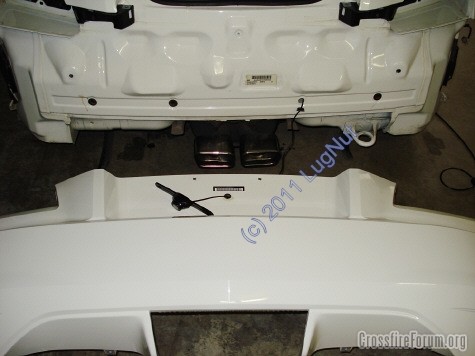
I didn't want any exposed wires, wanted the camera to be mounted in the center, and hoped not to drill any holes for the camera-to-transmitter wire. Well ... things snow-balled, and I ended up pulling the rear fascia, which really wasn't that difficult -- see someone else's the thread on "rear bumper cover", I posted some hints and pics to it too:
Note in the pic above the four little black, round plugs -- success in finding a way in without drilling a hole! Then threaded up to one of three existing holes in the rear sheet metal, behind the rear "transom" (what's that sheet metal area really called?).
Here's the transmitter installed -- it's heavy-duty double-sided taped up high and forward to help get a stronger signal to the monitor. I spliced the transmitter's power leads into the right on-taillight's harness (_not_ the body's harness). Brown was +12V, and black was ground. Note that the brown wire in the body's harness in _not_ +12V. I soldered and taped the connections to reduce future connection problems -- I do not want to pull that trim again -- what a pain!
Tested the unit before buttoning back up the car.
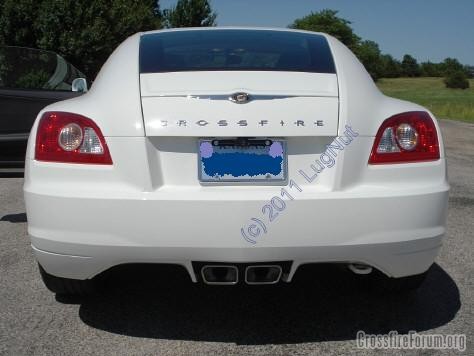
Here's the camera installed. I have an aftermarket chrome license-plate trim ring, and it worked nicely for pointing the camera downward a bit. I snaked the lead between the trim ring and the plate, so no wires are visible outside. As another member mentioned, the camera is very close to the hatch's release, but mine fortunately clears it. Also, a good hint from another was to seal the wire's entrance to the camera to help keep water out -- I used "Shoe Goo", both just before and then after mounting the camera (the wire gets bent during installation).
I planned to mount the monitor on the right-side dash, using one of those custom Panavise brackets (now for sale ... inquire {6/30/11: likely sold}), but the large screen made it stick out into the passenger's space (a safety problem), and I didn't like how it or the wires would look. So ... I mounted it between the seats, where I normally turn to look anyway! If you have a really stiff neck, this location isn't for you. But for me, it works, and looks great!
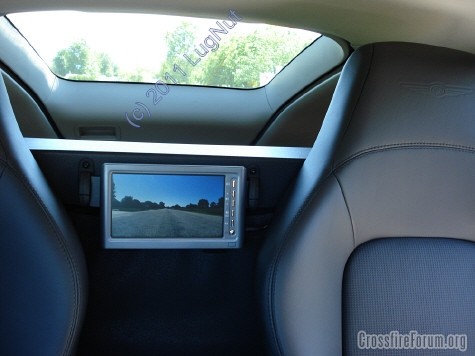
I made a custom mount, out of wood, and painted it black. The monitor is strapped to it, using the supplied straps, and the bracket it then held in place using the never-used umbrella clips (must remove one to put in the bracket -- easy). The power wire then goes down behind the driver's seat, to the console, then, for now, to the cigarette lighter.
Above shows an actual image too.
I was pleased to see that the unit turns off completely when the key is out -- the cigarette lighter apparently shuts off. I don't like the monitor's cigarette adapter plug and exposed power wire, so I will be hard-wiring it when I yank the console here shortly to replace one piece of trim that has the peeling black plastic covering.
Looking forward (backward?) to actually using the camera in a parking lot soon! And I hope these pics and hints help others, or maybe show that it's a _lot_ of work to do a pro-type installation.
I bought a new/sealed large-screen, wireless PEAK SafetyView PKC0RC, via eBay, for US$58 including shipping a little over a year ago. It has a seven inch color LCD screen, and can accept other AV inputs.
From readings I knew to tap into the right-rear wiring. Removing the right sail panel was necessary to get the rear center interior trim out, and it then gave me good access for installing the transmitter up high (later pic).
Here's the back side of the right-rear sail panel. It was a pain to remove, and install. The trim around the right seat belt must be removed first, as well as the cargo area's carpet and lower-right carpeted wall. Then it is ripped out with much more force than I would have liked to use, for a plastic piece. Reinstalling it was a pain too, and required that I climb into the cargo area (keeping my weight on the front metal pan, not the styrofoam to the rear.
Here's the rear "transom", after the center trim was out. Note the little hand holes down low, especially to the left-of-picture-center -- they helped me feed the camera wire.
I didn't want any exposed wires, wanted the camera to be mounted in the center, and hoped not to drill any holes for the camera-to-transmitter wire. Well ... things snow-balled, and I ended up pulling the rear fascia, which really wasn't that difficult -- see someone else's the thread on "rear bumper cover", I posted some hints and pics to it too:
Note in the pic above the four little black, round plugs -- success in finding a way in without drilling a hole! Then threaded up to one of three existing holes in the rear sheet metal, behind the rear "transom" (what's that sheet metal area really called?).
Here's the transmitter installed -- it's heavy-duty double-sided taped up high and forward to help get a stronger signal to the monitor. I spliced the transmitter's power leads into the right on-taillight's harness (_not_ the body's harness). Brown was +12V, and black was ground. Note that the brown wire in the body's harness in _not_ +12V. I soldered and taped the connections to reduce future connection problems -- I do not want to pull that trim again -- what a pain!
Tested the unit before buttoning back up the car.
Here's the camera installed. I have an aftermarket chrome license-plate trim ring, and it worked nicely for pointing the camera downward a bit. I snaked the lead between the trim ring and the plate, so no wires are visible outside. As another member mentioned, the camera is very close to the hatch's release, but mine fortunately clears it. Also, a good hint from another was to seal the wire's entrance to the camera to help keep water out -- I used "Shoe Goo", both just before and then after mounting the camera (the wire gets bent during installation).
I planned to mount the monitor on the right-side dash, using one of those custom Panavise brackets (now for sale ... inquire {6/30/11: likely sold}), but the large screen made it stick out into the passenger's space (a safety problem), and I didn't like how it or the wires would look. So ... I mounted it between the seats, where I normally turn to look anyway! If you have a really stiff neck, this location isn't for you. But for me, it works, and looks great!
I made a custom mount, out of wood, and painted it black. The monitor is strapped to it, using the supplied straps, and the bracket it then held in place using the never-used umbrella clips (must remove one to put in the bracket -- easy). The power wire then goes down behind the driver's seat, to the console, then, for now, to the cigarette lighter.
Above shows an actual image too.
I was pleased to see that the unit turns off completely when the key is out -- the cigarette lighter apparently shuts off. I don't like the monitor's cigarette adapter plug and exposed power wire, so I will be hard-wiring it when I yank the console here shortly to replace one piece of trim that has the peeling black plastic covering.
Looking forward (backward?) to actually using the camera in a parking lot soon! And I hope these pics and hints help others, or maybe show that it's a _lot_ of work to do a pro-type installation.
Last edited by LugNut; Jul 1, 2011 at 10:40 AM.
Senior Member
Joined: Apr 2006
Posts: 25,432
Likes: 650
From: Ontario
I would think the transmitter could be put up behind that upper panel without removing it as there is a gap behind it.

Senior Member
Joined: Dec 2008
Posts: 1,396
Likes: 1
From: Apple Valley, MN
Funny. Man you went to alot of work. I took of the access panel, ran the cord between the license plate and the wiring and the transmitter, then velcroed the transmitter to the back panel. then the monitor went on the dash, kinda just set it there and that was about it. Must be alot more **** retentive or OCD than me. LOL. Good you got it working. I love mine especially in tight spots too.
Thread Starter
Joined: May 2009
Posts: 275
Likes: 4
From: N.E., KS, USA
OCD, no, I definitely won't be repeating that job again, nor again, nor again, ... 
No exposed wires, or transmitter, was important. I just finished tapping-in the power cord to the cigar lighter's positive lead (blue/black), and ran the ground to the convenient nut on the driveshaft tunnel, just in front of the shifter (while replacing the center/front console). The camera's power adapter plug, now removed, had a glass fuse in its tip (unscrew the tip to reveal), so I put it in an in-line fuse holder. BTW, the center of the adapter plug is for +12VDC.
No exposed wires, or transmitter, was important. I just finished tapping-in the power cord to the cigar lighter's positive lead (blue/black), and ran the ground to the convenient nut on the driveshaft tunnel, just in front of the shifter (while replacing the center/front console). The camera's power adapter plug, now removed, had a glass fuse in its tip (unscrew the tip to reveal), so I put it in an in-line fuse holder. BTW, the center of the adapter plug is for +12VDC.
Senior Member
Joined: Apr 2006
Posts: 25,432
Likes: 650
From: Ontario
Originally Posted by LugNut
OCD, no, I definitely won't be repeating that job again, nor again, nor again, ...
No exposed wires, or transmitter, was important. I just finished tapping-in the power cord to the cigar lighter's positive lead (blue/black), and ran the ground to the convenient nut on the driveshaft tunnel, just in front of the shifter (while replacing the center/front console). The camera's power adapter plug, now removed, had a glass fuse in its tip (unscrew the tip to reveal), so I put it in an in-line fuse holder. BTW, the center of the adapter plug is for +12VDC.
No exposed wires, or transmitter, was important. I just finished tapping-in the power cord to the cigar lighter's positive lead (blue/black), and ran the ground to the convenient nut on the driveshaft tunnel, just in front of the shifter (while replacing the center/front console). The camera's power adapter plug, now removed, had a glass fuse in its tip (unscrew the tip to reveal), so I put it in an in-line fuse holder. BTW, the center of the adapter plug is for +12VDC.
Senior Member

Joined: Aug 2009
Posts: 3,459
Likes: 12
From: Warner Robins, GA
Have you tried pointing your rear view mirror to where you can see the camera between the seats? Hmmm..... Just might work. 
Thread Starter
Joined: May 2009
Posts: 275
Likes: 4
From: N.E., KS, USA
Yes, this unit does allow flipping the image. I didn't need to, however. And there's adjustments for brightness, contrast, etc.

Joined: Dec 2013
Posts: 86
Likes: 0
From: Oregon
Great work there !
I am in the same process, I took a first look today at how to bring the wire from the camera inside of the trunk
I have no idea how this could be done, the small hole behind the license plate doesnt seems to go anywhere
Unfortunately your picture doesnt show this part of the job
Could you give me more details about that, I am kind of stuck at this point
Thanks !
Forum Regular
Joined: Jan 2015
Posts: 346
Likes: 0
From: Greensboro NC
I am not sure but I don't think he will see this. His last log in is (Last Activity: 08-12-2011 04:36 PM). I am sure someone else can probably help though.
Administrator / Senior Member / Retired
Joined: Jul 2007
Posts: 18,129
Likes: 1,612
From: Aurora , ILL
Ya this is a pretty old thread
and oddly enough he sold that car only a few weeks after installing that camera and hasn't been back here since

Clean 2005 Alabaster Limited Coupe, under 40K miles
Joined: Dec 2013
Posts: 86
Likes: 0
From: Oregon
Oh thats too bad
I also posted the question on facebook. For now I have no clue how to do that
So if anyone here have any information I would appreciated
I also posted the question on facebook. For now I have no clue how to do that
So if anyone here have any information I would appreciated
Senior Member
Joined: Dec 2008
Posts: 1,396
Likes: 1
From: Apple Valley, MN
I ran the wire up under the weather strip on the trunklid. Ran the wires to the viewer under the door sills. Fished the connections to the tail lights through the panel in the hatch and works like a champ for the last 3 years .

Thread
Thread Starter
Forum
Replies
Last Post
LE Cross
Interior
31
Oct 17, 2016 06:35 AM
MAXIMUM
Cars For Sale - Archive
7
Aug 4, 2015 11:04 PM
xfireon20z
Parts/Accessories for sale - Archive
3
Jul 20, 2015 04:35 PM
Currently Active Users Viewing This Thread: 1 (0 members and 1 guests)