

I found the problem! Pics inside


Thread Starter
|
Forum Regular

Joined: Dec 2009
Posts: 816
Likes: 11
From: Schaumburg, IL
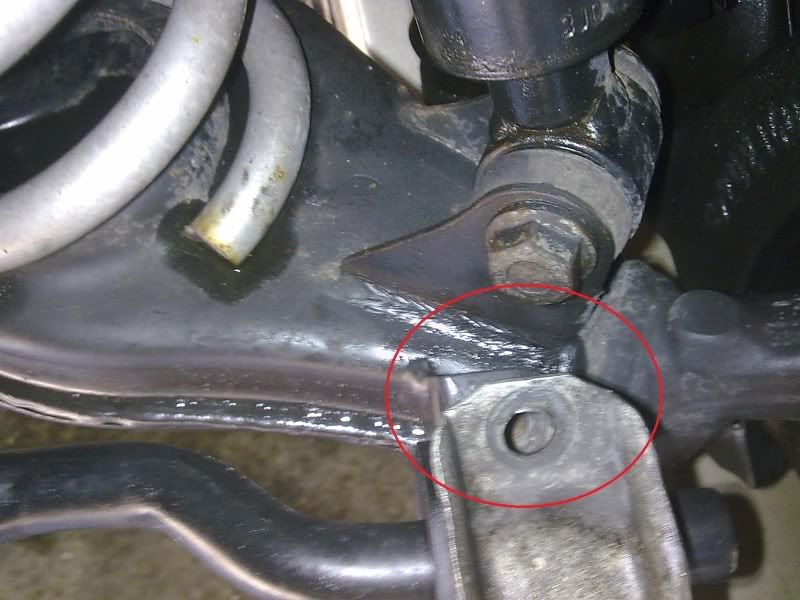
Well, if you remember a while back i posted a thread with a video about a clung from the front driver side wheel area? as suspected, i broke something. I knew it right after i hit that huge bump on the highway, it was brutal!
the clamp which holds swaybar tight has 2 bolts and one of them snapped. swaybar is slightly loose. I need to get a bolt ASAP to replace it but not sure where can I get that bolt. it appeared to be something special. Any help?
Here are the pics:
Image019.jpg
Image014.jpg
P.S. while I was at it, i put on a new steering stabilizer. and damn it made the steering wheel very tight. Mine was shot and i didnt even know it. it was greasy and wayyyy too easy to push it in and out.
Senior Member
Joined: Feb 2008
Posts: 1,430
Likes: 0
From: Atlanta, GA
its actually a stud that is in the lower control arm, not a bolt. However a bolt would replace the missing stud.
If you do want to replace it with a stud, the best way to do it is to take the nut off, goto home depot or lowes and figure out what thread pitch and diameter it is ( i dont remember off the top of my head) then order a stud of the same type
If you do want to replace it with a stud, the best way to do it is to take the nut off, goto home depot or lowes and figure out what thread pitch and diameter it is ( i dont remember off the top of my head) then order a stud of the same type
Senior Member
Joined: Feb 2008
Posts: 1,430
Likes: 0
From: Atlanta, GA
It's a common problem, I have an 07 with 32k on it and mine appears to have started leaking, so thats the next thing I'll do. Although I might look at a non-stock upgrade to avoid the problem again.
Thread Starter
|
Forum Regular
Joined: Dec 2009
Posts: 816
Likes: 11
From: Schaumburg, IL
Thanks guys!! How do I get the stud out? I don't think I have enough room to hammer it out.
I am glad to know it was nothing serious
I replaced mine when everything was working just fine. i didnt have any problem with my steering wheel at all. I just simply read a thread here and bought it. It was only 28 bucks shipped. The steering wheel did get a lot tighter.
I am glad to know it was nothing serious
Originally Posted by Ed Mahoney
how many miles on your ride ???? That you needed to replace steering stabilizer bar ???? Maybe mine needs it !!!
Senior Member
Joined: Apr 2006
Posts: 25,432
Likes: 648
From: Ontario
Originally Posted by Infinite
its actually a stud that is in the lower control arm, not a bolt. However a bolt would replace the missing stud.
If you do want to replace it with a stud, the best way to do it is to take the nut off, goto home depot or lowes and figure out what thread pitch and diameter it is ( i dont remember off the top of my head) then order a stud of the same type
If you do want to replace it with a stud, the best way to do it is to take the nut off, goto home depot or lowes and figure out what thread pitch and diameter it is ( i dont remember off the top of my head) then order a stud of the same type
Senior Member
Joined: Jan 2009
Posts: 6,285
Likes: 5
From: Carmel, In.
Muscle, thanks for posting this, as I tend to hit potholes a little harder with the even lower profile tires I have, I think I nay replace these bolts ahead of time to ensure no shearing takes place.
When you figure out what it takes to replace, will you kindly post the info. TIA
When you figure out what it takes to replace, will you kindly post the info. TIA
Life is random...so am I.
Joined: Apr 2007
Posts: 3,433
Likes: 2

If we had a pic of the head of the stud we'd be much better equipped to give advice on removal.
It could be put in one of 4 ways:
1. Rusted in place.....basically just pushed in by hand and then torqued. You might get lucky with some WD-40 and a hammer.
2. Press fit....it is pushed into the part by means of a press. Much harder to get out and will require a bit of force.
3. Interference fit.....it was installed with one part hot and the other cold...when the temperatures return to normal the parts expand to make the stud fit tightly in place. Again. it could require considerable force to try to remove.
4. Projection welded....There are small projections on the bottom of the stud that are resisitively welded to the part. Another way of saying it's gonna require a good deal of force to remove what's left of the stud.
Senior Member
Joined: Jan 2008
Posts: 5,180
Likes: 13
From: North Plains, OR
It also looks like it is mounted on a welded on tab with no clearance behind it... you may not be able to get behind it to put in a new stud or bolt..... I didnt look that closely at mine when I was doing the springs last week...
You might have to have a stud welded on.....
You might have to have a stud welded on.....
Thread Starter
|
Forum Regular
Joined: Dec 2009
Posts: 816
Likes: 11
From: Schaumburg, IL
Originally Posted by MikeR
It also looks like it is mounted on a welded on tab with no clearance behind it... you may not be able to get behind it to put in a new stud or bolt..... I didnt look that closely at mine when I was doing the springs last week...
You might have to have a stud welded on.....
You might have to have a stud welded on.....
It did not look like it was welded in. It looked like it was pressed by a tool permanently. Not in any shape for any tool to remove it basically. Just like wheel studs, you gotta hammer it to get out. That is how it looked to me but I am not sure.
Boilerupxfire, you are welcome. I will for sure post anything new to this thread.
I only hit that bump twice and this happened. I am thinking it is not really that strong so yea maybe replacing yours is indeed a good idea. It is at a piece of cake location by the way so not a hard job (Unless the studs are stuck or welded)
Senior Member
Joined: Apr 2006
Posts: 25,432
Likes: 648
From: Ontario
[quote=apkano]
3. Interference fit.....it was installed with one part hot and the other cold...when the temperatures return to normal the parts expand to make the stud fit tightly in place. Again. it could require considerable force to try to remove.
quote]
You mean shrink. I assume when you say cold you mean room temperature. This is a car part and not the space shuttle so it would be just pressed in, if it is tight that is.
I would say its welded in place as the material is too thin for a workable press fit so it would turn when the nut was tightened.
Looks like it will have to be drilled out.
Last edited by onehundred80; May 5, 2010 at 01:08 PM.
Life is random...so am I.
Joined: Apr 2007
Posts: 3,433
Likes: 2
Originally Posted by onehundred80
3. Interference fit.....it was installed with one part hot and the other cold...when the temperatures return to normal the parts expand to make the stud fit tightly in place. Again. it could require considerable force to try to remove.
quote]
You mean shrink. I assume when you say cold you mean room temperature. This is a car part and not the space shuttle so it would be just pressed in, if it is tight that is.
I would say its welded in place as the material is too thin for a workable press fit so it would turn when the nut was tightened.
Looks like it will have to be drilled out.
I only spend about 250 days a year on the road as a consultant to the automotive industry. You'd be surprised what the OEM's are doing to shave a few pounds or speed up a process.
If the plate has a taper in the I.D. of the hole and the parts are assembled cold, when they heat up and expand they become a pretty permanent interference fit. Asian automakers are fond of this method.
Senior Member
Joined: Apr 2006
Posts: 25,432
Likes: 648
From: Ontario
Originally Posted by apkano
No, actually I meant what I typed.
I only spend about 250 days a year on the road as a consultant to the automotive industry. You'd be surprised what the OEM's are doing to shave a few pounds or speed up a process.
If the plate has a taper in the I.D. of the hole and the parts are assembled cold, when they heat up and expand they become a pretty permanent interference fit. Asian automakers are fond of this method.
Time is money so it is quicker to spot weld the large head of the headed stud. The head is not flat, so it would indicate to me that the small contact area of the head resistance welds to its mating part.
Heating and cooling parts take time, time to heat and time to cool, each of these processes take power which also costs money. If the parts are handled manually special precautions have to be taken.
The female part is quite thin, .06 - .08 and a band of an interference fit in this takes no effort to turn the bolt, as the steel will crush under the load and mushroom effectively reducing the grip.
On thick parts the interference can be minimal, and heat can be applied to reduce any dimensional interference at room temperature to a negative number when heated. On thin parts it just does not work the same as noted above, even more so on small diameter parts.
This part has to take the force of turning a nut on and off. The torque of turning a rusted nut is often greater than the torque specs to install it. In this case the stud broke as it was probably over tightened some time.
Heating the part 250�F. (to 320�F.) would result in an expansion of, .00000633 x .316 x 250 = .0005.
This is hardly a good tight fit and to get that the part would have to be exactly the same size as the hole to start and it would be a light press fit at that - size to size. Cooling the stud to achieve that shrinkage would involve cooling it down to room temperature 70�F - 250�F = -180�F which is hard to do and would gain a poor interference fit anyway - .001.
Life is random...so am I.
Joined: Apr 2007
Posts: 3,433
Likes: 2
Originally Posted by onehundred80
If the parts are both cold then they will maintain the same size difference hot or cold. To achieve any useful change in the sizes the part with the hole is heated and the stud cooled.
Time is money so it is quicker to spot weld the large head of the headed stud. The head is not flat, so it would indicate to me that the small contact area of the head resistance welds to its mating part.
Time is money so it is quicker to spot weld the large head of the headed stud. The head is not flat, so it would indicate to me that the small contact area of the head resistance welds to its mating part.
To use a PRW method on any application you have to account for the entire weld cycle. This involves bringing the parts into tooling, closing the gun, applying a set force, waiting for a set hold time, possibly applying a post-weld heat treat (if it's a hardened part, ie. group 3 or 4 steels), waiting for a 2nd hold time, opening the gun, and then finally removing the part. Compare that to an automated line where many parts are cooled at the same time through a moving helical line and are brought together with their female companion part (not cooled) and placed together on a rotating table where the parts never stop moving. BAW, Shuanghuan, Quingling, and Hafei all have been doing this for many years.
Originally Posted by onehundred80
Heating and cooling parts take time, time to heat and time to cool, each of these processes take power which also costs money. If the parts are handled manually special precautions have to be taken.
Are you aware of the power requirements for a typical 150KVA MFDC transformer.
Originally Posted by onehundred80
The female part is quite thin, .06 - .08 and a band of an interference fit in this takes no effort to turn the bolt, as the steel will crush under the load and mushroom effectively reducing the grip.
Typical Projection welds are not a weld at all. If you look closely at a prepared metallurgical sample of a projection weld you'd see no mixing of parent metals. Just about every projection weld is basically a solid-state bond. Projection welds are NEVER meant to be anything more than a holder for a fastener to be used in compression. Projection welds in the automotive industry are strictly used to aid in the assembly process. If that bracket is a hot-stamped AHSS group 3 or 4 material it can have a substantial amount of strength. Even if it's a relatively mild DP980 it's over 900MPa Tensile. If it's Martensitic it could be up to or more than 1600MPa tensile. I suppose I could find out, but I don't want to remove my lower control arm just to put it in my microhardness machine.
Originally Posted by onehundred80
On thick parts the interference can be minimal, and heat can be applied to reduce any dimensional interference at room temperature to a negative number when heated. On thin parts it just does not work the same as noted above, even more so on small diameter parts.
I fail to follow this. On thicker parts the surface area is much larger, allowing a substantial amount greater force to be applied.
Originally Posted by onehundred80
This part has to take the force of turning a nut on and off. The torque of turning a rusted nut is often greater than the torque specs to install it. In this case the stud broke as it was probably over tightened some time.
Actually, I'm more than positive the engineers that designed this part only intended for it to be fastened one time. I've dealt with thousands of automotive engineers over the years in this industry and have yet to find one who takes special precautions to make it easy to work or repair anything on a vehicle. Moreover, if ease of repair was what was on their mind then there's even more reason not to weld it. Once the weld is broken there's a substantial weakening of the structure with the loss of parent metal, and heat-cracking and metal embrittlement through the heat-affected zone. In this case I'm fairly sure the stud broke from exactly what the OP stated...... hitting a huge pothole.....twice.
Originally Posted by onehundred80
Heating the part 250�F. (to 320�F.) would result in an expansion of, .00000633 x .316 x 250 = .0005.
Originally Posted by onehundred80
This is hardly a good tight fit and to get that the part would have to be exactly the same size as the hole to start and it would be a light press fit at that - size to size. Cooling the stud to achieve that shrinkage would involve cooling it down to room temperature 70�F - 250�F = -180�F which is hard to do and would gain a poor interference fit anyway - .001.
Senior Member
Joined: Jul 2008
Posts: 4,525
Likes: 29
From: Puerto Rico
Musclefan21, you need to take a drill and some bits, a strong punch and heavy hammer, a propane torch, grade 8 bolt and nut and figure it out. It can't be worse than a ball joint that's riveted in that has to be replaced. I've had the bracket apart several times but can't say how the stud is inserted. From the lightweight stamped metal that surrounds the rubber on the sway bar I doubt it will cause you too much trouble. I'll most likely have the front of my car apart AGAIN this weekend and if you haven't solved your problem by then I'll take a real good look at it.
Les
Les
Senior Member
Joined: Apr 2006
Posts: 25,432
Likes: 648
From: Ontario
My point is that shrink fits are not good when using this thickness of material.
If not welded then staking is another option.

If not welded then staking is another option.

Last edited by onehundred80; May 5, 2010 at 08:15 PM.
Originally Posted by Musclefan21

BTW - look like your leaking some type of fluid around your springs....
Thread Starter
|
Forum Regular
Joined: Dec 2009
Posts: 816
Likes: 11
From: Schaumburg, IL
Originally Posted by BrianBrave
Drill it out and replace with a Grade 8 nut & bolt
BTW - look like your leaking some type of fluid around your springs....
BTW - look like your leaking some type of fluid around your springs....
the fluid is oil, when i removed the oil filter, it leaked a bit.

Thread
Thread Starter
Forum
Replies
Last Post
oldvintagedude
Troubleshooting & Technical Questions & Modifications
3
Aug 14, 2015 06:20 AM
tom2112
Parts/Accessories for sale - Archive
7
Jul 28, 2015 08:12 AM
Currently Active Users Viewing This Thread: 1 (0 members and 1 guests)