
How To - Super Cooler Install

Thread Starter
|
Senior Member
Joined: Aug 2008
Posts: 5,741
Likes: 98
From: Sierra Vista, Arizona

How to Super Cooler Install
With warmer weather upon us some of you may be thinking of installing a Super Cooler (SC).
FACTS:
Stock Heat Exchanger (HE) holds only 2 cups of coolant
The SC holds 8 cups
Stock HE full weighs 3.2lbs
The SC full weighs 10.6lbs
Stock cooling area measures 22x4.5x1.6 - 158.4 cu in
SC cooling area measures 20.5x16x1.4 - 459.2 cu in
So it’s going to cost you about 7 pounds of weight to gain four times as much cooling capacity and nearly three times the cooling area. Oh, so now you want to do it! Well let’s get started!
PARTS LIST
Super Cooler
Various hose clamps
Hose plugging stuff
5/8” hose
Zip Ties
TOOLS
Jack
Jack Stands
�” Ratchet
Couple of Extensions
8mm, 10mm socket
T25, T30 Star Bits
Drill with � bit
Screw Driver
Funnel
Knife
PROCESS
1. Safely and securely jack up the front of your car.
2. Open hood
3. Remove X4, 8mm bolts from the top of the grill and pull grill off. (just the four inside bolts)

4. Remove the plastic splash shield under the engine X5, 8mm bolts and a plastic rivet.
5. Remove plastic nuts, 10mm, and plastic screws, T25, from the front fender well inner liners. (Think its 4 nuts and 3 screws on driver side. 2 nuts and 3 screws on the passenger side). Take out liners.
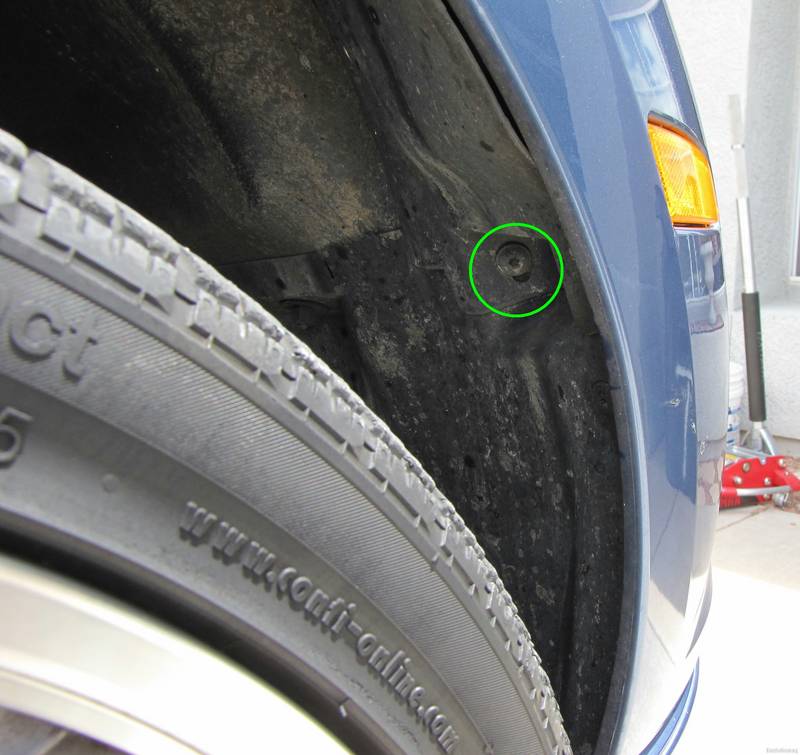
6. Remove X2, 10mm nuts from the front lower center of the bumper. (circled in green)
7. Pull the outside temperature sensor off of the bumper.(circled in yellow)

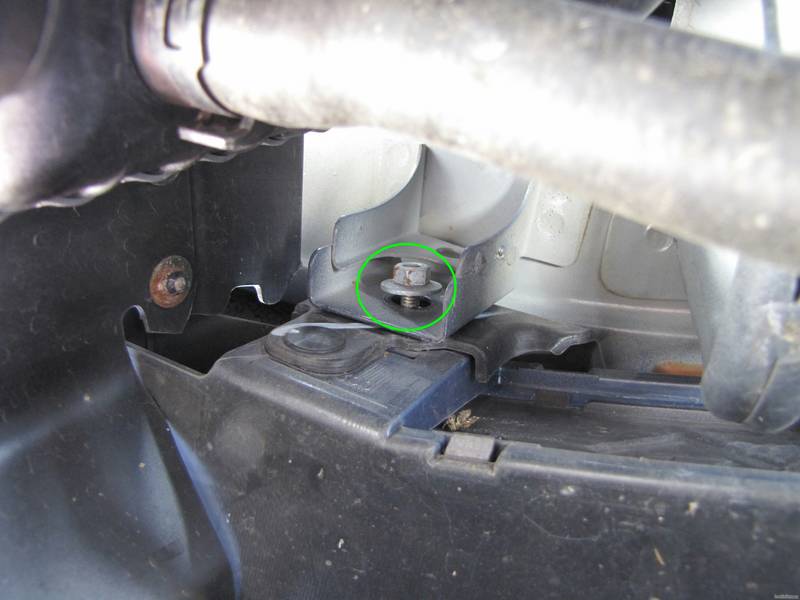
8. On both the drivers and passenger inside upper fender area remove one 10mm bolt and nut. (circled in green)
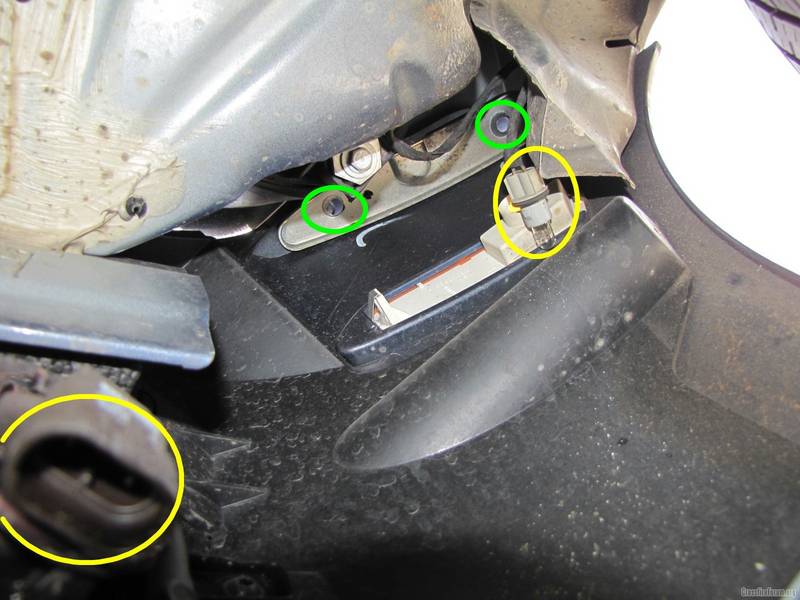
9. Disconnect X2 fog lights. (circled in yellow)
10. Disconnect X2 side marker lights. (circled in yellow)

11. Back on top remove X2, T30 bolts. The bumper is free!

Stock Heat Exchanger (HE) Removal and Super Cooler Install
1. Remove 10mm bolt from left and right side of the stock HE. (circled in green)
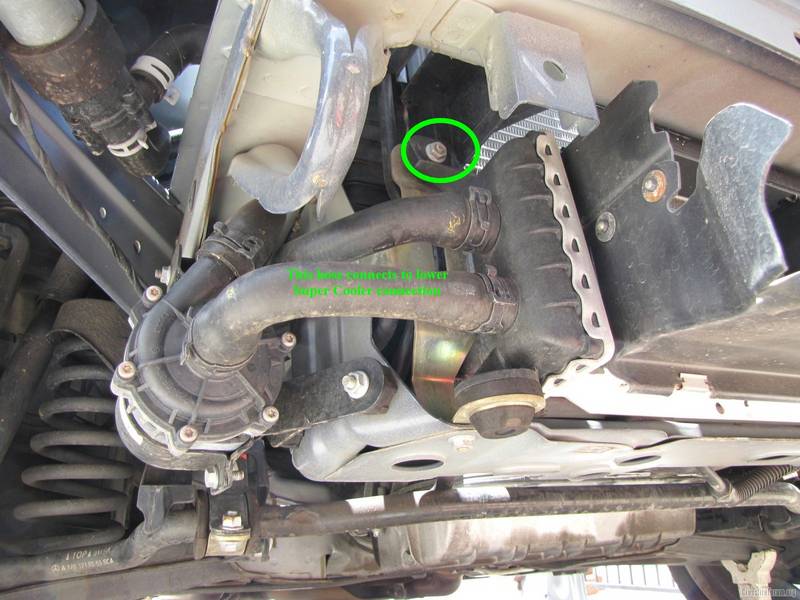

The area in yellow is where you can relocate your horns if you desire.
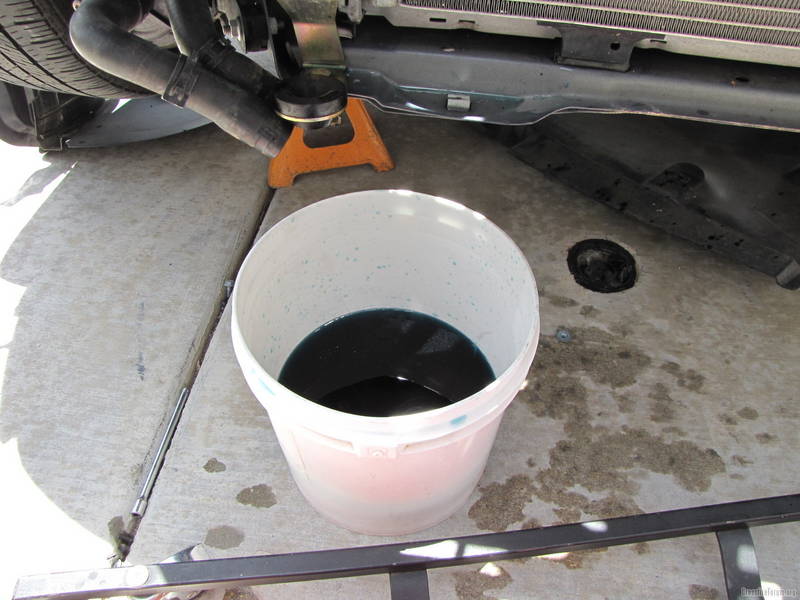
2. Remove hoses from HE and drain.
Last edited by tighed1; Jun 19, 2009 at 09:29 PM.
Thread Starter
|
Senior Member
Joined: Aug 2008
Posts: 5,741
Likes: 98
From: Sierra Vista, Arizona
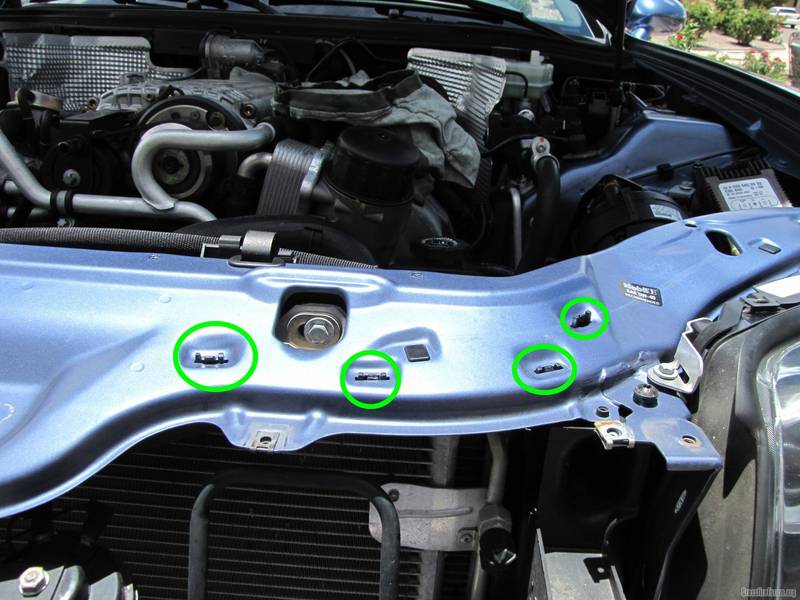
3. Next you will remove the plastic guard for the hood release cable. Pry off the two plastic caps. Push the tabs so that the guard can be pushed down.

Continue pushing the remaining tabs until the guard is free.
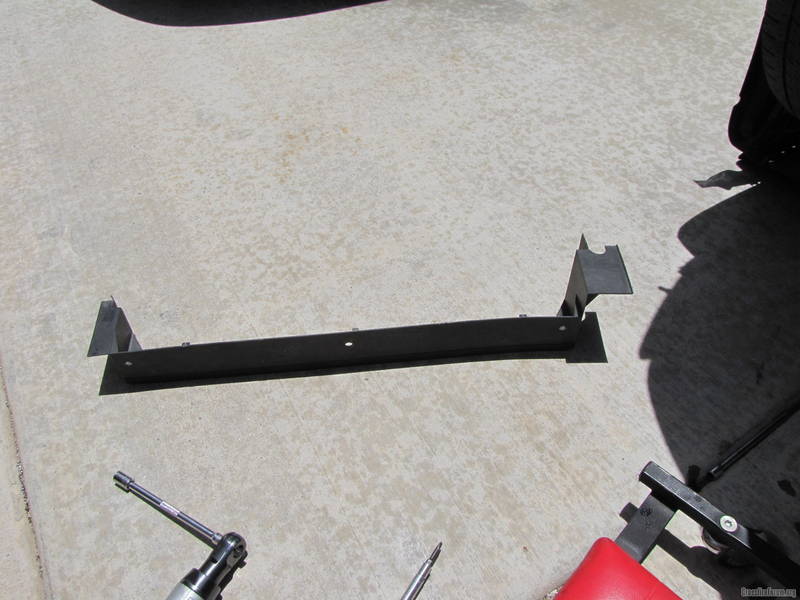
4. Remove this piece by releasing the plastic rivets that hold it in place. It is located between the steel bumper and the AC condenser (look below the horns).
5. You are now ready to test fit the SC. Carefully insert the SC into the area once occupied by the stock HE. Position the left lower corner of the SC on the rubber bumper that the stock HE rested on. Pay attention to the position of the SC filling cap. You want to position it so you can put the cap on/off as needed. If you have a single flow SC you will want to loosely zip tie the bottom two tabs at this time and skip to step 7.
Once the SC is in position rub the mounting tabs against the existing stock HE mounting bolts. This will mark the location that you need to drill �� holes.

6. Remove SC and drill the holes. Reinstall SC and pass the bolts through the SC tabs. Use the stock nuts to hold (not tight yet) the SC in place.


7. Connect the hose located on the front of the electric water pump to the lower connection of the SC.
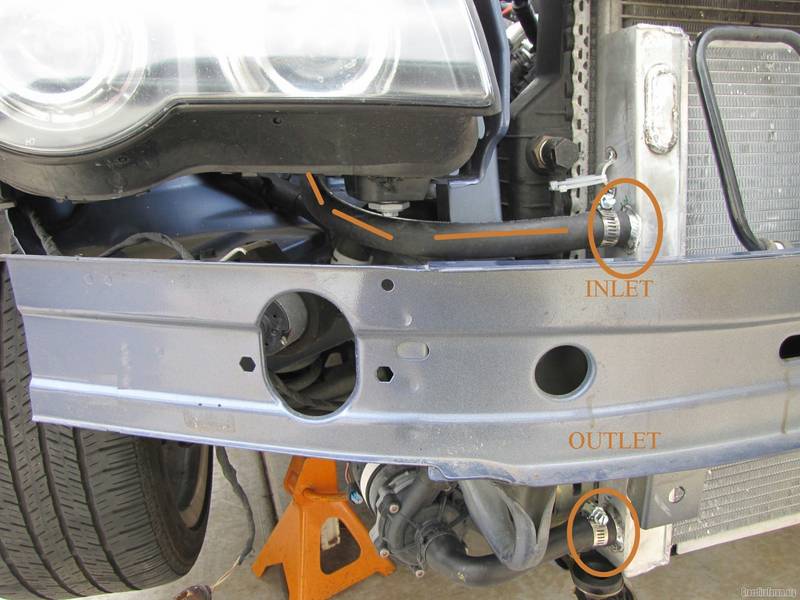
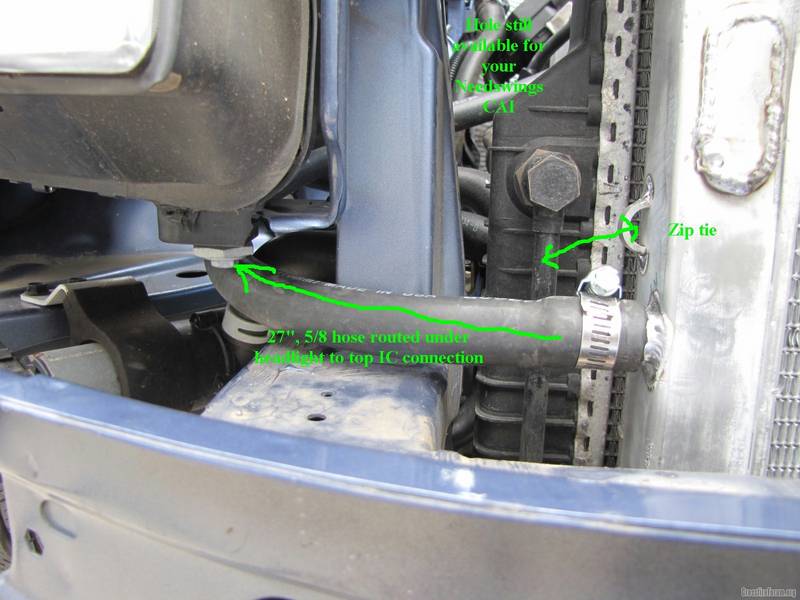
8. On a Dual Flow SC you will connect a 27� length of 5/8� hose between the upper SC connection and the top Intercooler connection (yellow). Be sure to route the hose under the headlight so you keep the air intake area unobstructed for your air intake. On a single flow SC connect the driver�s side SC connection to the top Intercooler connection (yellow).
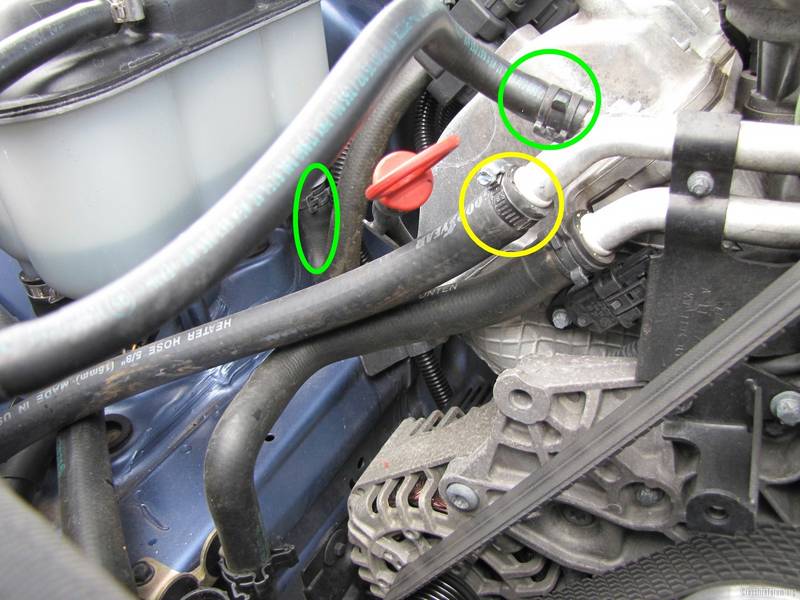
9. In the above picture note the hose circled in green on the left. You want to plug this hose. I cut it a few inches from the coolant tank and plugged it with a piece of solid rod and secured it with a hose clamp.
10. Here you separate and plug the hoses circled in yellow. I used small bolts and hose clamps.
11. Now it�s time to fill your SC. Pull the top of the SC forward so you can access the fill neck. Fill it! I reused the coolant that was drained and added plain water to complete the fill. I also used a spare battery and wires with alligator clip to power the electric water pump to move coolant. I suggest you find a way to power the pump also to eliminate air pockets. Be sure to top off your engine coolant tank also.
12. Almost done! Once SC is full, cap it. Grab a couple of zip ties and secure the top left and right of the SC to existing points on the car. Now put it all back together. Yer DONE!
Continue pushing the remaining tabs until the guard is free.
4. Remove this piece by releasing the plastic rivets that hold it in place. It is located between the steel bumper and the AC condenser (look below the horns).
5. You are now ready to test fit the SC. Carefully insert the SC into the area once occupied by the stock HE. Position the left lower corner of the SC on the rubber bumper that the stock HE rested on. Pay attention to the position of the SC filling cap. You want to position it so you can put the cap on/off as needed. If you have a single flow SC you will want to loosely zip tie the bottom two tabs at this time and skip to step 7.
Once the SC is in position rub the mounting tabs against the existing stock HE mounting bolts. This will mark the location that you need to drill �� holes.
6. Remove SC and drill the holes. Reinstall SC and pass the bolts through the SC tabs. Use the stock nuts to hold (not tight yet) the SC in place.
7. Connect the hose located on the front of the electric water pump to the lower connection of the SC.
8. On a Dual Flow SC you will connect a 27� length of 5/8� hose between the upper SC connection and the top Intercooler connection (yellow). Be sure to route the hose under the headlight so you keep the air intake area unobstructed for your air intake. On a single flow SC connect the driver�s side SC connection to the top Intercooler connection (yellow).
9. In the above picture note the hose circled in green on the left. You want to plug this hose. I cut it a few inches from the coolant tank and plugged it with a piece of solid rod and secured it with a hose clamp.
10. Here you separate and plug the hoses circled in yellow. I used small bolts and hose clamps.
11. Now it�s time to fill your SC. Pull the top of the SC forward so you can access the fill neck. Fill it! I reused the coolant that was drained and added plain water to complete the fill. I also used a spare battery and wires with alligator clip to power the electric water pump to move coolant. I suggest you find a way to power the pump also to eliminate air pockets. Be sure to top off your engine coolant tank also.
12. Almost done! Once SC is full, cap it. Grab a couple of zip ties and secure the top left and right of the SC to existing points on the car. Now put it all back together. Yer DONE!
Senior Member
Joined: Jul 2008
Posts: 4,525
Likes: 29
From: Puerto Rico
It looks so easy I may be tempted to buy one and hook it up myself. How does it work with the stock pump? I may need to do this in the future. The water temps at the last track day were over boiling point.
Les
Les
Thread Starter
|
Senior Member
Joined: Aug 2008
Posts: 5,741
Likes: 98
From: Sierra Vista, Arizona
Working fine with the stock pump on my roadster with temp in the 90's and me driving like a mad man!
With the Johnson pump on my coupe you could notice the coolant flowing better than you can with the stock pump.
With the cooling systems separated it seems either pump will work just fine.
With the Johnson pump on my coupe you could notice the coolant flowing better than you can with the stock pump.
With the cooling systems separated it seems either pump will work just fine.
Thread Starter
|
Senior Member
Joined: Aug 2008
Posts: 5,741
Likes: 98
From: Sierra Vista, Arizona
Originally Posted by manisusmc
just wondering did you do any work for the people that make the Haynes repair manuals because what a great write-up for the DIYfer
Now wait a minute, that WAS a complement wasn't it????
Joined: Dec 2006
Posts: 55
Likes: 0
From: Munich, Germany
Originally Posted by manisusmc
just wondering did you do any work for the people that make the Haynes repair manuals because what a great write-up for the DIYfer
Forum Regular
Joined: Dec 2007
Posts: 696
Likes: 1
From: Spartanburg,S.C.
Originally Posted by tighed1
LOL! Nope! Just trying to do what I can for all of the great folks here on Crossfireforum.org!
Now wait a minute, that WAS a complement wasn't it????
Now wait a minute, that WAS a complement wasn't it????
")
Thread Starter
|
Senior Member
Joined: Aug 2008
Posts: 5,741
Likes: 98
From: Sierra Vista, Arizona
F.Y.I.
Just un-installed a super cooler WITHOUT removing the front bumper!
Looks as though it can also be installed WITHOUT removing the bumper!
I'll have to try on my next install. Will let ya know.
I'm soooo excited!
Just un-installed a super cooler WITHOUT removing the front bumper!
Looks as though it can also be installed WITHOUT removing the bumper!
I'll have to try on my next install. Will let ya know.
I'm soooo excited!
Thread Starter
|
Senior Member
Joined: Aug 2008
Posts: 5,741
Likes: 98
From: Sierra Vista, Arizona
Working on a "How To Always on Electric Coolant Pump SRT" write up.
It's a logical mod to make after you have installed a Super Cooler.
Stay Tuned!
It's a logical mod to make after you have installed a Super Cooler.
Stay Tuned!

Thread Starter
|
Senior Member
Joined: Aug 2008
Posts: 5,741
Likes: 98
From: Sierra Vista, Arizona
Originally Posted by tighed1
Working on a "How To Always on Electric Coolant Pump SRT" write up.
It's a logical mod to make after you have installed a Super Cooler.
Stay Tuned!
It's a logical mod to make after you have installed a Super Cooler.
Stay Tuned!
"How To Always on Electric Coolant Pump SRT" write up.
Can be found here...LINKY
Forum Regular
Joined: May 2010
Posts: 488
Likes: 5
From: Austin, TX
Did you ever find out if it is reasonable to install the supercooler without removing the bumper?

Thread
Thread Starter
Forum
Replies
Last Post
2005 Ragtop
Wheels, Brakes, Tires and Suspension
7
Oct 3, 2015 03:01 PM
Currently Active Users Viewing This Thread: 1 (0 members and 1 guests)