
Installing Rear Camber arms

Thread Starter
|
Forum Regular
Joined: Aug 2011
Posts: 595
Likes: 0
From: Reno, NV
I am sorry if it exist and is easy to find but I have been trying different searches for about a week now and can not find a DIY install of the camber arms. Is it just that easy? I will be switching mine out next weekend and was hoping to read over a DIY step by step before starting the install.
So if there is one could you please point me towards it! Thanks forum!
So if there is one could you please point me towards it! Thanks forum!
Senior Member
Joined: Jan 2008
Posts: 2,008
Likes: 2
From: Long Island, NY
Originally Posted by frankeyser
I am sorry if it exist and is easy to find but I have been trying different searches for about a week now and can not find a DIY install of the camber arms. Is it just that easy? I will be switching mine out next weekend and was hoping to read over a DIY step by step before starting the install.
So if there is one could you please point me towards it! Thanks forum!
So if there is one could you please point me towards it! Thanks forum!
Thread Starter
|
Forum Regular
Joined: Aug 2011
Posts: 595
Likes: 0
From: Reno, NV
Originally Posted by downwardspiral
The old ones come out without removing the springs or anything else suspension related... They may pop out of place, so be prepared for that. I adjusted the new ones to the right length, then adjusted them again until the tire looked straight up when I put the tires back on.
Senior Member
Joined: May 2008
Posts: 10,434
Likes: 144
From: Cincinnati ( Delhi )
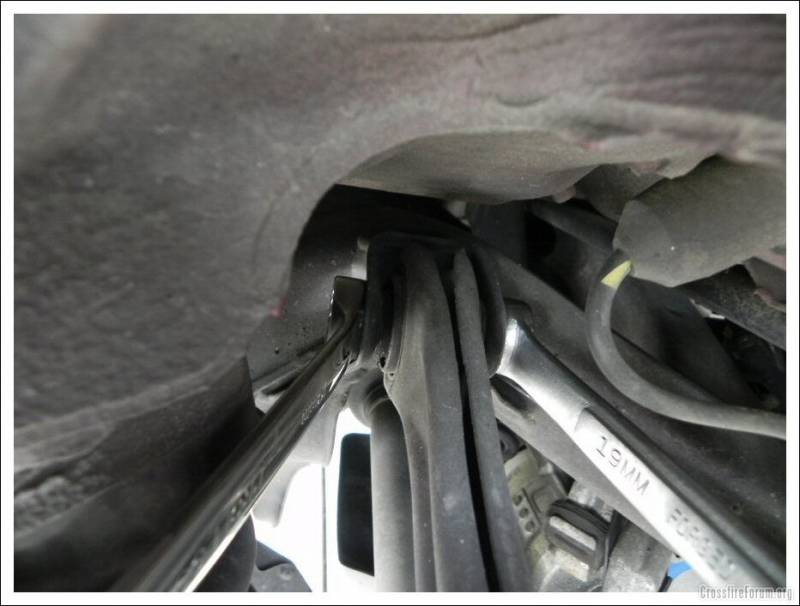
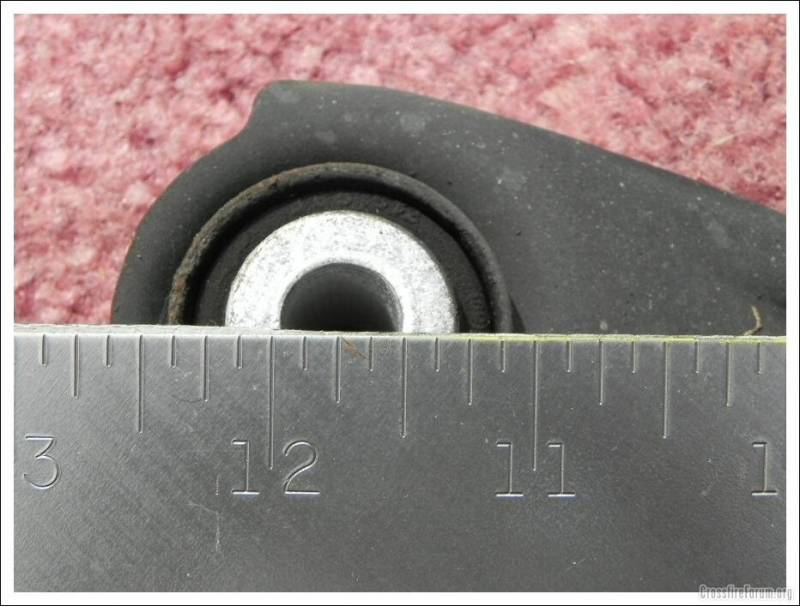
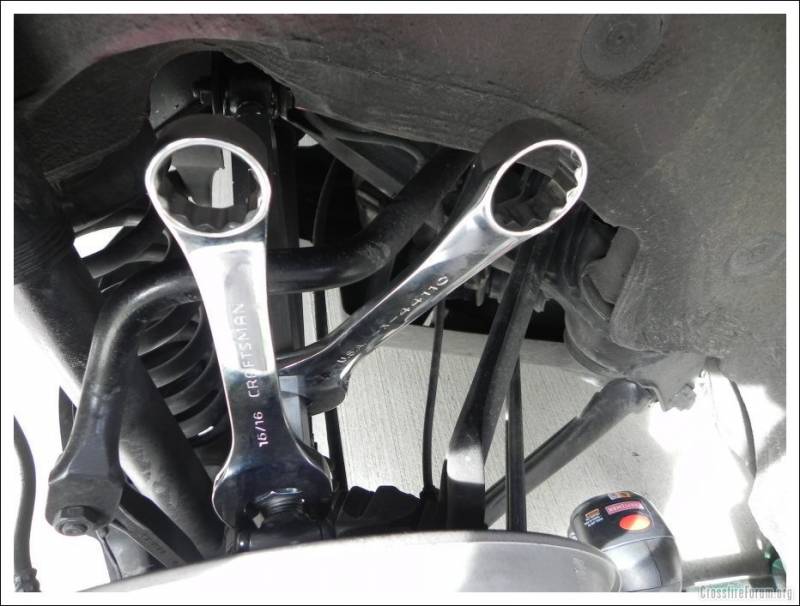
I understand you want a DIY post, but it is very easy. I found my best way to remove the inboard bolts was with two wrenches. When you remove the OEM arms, they will be 11�" OC.
Before installing adjustable arms, take them apart and apply anti-seize compound on the threads. Reassemble and run both ends in until they bottom out. Then equally turn them out until you get 12" OC. I slightly tightened the lock nuts before assembling so I wouldn't accidently move the adjustment. Once tight on the car, I locked down the nuts with the ends parallel to each other.
Using the 12" OC measurement, at first I thought it was too much when I got the car off the stands. After I drove it around the block, the wheels look as I want them. Using a framing square to the driveway, the wheels are still slightly tilted in, but not noticable to the eye. I will leave it alone until I get an alignment one day.
James
Senior Member
Joined: May 2008
Posts: 10,434
Likes: 144
From: Cincinnati ( Delhi )
I would make a DIY post, but then others would just want to tear holes in it. So with that, I will post the pics from when I did mine. Any more questions, just ask.


Senior Member
Joined: May 2008
Posts: 10,434
Likes: 144
From: Cincinnati ( Delhi )
Originally Posted by maxcichon
James,
which rod ends did you use? Shims? Let us all know!
which rod ends did you use? Shims? Let us all know!
James
Senior Member
Joined: Sep 2007
Posts: 8,015
Likes: 14
From: MOFN, AL, 70 miles from George

Originally Posted by James1549
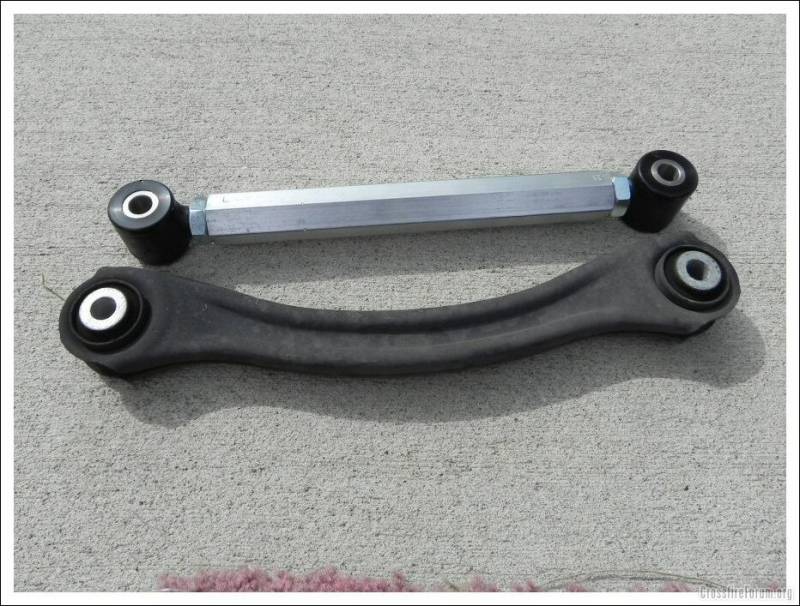
Max, I bought these from a member that sold his car before he had them installed. Its my understanding they came from the seller on MBWorld. About � price so I couldn't pass it up. No shims required, direct bolt on. The ends fit tight enough that you have to tap them in place to line up the center holes. Very nice fit.
James
James
Senior Member
Joined: Apr 2006
Posts: 25,432
Likes: 647
From: Ontario
Both my cars, hopefully soon to be one, exhibit too much wear on the inside edges. The wear is about 1/16" to 3/32" more than the outside. How much would the camber have to be reduced to counter this without making something else worse?
The OEM arm is bow shaped, what is it designed to miss? I could look but it is too cold to kneel and look under the car in the garage. I guess the straight arms could be bent when red hot without too much worry.
I never bothered much about alignment issues so I have no knowledge of it really.
The OEM arm is bow shaped, what is it designed to miss? I could look but it is too cold to kneel and look under the car in the garage. I guess the straight arms could be bent when red hot without too much worry.
I never bothered much about alignment issues so I have no knowledge of it really.
Senior Member
Joined: Jul 2011
Posts: 914
Likes: 3
From: Barrhaven, Ontario
Originally Posted by onehundred80
Both my cars, hopefully soon to be one, exhibit too much wear on the inside edges. The wear is about 1/16" to 3/32" more than the outside. How much would the camber have to be reduced to counter this without making something else worse?
The OEM arm is bow shaped, what is it designed to miss? I could look but it is too cold to kneel and look under the car in the garage. I guess the straight arms could be bent when red hot without too much worry.
I never bothered much about alignment issues so I have no knowledge of it really.
The OEM arm is bow shaped, what is it designed to miss? I could look but it is too cold to kneel and look under the car in the garage. I guess the straight arms could be bent when red hot without too much worry.
I never bothered much about alignment issues so I have no knowledge of it really.
Last edited by turbomar; Jan 19, 2012 at 08:56 PM.
Senior Member
Joined: Apr 2006
Posts: 25,432
Likes: 647
From: Ontario
Originally Posted by turbomar
The OEM links are 11.3/4" centers. You can start by setting the adjustable links to 12" centers. The OEM links curve around the sway bar. The straight ones come awfull close but if you lower the car by 1" or less, it will be fine. The fact that it is straight makes it much stronger and rigid.
Did you get the diodes?
Senior Member
Joined: Apr 2006
Posts: 25,432
Likes: 647
From: Ontario
Originally Posted by James1549
I would make a DIY post, but then others would just want to tear holes in it. So with that, I will post the pics from when I did mine. Any more questions, just ask.
Senior Member
Joined: Jul 2011
Posts: 914
Likes: 3
From: Barrhaven, Ontario
Originally Posted by onehundred80
I know about the strength, I'm not lowering but is a lowered car closer or farther away from the sway bar?
Did you get the diodes?
Did you get the diodes?
Senior Member
Joined: Apr 2009
Posts: 5,349
Likes: 4
From: murfreesboro,tn
lowering brings it closer. velociabstract had a pic thread showing his hitting during his track runs on a set he had. oem height and less than 1" drop should be fine
Senior Member
Joined: Jan 2008
Posts: 2,008
Likes: 2
From: Long Island, NY
Originally Posted by 32krazy!
lowering brings it closer. velociabstract had a pic thread showing his hitting during his track runs on a set he had. oem height and less than 1" drop should be fine
Senior Member
Joined: Apr 2006
Posts: 25,432
Likes: 647
From: Ontario
Originally Posted by downwardspiral
My home-made set hits the sway bar on the passenger side, and is starting to show signs of wear because of it. My current set is aluminum, but I will be making new bars out of 4140 alloy steel (roughly double the yield strength of stainless).

Senior Member
Joined: Jan 2008
Posts: 2,008
Likes: 2
From: Long Island, NY
Originally Posted by onehundred80
That makes perfect sense, it hits so make it harder.
"I never bothered much about alignment issues so I have no knowledge of it really."
What's your solution?
Hardness is resistance to penetration, yield strength is the amount of stress a material can take before permanent deformation occurs. I would rather break a sway bar mount which I can weld back on than snap an upper control arm. My current ones are hexaganol, the new ones will be round and will have more clearance.
If you are getting at making an adjustable arm that is curved, it will defeat the whole purpose of having it adjustable, it will need to be removed to change its length, and at that point might as well be fixed.


