
SL55 AMG V8 Intake Conversion

Thread Starter
|
<--- Huge Horsepower
]Last night I completed fitting and installing the SL55 intake system. Tonight I worked on fitting the SRT engine cover.
I purchased the whole assembly from Erick at LET MotorSports as part of an Airbox – Pulley – Iridium spark plug package. The Intake came to my door – with all the parts in OEM MB Boxes and the tamper seals in place.
Here is Erick’s website and contact info. He told me he was going to offer the intake kit at $320 but I don’t see it listed yet, so you should call Erick direct.
http://www.letmotorsports.com
First off let me say that this conversion does wonders for the car. I ran it hard last night and right from start up it sounded awesome and acceleration from standing still to WOT was tremendous. This conversion will provide all the intake air your SRT will ever need and still retain the stock look. You could add two K&N filters but I think the stock filters allow you to pull all the air that this engine can use.
There are already a few write-ups on the Y-pipe by Shawn, Simon and Steve so you can read their posts if you have not done so already.
Part # 113 090 01 29 - Y-Pipe with hoses
Part # 113 090 06 01 – Right side airbox with filter
Part # 113 094 16 82 – Right side intake tube (to radiator support)
Part # 113 090 05 01 – Left side airbox with filter
Part # 113 094 17 82 – Left side intake tube (to radiator supprt)
The boxes are huge and when looking through the opening you can see much more of the filter then the stock box. The intake tubes are huge – I could fit my whole arm in one and could not get my hand past the knuckles in the stock tube. Bigger is the best description. Easy mod is the second. Great look is the third. Low price is the forth.
After installing the Y-pipe I fitted the airboxes using the stock mount locations on the boxes and engine and noticed that the boxes did not reach the Y-pipe hoses. I thought about it for a bit, then removed the clips from the air boxes and just fitted the boxes into the Y-Pipe hoses to see where I was at. This moved the boxes back 1-1/2 inches and the two inner screws (toward the SC) that hold the top cover on fit nicely between the two slots of the intake manifold. (see Pic) I decided this was going to be the proper location. I could see that the engine cover would fit better with the boxes located here. You can see a tie-wrap in the pic that was used to secure the mock up while I measured. It was not used on the final fitting.

So I drilled a hole 1-1/2” forward and inline from the original rear clip location on the bottom of the airbox (both boxes), used a shim under the clip to keep the clip a stock height (easy to eye-ball) and to keep the boxes off the valve covers. Secured the clip to the box with a 10-32 bolt and lock nut (with the nut inside the airbox) - the boxes mounted and fit great. Very easy job.
I then made two brackets for the front clips now that the engine mount location is now 1-1/2" in front of the box. I had some straight brackets lying around from my barn building days that were the same width as the clips and was a nice fit. Measured and cut to length and then drilled two holes where the clip mounted onto the airbox and assembled (see pic) (same for other box).

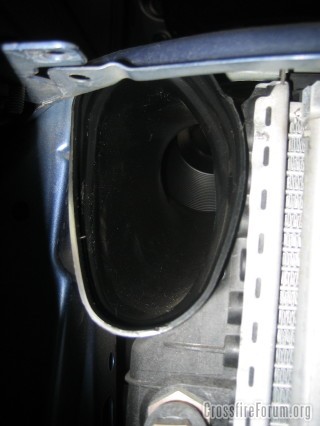
Now the air boxes are firmly secured in place and attached to the Y-pipe. I removed the stock SRT plastic radiator intake fittings (both sides) and fit the right side intake tube through the opening (See Pic) perfect fit – no trimming required and slid the other end into the airbox. Done Deal.
Went to the left side and the discovered that the radiator support opening is a bit smaller due to the radiator hose – so I trimmed the tube back and made the mistake of making a straight trim. I should have notched it at an angle or perhaps heated it up and formed it to fit but the tubes are cheap and I will buy another and fit properly.
The more time consuming – but not too difficult part was fitting the engine cover. I used a dremel tool and made slots on both air boxes (where the front clips used to mount) for the ends of the cover but I need a spacer and longer screw for the center clip (the boxes are just a bit taller) and the hardware store is closed but from the pictures you will see that it will work and will look great.

Lots of pictures in my gallery and as always – if you have a question feel free to ask.
BB
I purchased the whole assembly from Erick at LET MotorSports as part of an Airbox – Pulley – Iridium spark plug package. The Intake came to my door – with all the parts in OEM MB Boxes and the tamper seals in place.
Here is Erick’s website and contact info. He told me he was going to offer the intake kit at $320 but I don’t see it listed yet, so you should call Erick direct.
http://www.letmotorsports.com
First off let me say that this conversion does wonders for the car. I ran it hard last night and right from start up it sounded awesome and acceleration from standing still to WOT was tremendous. This conversion will provide all the intake air your SRT will ever need and still retain the stock look. You could add two K&N filters but I think the stock filters allow you to pull all the air that this engine can use.
There are already a few write-ups on the Y-pipe by Shawn, Simon and Steve so you can read their posts if you have not done so already.
Part # 113 090 01 29 - Y-Pipe with hoses
Part # 113 090 06 01 – Right side airbox with filter
Part # 113 094 16 82 – Right side intake tube (to radiator support)
Part # 113 090 05 01 – Left side airbox with filter
Part # 113 094 17 82 – Left side intake tube (to radiator supprt)
The boxes are huge and when looking through the opening you can see much more of the filter then the stock box. The intake tubes are huge – I could fit my whole arm in one and could not get my hand past the knuckles in the stock tube. Bigger is the best description. Easy mod is the second. Great look is the third. Low price is the forth.
After installing the Y-pipe I fitted the airboxes using the stock mount locations on the boxes and engine and noticed that the boxes did not reach the Y-pipe hoses. I thought about it for a bit, then removed the clips from the air boxes and just fitted the boxes into the Y-Pipe hoses to see where I was at. This moved the boxes back 1-1/2 inches and the two inner screws (toward the SC) that hold the top cover on fit nicely between the two slots of the intake manifold. (see Pic) I decided this was going to be the proper location. I could see that the engine cover would fit better with the boxes located here. You can see a tie-wrap in the pic that was used to secure the mock up while I measured. It was not used on the final fitting.
So I drilled a hole 1-1/2” forward and inline from the original rear clip location on the bottom of the airbox (both boxes), used a shim under the clip to keep the clip a stock height (easy to eye-ball) and to keep the boxes off the valve covers. Secured the clip to the box with a 10-32 bolt and lock nut (with the nut inside the airbox) - the boxes mounted and fit great. Very easy job.
I then made two brackets for the front clips now that the engine mount location is now 1-1/2" in front of the box. I had some straight brackets lying around from my barn building days that were the same width as the clips and was a nice fit. Measured and cut to length and then drilled two holes where the clip mounted onto the airbox and assembled (see pic) (same for other box).
Now the air boxes are firmly secured in place and attached to the Y-pipe. I removed the stock SRT plastic radiator intake fittings (both sides) and fit the right side intake tube through the opening (See Pic) perfect fit – no trimming required and slid the other end into the airbox. Done Deal.
Went to the left side and the discovered that the radiator support opening is a bit smaller due to the radiator hose – so I trimmed the tube back and made the mistake of making a straight trim. I should have notched it at an angle or perhaps heated it up and formed it to fit but the tubes are cheap and I will buy another and fit properly.
The more time consuming – but not too difficult part was fitting the engine cover. I used a dremel tool and made slots on both air boxes (where the front clips used to mount) for the ends of the cover but I need a spacer and longer screw for the center clip (the boxes are just a bit taller) and the hardware store is closed but from the pictures you will see that it will work and will look great.
Lots of pictures in my gallery and as always – if you have a question feel free to ask.
BB
Last edited by BrianBrave; Nov 29, 2007 at 11:05 PM.

Joined: Apr 2007
Posts: 166
Likes: 0
From: England
Originally Posted by BrianBrave
Last night I completed fitting and installing the SL55 intake system. Tonight I worked on fitting the SRT engine cover.
I purchased the whole assembly from Erick at LET MotorSports as part of an Airbox – Pulley – Iridium spark plug package. The Intake came to my door – with all the parts in OEM MB Boxes and the tamper seals in place.
Here is Erick’s website and contact info. He told me he was going to offer the intake kit at $320 but I don’t see it listed yet, so you should call Erick direct.
http://www.letmotorsports.com
First off let me say that this conversion does wonders for the car. I ran it hard last night and right from start up it sounded awesome and acceleration from standing still to WOT was tremendous. This conversion will provide all the intake air your SRT will ever need and still retain the stock look. You could add two K&N filters but I think the stock filters allow you to pull all the air that this engine can use.
There are already a few write-ups on the Y-pipe by Shawn, Simon and Steve so you can read their posts if you have not done so already.
Part # 113 090 01 29 - Y-Pipe with hoses
Part # 113 090 06 01 – Right side airbox with filter
Part # 113 094 16 82 – Right side intake tube (to radiator support)
Part # 113 090 05 01 – Left side airbox with filter
Part # 113 094 17 82 – Left side intake tube (to radiator supprt)
The boxes are huge and when looking through the opening you can see much more of the filter then the stock box. The intake tubes are huge – I could fit my whole arm in one and could not get my hand past the knuckles in the stock tube. Bigger is the best description. Easy mod is the second. Great look is the third. Low price is the forth.
After installing the Y-pipe I fitted the airboxes using the stock mount locations on the boxes and engine and noticed that the boxes did not reach the Y-pipe hoses. I thought about it for a bit, then removed the clips from the air boxes and just fitted the boxes into the Y-Pipe hoses to see where I was at. This moved the boxes back 1-1/2 inches and the two inner screws (toward the SC) that hold the top cover on fit nicely between the two slots of the intake manifold. (see Pic) I decided this was going to be the proper location. I could see that the engine cover would fit better with the boxes located here. You can see a tie-wrap in the pic that was used to secure the mock up while I measured. It was not used on the final fitting.
So I drilled a hole 1-1/2” forward and inline from the original rear clip location on the bottom of the airbox (both boxes), used a shim under the clip to keep the clip a stock height (easy to eye-ball) and to keep the boxes off the valve covers. Secured the clip to the box with a 10-32 bolt and lock nut (with the nut inside the airbox) - the boxes mounted and fit great. Very easy job.
I then made two brackets for the front clips now that the engine mount location is now 1-1/2" in front of the box. I had some straight brackets lying around from my barn building days that were the same width as the clips and was a nice fit. Measured and cut to length and then drilled two holes where the clip mounted onto the airbox and assembled (see pic) (same for other box)
Now the air boxes are firmly secured in place and attached to the Y-pipe. I removed the stock SRT plastic radiator intake fittings (both sides) and fit the right side intake tube through the opening (See Pic) perfect fit – no trimming required and slid the other end into the airbox. Done Deal.
Went to the left side and the discovered that the radiator support opening is a bit smaller due to the radiator hose – so I trimmed the tube back and made the mistake of making a straight trim. I should have notched it at an angle or perhaps heated it up and formed it to fit but the tubes are cheap and I will buy another and fit properly.
The more time consuming – but not too difficult part was fitting the engine cover. I used a dremel tool and made slots on both air boxes (where the front clips used to mount) for the ends of the cover but I need a spacer and longer screw for the center clip (the boxes are just a bit taller) and the hardware store is closed but from the pictures you will see that it will work and will look great.
Lots of pictures in my gallery and as always – if you have a question feel free to ask.
BB
I wonder how much better your mod is over mine, as I could notice an improvement, but you make it sound that yours was greater. Mine is better off the mark and then between 5000 & 6000 rpm and stronger on the gear changes. Mid range seemed similar, so I think it is at WOT at higher revs where most of the gain is, other than a bit more torque "off the mark"
Si
Thread Starter
|
<--- Huge Horsepower
Originally Posted by simon-srt6
I wonder how much better your mod is over mine, as I could notice an improvement, but you make it sound that yours was greater. Mine is better off the mark and then between 5000 & 6000 rpm and stronger on the gear changes. Mid range seemed similar, so I think it is at WOT at higher revs where most of the gain is, other than a bit more torque "off the mark"
Si
Si
I plan on installing LET's 185mm Pulley (20% boost) so it makes sense to increase the intake air flow.
It's just one more option of many that are out there for SRT owners.
Senior Member
Joined: Oct 2006
Posts: 1,409
Likes: 2
From: INDIANA
Good job Brian, You defiantly won't have a problem getting enough air to your supercharger. I had thought about going the route that you did, but I knew the air boxes were wider than the engine cover. And I was just too set on keeping the OEM look.

Joined: Nov 2007
Posts: 99
Likes: 0
From: Houston, TX
Originally Posted by BrianBrave
The SL55 airbox filter area and the in-n-out openings are approx 25% larger then the stock set up, so there are some gains to be found but only if you already had the Y-Pipe installed. It was getting time for new air filters anyway so that helped offset the cost for the SL55 boxes. Plus I can still add K&N's down the line.
I plan on installing LET's 185mm Pulley (20% boost) so it makes sense to increase the intake air flow.
It's just one more option of many that are out there for SRT owners.
I plan on installing LET's 185mm Pulley (20% boost) so it makes sense to increase the intake air flow.
It's just one more option of many that are out there for SRT owners.
thanks for the kind words! the intake is up on the website as promised, pictures will be active today!
if you guys have any questions about this, please let me know...i can get as many of these setups as you want...

Senior Member
Joined: May 2007
Posts: 1,325
Likes: 0
From: Bayou Vista, TX
Nice work Brian!
I may end up going this route...still not sure yet.
I definitely like how it still retains the somewhat stock look.
When is the pulley going on? Are you doing a tune with it?
SQ
I may end up going this route...still not sure yet.
I definitely like how it still retains the somewhat stock look.
When is the pulley going on? Are you doing a tune with it?
SQ
Joined: Nov 2007
Posts: 99
Likes: 0
From: Houston, TX
Originally Posted by ShawnQ
Nice work Brian!
I may end up going this route...still not sure yet.
I definitely like how it still retains the somewhat stock look.
When is the pulley going on? Are you doing a tune with it?
SQ
I may end up going this route...still not sure yet.
I definitely like how it still retains the somewhat stock look.
When is the pulley going on? Are you doing a tune with it?
SQ
Senior Member
Joined: Aug 2007
Posts: 3,084
Likes: 8
From: Lantana, Republic of Texas
Brian,
Great write up! I think you have helped me solve a problem with my project! The engine cover on my V8 has the same large air intakes and I have been trying to figure out how I was going to get the air from the radiaitor support area to the air boxes. In the pictures I studied of the Startech V8 Crossfire they did a real Mickey mouse job of piecing diferent pipes and tubing together. I looks like I could just get the intake tubes and they should fit right onto my engine cover/air boxes! thanks! I will order the two tubes.
Great write up! I think you have helped me solve a problem with my project! The engine cover on my V8 has the same large air intakes and I have been trying to figure out how I was going to get the air from the radiaitor support area to the air boxes. In the pictures I studied of the Startech V8 Crossfire they did a real Mickey mouse job of piecing diferent pipes and tubing together. I looks like I could just get the intake tubes and they should fit right onto my engine cover/air boxes! thanks! I will order the two tubes.
Senior Member
Joined: May 2007
Posts: 1,325
Likes: 0
From: Bayou Vista, TX
Originally Posted by 1FASTC32
Shawn, when you are you going to bring me that SRT-6? 
My Co-Worker's car (which I was going to bring) is in the shop getting the I/C pump fixed. If it is done by then, I will likely bring it. If not, I may just drive my own. I will touch base with you before I leave.
Are you still going to be in town/at the 'shop' next Friday?
BTW, my co-worker purchased the ASP pulley already during the group buy through needswings - so he is mainly interested in any heat exchanger ideas you may have for it. I have yet to buy a pulley for my car, need to wait until after Christmas.
Have you had a chance to tear into any other SRT's or SLK32's?
Thanks for asking,
Shawn
Joined: Nov 2007
Posts: 99
Likes: 0
From: Houston, TX
Originally Posted by ShawnQ
I am heading out next Friday towards Biloxi.
My Co-Worker's car (which I was going to bring) is in the shop getting the I/C pump fixed. If it is done by then, I will likely bring it. If not, I may just drive my own. I will touch base with you before I leave.
Are you still going to be in town/at the 'shop' next Friday?
BTW, my co-worker purchased the ASP pulley already during the group buy through needswings - so he is mainly interested in any heat exchanger ideas you may have for it. I have yet to buy a pulley for my car, need to wait until after Christmas.
Have you had a chance to tear into any other SRT's or SLK32's?
Thanks for asking,
Shawn
i have not had a chance to get my hands on any other SLK/SRT yet...yours will be the first.
Thread Starter
|
<--- Huge Horsepower
Originally Posted by ShawnQ
Nice work Brian!
I may end up going this route...still not sure yet.
I definitely like how it still retains the somewhat stock look.
When is the pulley going on? Are you doing a tune with it?
SQ
I may end up going this route...still not sure yet.
I definitely like how it still retains the somewhat stock look.
When is the pulley going on? Are you doing a tune with it?
SQ
I am still waiting for delivery of the 185mm Pulley & Iridium Plugs.
I will get the ECU tuned - Just not sure by whom. I may go with a local shop in the SF Valley that has dyno. I plan on keeping my A/F ratios in the safe zone rather then chase peak HP. Not that I don't have big plans if I ever grenade the engine - but I just paid for the XF so I figure I should enjoy it for a while.
I am sure when I get the pulley, plugs and tune done - It will be fast.
I already have wings so I guess my next need would be an orbital re-entry proccessor.
Senior Member
Joined: May 2007
Posts: 1,325
Likes: 0
From: Bayou Vista, TX
Originally Posted by BrianBrave
It would be an inexpensive upgrade for you - as you already have the Y-Pipe and hoses - you'll just need the air boxes and intake tubes.
I am still waiting for delivery of the 185mm Pulley & Iridium Plugs.
I will get the ECU tuned - Just not sure by whom. I may go with a local shop in the SF Valley that has dyno. I plan on keeping my A/F ratios in the safe zone rather then chase peak HP. Not that I don't have big plans if I ever grenade the engine - but I just paid for the XF so I figure I should enjoy it for a while.
I am sure when I get the pulley, plugs and tune done - It will be fast.
I already have wings so I guess my next need would be an orbital re-entry proccessor.
Keep us posted - I haven't bought pulleys yet, and I'm anxious to see how the larger LET does on these cars as far as air/fuel. I'm also curious to see if the fuel system is at its limit with that pulley. I wonder how much the fuel system can handle?
Unfortunately, when I got my Y-Pipe it was the Pipe only - no inlet tubes. So, I'd have to buy the whole thing if I wanted to swap.
SQ
Forum Regular
Joined: Sep 2006
Posts: 419
Likes: 0
From: Valley of the Sun
Brian, does the SL55 Y fit the standard SRT6 throttle body or does that
need to be swapped out also?
Second-What is the diameter of the y tubes?
I would like to make my own CAI, one on each side..
The SL55 Y would make my job much easier if the diameter is
3 inches. I have everything figured out but the 'Y'..
need to be swapped out also?
Second-What is the diameter of the y tubes?
I would like to make my own CAI, one on each side..
The SL55 Y would make my job much easier if the diameter is
3 inches. I have everything figured out but the 'Y'..
Senior Member
Joined: May 2007
Posts: 1,325
Likes: 0
From: Bayou Vista, TX
Originally Posted by roncosrt6
Brian, does the SL55 Y fit the standard SRT6 throttle body or does that
need to be swapped out also?
Second-What is the diameter of the y tubes?
I would like to make my own CAI, one on each side..
The SL55 Y would make my job much easier if the diameter is
3 inches. I have everything figured out but the 'Y'...
need to be swapped out also?
Second-What is the diameter of the y tubes?
I would like to make my own CAI, one on each side..
The SL55 Y would make my job much easier if the diameter is
3 inches. I have everything figured out but the 'Y'...
The SL55 Y fits right onto the SRT6 Throttle Body, no problem or modifications.
FYI - User named 'Marc' on mbworld.org has a Y-Pipe for sale, Y only (no intake tubes).
SQ
Last edited by ShawnQ; Dec 5, 2007 at 12:04 PM.
Thread Starter
|
<--- Huge Horsepower
Originally Posted by roncosrt6
Brian, does the SL55 Y fit the standard SRT6 throttle body or does that
need to be swapped out also?
Second-What is the diameter of the y tubes?
I would like to make my own CAI, one on each side..
The SL55 Y would make my job much easier if the diameter is
3 inches. I have everything figured out but the 'Y'...
need to be swapped out also?
Second-What is the diameter of the y tubes?
I would like to make my own CAI, one on each side..
The SL55 Y would make my job much easier if the diameter is
3 inches. I have everything figured out but the 'Y'...
The dual intake Y-tubes are oval approx 4.5" X 3" - tuff for me to measure as they came with the hoses attached.
Shawn has a good write-up - perhaps it will help you out.
https://www.crossfireforum.org/forum...393#post169393
https://www.crossfireforum.org/forum...ad.php?t=19417
Good luck with your project.
Senior Member
Joined: May 2007
Posts: 1,325
Likes: 0
From: Bayou Vista, TX
I will measure it when I get home - but I remember thinking a 3" silicon coupler would be able to fit onto the outlets of the Y-Pipe.
It isn't installed on the car as of right now.
SQ
It isn't installed on the car as of right now.
SQ
Forum Regular
Joined: Sep 2006
Posts: 419
Likes: 0
From: Valley of the Sun
Thanks for the help. It sounds like I can use the SL55 'Y', attach
slight extention hose as long as I get a good seal on 'Y'. Then
attach 3" aluminum pipe. I'm having problem finding a pure
3" 'Y' made of rubber. Only been looking for a few days. If I can't
find, will resort to using SL55 'Y'. My SRT6 tech at dealer wants
to help. He said new CAI would no way affect warranty. This guy
is really good. Still in research mode.
Last edited by roncosrt6; Dec 5, 2007 at 04:44 PM.
Senior Member
Joined: Dec 2007
Posts: 1,685
Likes: 3
From: Las Vegas
I just got all my new parts in to do the conversion today..........all 5 SL55 intake pieces and 2 K&N drop in air filters....................total cost $325.75. I'm gonna do the install tomorrow so I can tear up the streets this weekend.