
DIY Transmission leak fix with photos... TA DAAaa

Thread Starter
|
Senior Member
Joined: Feb 2008
Posts: 4,508
Likes: 34
From: VA

EDIT: update to this thread with a VIDEO of "how to do this"
I decided to change out the leaking gaskets for my transmission connector that I searched on the forum. Down loaded the tech brief and went to the local dealer to get the O rings, asked Alex on the counter for the 2 rings. In a moment he said that the parts were superceeded by a single part and handed me a costly looking part, announcing that it cost me $8.85. Well Heil! yes I'll do it, that's within reason.
Got home put the C on the lift and started to replace it, it was easy to do and the steps are described below FYI. Took about 5 minutes of real work, more to wipe the oil off the elbows as you will lose about 1 quart of oil - ATF. Yucky part of job.
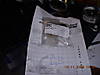
1. read the tech bulletin on the forum for the Crossfire
2. Pop off the O2 sensor wires from the aluminum shield
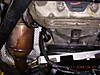
3. Passenger side remove the T27 sized bolt on the BOTTOM of the bracket, loosen the shield and let it fall, see photos
4.Lift off the shield for the socket that is near the Passenger 1st Cat Converter. It is held in a slip clip on the transmission.
5.Looking at the Connector, rotate the light Nylon ring counter-clockwise 120 degrees; to the left.
6. Easily pull the cable and black connector out of xmission, causing a bunch of ATF to spill all over you, warned ya.
7.Using a 7mm socket unscrew the brass bolt at the center of the connector shell releasing the nylon ring and black socket shell. Much more ATF now. Read this again and see photos on my album first.
8.Pull out shell, looks like the new one, compare them.
9. See the three cutouts that are one small slot, and two wedge shaped reliefs that KEY the shell to the transmission.
10.Re insert the new shell being SURE THAT the keying is installed correctly by rolling the shell till they line up
11.PUSH the shell in with your hand about 3/8" till it seats
12.Using the 7mm socket again tighten the center bolt gently
13. Align the KEY of the electrical connector and insert it, tighten the connector by ROTATING the nylon ring UP seating the connector. See photos.
14. At this point you need to reverse the first steps to reinstall the shield and bracket, if your my age, the steps are listed above for your memory aid, just do them as 4 - 3 - 2 - 1 .
************************************************** *******
Guy walks into the hospital ward where his friend is dealing with memory loss and a failing mind.
- The last time he was there, his friend never seemed to know him.
- He paused at the doorway looking in, wondering if this visit was going to be any different.
- Looking at his buddy in the hospital bed he asks " Do you know who Iam ????"
NO, I dont, but if you stand there for a while it i'll come back to ya!!!!!!
**********************************************
Tomorrow Ill get into the ATF refill and see how that is done easily.
WOODY, ENJOY


I decided to change out the leaking gaskets for my transmission connector that I searched on the forum. Down loaded the tech brief and went to the local dealer to get the O rings, asked Alex on the counter for the 2 rings. In a moment he said that the parts were superceeded by a single part and handed me a costly looking part, announcing that it cost me $8.85. Well Heil! yes I'll do it, that's within reason.
Got home put the C on the lift and started to replace it, it was easy to do and the steps are described below FYI. Took about 5 minutes of real work, more to wipe the oil off the elbows as you will lose about 1 quart of oil - ATF. Yucky part of job.
1. read the tech bulletin on the forum for the Crossfire
2. Pop off the O2 sensor wires from the aluminum shield
3. Passenger side remove the T27 sized bolt on the BOTTOM of the bracket, loosen the shield and let it fall, see photos
4.Lift off the shield for the socket that is near the Passenger 1st Cat Converter. It is held in a slip clip on the transmission.
5.Looking at the Connector, rotate the light Nylon ring counter-clockwise 120 degrees; to the left.
6. Easily pull the cable and black connector out of xmission, causing a bunch of ATF to spill all over you, warned ya.
7.Using a 7mm socket unscrew the brass bolt at the center of the connector shell releasing the nylon ring and black socket shell. Much more ATF now. Read this again and see photos on my album first.
8.Pull out shell, looks like the new one, compare them.
9. See the three cutouts that are one small slot, and two wedge shaped reliefs that KEY the shell to the transmission.
10.Re insert the new shell being SURE THAT the keying is installed correctly by rolling the shell till they line up
11.PUSH the shell in with your hand about 3/8" till it seats
12.Using the 7mm socket again tighten the center bolt gently
13. Align the KEY of the electrical connector and insert it, tighten the connector by ROTATING the nylon ring UP seating the connector. See photos.
14. At this point you need to reverse the first steps to reinstall the shield and bracket, if your my age, the steps are listed above for your memory aid, just do them as 4 - 3 - 2 - 1 .
************************************************** *******
Guy walks into the hospital ward where his friend is dealing with memory loss and a failing mind.
- The last time he was there, his friend never seemed to know him.
- He paused at the doorway looking in, wondering if this visit was going to be any different.
- Looking at his buddy in the hospital bed he asks " Do you know who Iam ????"
NO, I dont, but if you stand there for a while it i'll come back to ya!!!!!!
**********************************************
Tomorrow Ill get into the ATF refill and see how that is done easily.
WOODY, ENJOY
Last edited by Valk; Dec 26, 2015 at 08:01 PM.
Senior Member
Joined: May 2008
Posts: 10,443
Likes: 151
From: Cincinnati ( Delhi )
So is the leak actually the O-rings or the connector itself?
In step 6, you mention trans fluid leaking out. Should that be or is that where the problem is.
I work with similar connectors on Allison and Voith transmissions. Just unplugging the wire harness plug, you shouldn't get any fluid spill.
James
In step 6, you mention trans fluid leaking out. Should that be or is that where the problem is.
I work with similar connectors on Allison and Voith transmissions. Just unplugging the wire harness plug, you shouldn't get any fluid spill.
James
Last edited by James1549; Dec 11, 2008 at 05:24 PM.
Senior Member
Joined: Aug 2008
Posts: 5,741
Likes: 98
From: Sierra Vista, Arizona
Yo Woody.
So where's the video? Something to do with step 14?
14. ... if your my age, the steps are listed above for your memory aid, just do them as 4 - 3 - 2 - 1 .
So where's the video? Something to do with step 14?
14. ... if your my age, the steps are listed above for your memory aid, just do them as 4 - 3 - 2 - 1 .
Thread Starter
|
Senior Member
Joined: Feb 2008
Posts: 4,508
Likes: 34
From: VA
Possibly a poor phrase to use, Video. As in Video images, too too messy for the dvd camera, stills only. Sorry not a moving picture show, but makes it easy for you to follow I hope.
Thanks Woody


Thanks Woody

Thread Starter
|
Senior Member
Joined: Feb 2008
Posts: 4,508
Likes: 34
From: VA
Woopsie, the leak is from the shell to the transmission, the connector has that red silicone O ring and it works well. The clear O rings must of lost their retention, causing the loss. I did not 'mike' the shells to see if the new one was bigger / tighter though it went in harder..........
Forgot that point, sri Woody")
Forgot that point, sri Woody
Senior Member
Joined: Aug 2008
Posts: 5,741
Likes: 98
From: Sierra Vista, Arizona
Originally Posted by waldig
Possibly a poor phrase to use, Video. As in Video images, too too messy for the dvd camera, stills only. Sorry not a moving picture show, but makes it easy for you to follow I hope.
Got it. Great job as always Woody. Thanks again and again and again!
Senior Member
Joined: Aug 2008
Posts: 1,203
Likes: 3
From: Elburn, IL
'We do hundreds of these at work. Its really simple and the "how to" above is great. All you need is the $9.00 pilot bushing (the black electrical connector) a 70 cent red trans lock (for the cap) and a quart of $12.00 722.6 trans fluid. The fluid leaking out is normal when the connector is removed. Warranty time for this job only pays .4 of an hour.

Forum Regular
Joined: Jul 2008
Posts: 392
Likes: 0
From: Tucson, AZ
Woody... I've done this replacement a few times and each time, like you said, I lose a good amount of fluid during it. So I was wondering does the fluid have an effect on the electronic pins inside that little hole? I spray them with electronics cleaner the best I can, as well as the circular connector too, but its hard to get all fluid completely gone.
Do you know anything about the need for those pins to be completely dry? Probably not? Maybe? Thanks.
Edit: And yes, the clear orings are weak and will leak. The new black ones are thicker and squishier. But I found the new black orings leaked in my first replacement. Had to do it again with a new connector new black orings.
Senior Member
Joined: Apr 2008
Posts: 2,665
Likes: 5
From: Orlando, FL
Wow, Woody strikes again! Thanks for an excellent write up and keep up the great work as usual! You are making our cars easier to fix on our own and we greatly appreciate all your efforts! 
Thread Starter
|
Senior Member
Joined: Feb 2008
Posts: 4,508
Likes: 34
From: VA
Here is something that may be of use, Oil is great for terminals, that do not move. It cools the connections and insulates them from moisture, see the power transformer on your lawn or power pole.
High tension switches are immersed in oil to quench the arc during switching.
The socket and pins are wet (ATF) on the transmission side and not affected by oil. When I put connectors together for the car, I spray them before assembly with white lithum grease ( Thanks Ford for the idea). For spark plug boots I always add silicone grease so they will release later. Back in the day when I admitted to doing TV repair, there was a spray contact cleaner and lube for pots and switches - especially the rotary tuner contacts........
Sorta like the advice I give to young couples with children - to use vasoline brand grease during sex activities. It really works well and makes everything go much better. Not a lot is actually needed in reality. You dont need to use much, just a thin even coat to completely cover the door **** .
This helps keep the kids out...........Priceless
Enjoy Woody

Forum Regular
Joined: Jul 2008
Posts: 392
Likes: 0
From: Tucson, AZ
$68 isn't bad at all, considering how dirty and sometimes nerve-racking it can be. Also, tranny fluid isn't cheap.
But, make sure your dealer filled and adjusted the fluid afterwards. Many dealers fix the leak and consider the job done, including mine. They don't add the quart or so needed after the repair. it should be on the paperwork that tranny fluid was used....
But, make sure your dealer filled and adjusted the fluid afterwards. Many dealers fix the leak and consider the job done, including mine. They don't add the quart or so needed after the repair. it should be on the paperwork that tranny fluid was used....

Thread Starter
|
Senior Member
Joined: Feb 2008
Posts: 4,508
Likes: 34
From: VA
There is a dip stick hole, I wrote up how you can use a LONG Zip tie to read the oil level easily, you just have to look up my posts to get the 'address'.
Be Happy Woody
Be Happy Woody
Senior Member
Joined: Jan 2007
Posts: 1,751
Likes: 5
From: Lexington Kentucky
Great Pic ! on how to fix ! Print them and took them to the dealer this early AM Cost to fix 66.57 The look on his face as told him i know what was wrong and here are the pic ! now fix dam thing was mill dollar look ! did not want that stupied fee for looking to see what wrong ! Just like to say thanks this help out alot !