Fog light fix - loose caps


Right after I bought my 05 SRT-6 the passenger fog light cap fell off. Not even 2 weeks after having the car out this spring the drivers cap fell off. I did not want to spend over $200 on a new set of fogs from the dealer so I decided to just remove the loose caps. Once the fogs are removed its litterally a 2 minute fix.
Here are some pics.
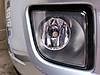
Step one, remove the fogs, there are 3 torx screws that mount them to the bumper. These can be accessed through the fog light covers in the wheel well. It may be easier if the car is jackd up so the wheel drops down, you can also turn the wheels to get more access.
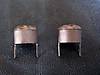
Here we have the stock Hella fog
10.jpg
Loose cap and all.
1-6.jpg
There are 2 clips on the side of the fog, I took my hook tool on the clip opposite of the adjustment screw. Carefully press the plastic clip outward to allow the round nub to be freed. This will allow the back of the fog to pull out.
2-6.jpg
3-6.jpg
4-6.jpg
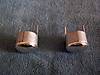
Allow the foglight rotate out of the way on the adjusment screw and remove the cap.
5-3.jpg
Now make sure the thick rubber gasket is in place. I held the back of the fog light down, allowing gravity to hold the gaset and press the top down onto the back.
6-3.jpg
7-4.jpg
8-3.jpg
Notice the gasket didnt press all the way back into the housing. Left like this it would not seal properly and the extra stress may crack the plastic clip. I thought I may need to put some lubrication on the big o ring, however some light pressure with the smooth side of a hook tool it I was able to press it into place.
9-2.jpg
Here are some pics.
Step one, remove the fogs, there are 3 torx screws that mount them to the bumper. These can be accessed through the fog light covers in the wheel well. It may be easier if the car is jackd up so the wheel drops down, you can also turn the wheels to get more access.
Here we have the stock Hella fog
10.jpg
Loose cap and all.
1-6.jpg
There are 2 clips on the side of the fog, I took my hook tool on the clip opposite of the adjustment screw. Carefully press the plastic clip outward to allow the round nub to be freed. This will allow the back of the fog to pull out.
2-6.jpg
3-6.jpg
4-6.jpg
Allow the foglight rotate out of the way on the adjusment screw and remove the cap.
5-3.jpg
Now make sure the thick rubber gasket is in place. I held the back of the fog light down, allowing gravity to hold the gaset and press the top down onto the back.
6-3.jpg
7-4.jpg
8-3.jpg
Notice the gasket didnt press all the way back into the housing. Left like this it would not seal properly and the extra stress may crack the plastic clip. I thought I may need to put some lubrication on the big o ring, however some light pressure with the smooth side of a hook tool it I was able to press it into place.
9-2.jpg
This takes a few mins per foglight. Simple fix that costs nothing.
Originally I was going to epoxy the caps back in place, but when I was told the "updated" foglights from Chrysler do not have the caps, I figured I would just leave them out.
11.jpg
Originally I was going to epoxy the caps back in place, but when I was told the "updated" foglights from Chrysler do not have the caps, I figured I would just leave them out.
11.jpg
Last edited by ACRucrazy; 06-01-2009 at 10:23 AM.


Originally Posted by ACRucrazy
This takes a few mins per foglight. Simple fix that costs nothing.
Originally I was going to epoxy the caps back in place, but when I was told the "updated" foglights from Chrysler do not have the caps, I figured I would just leave them out.
Originally I was going to epoxy the caps back in place, but when I was told the "updated" foglights from Chrysler do not have the caps, I figured I would just leave them out.
I found this thread after completing this procedure on my 2004
I must say that this is the exact procedure I followed originally posted here by ACRucrazy
Although my caps on my 04 were still securely attached I removed them to produce a bit more light.
They are now the same as the replacement lights without caps that were manufactured and installed on the later model Crossfires.
I removed the lights from the car by first removing the front wheels to access them more easily.
There is a small door in the front of each wheel well that can be removed to access the fog light assembly.
There are 3 torx screws that hold the light assembly in the bumper and they can easily be removed.
Once the assembly is off the car you can partially separate the bulb fixture from the housing by carefully prying away the 2 tabs that are fitted around the 2 pins.
Pay attention to the rubber o-ring and the position it is in as you will need to place this back tightly during reassembly
Then simply twist the steel caps until they break off.
Then reassemble the light and carefully push the rubber o-ring back into place and reinstall on your car.
Be careful to not touch the light bulb with your fingers.
Senior Member
Join Date: Aug 2006
Location: Colorado Springs, CO
Posts: 1,053
Likes: 0
Received 0 Likes
on
0 Posts
Join Date: Jun 2008
Location: Fredericksburg, VA
Age: 64
Posts: 1,113
Likes: 0
Received 0 Likes
on
0 Posts
Originally Posted by H82BL8
Some gel superglue I had around the house. Didn't use much, center cap was still a tight fit.
Another thing is that if you get the 'O' ring wet, a little Vaseline, or just some spit (my personal choice) it slides together just like it is supposed to, no need to poke at it.
Did the one side that was broken, including taking the front wheel off, and putting it back on, it only took an hour (not including drying time).
I had to fight with the access door a bit, so I took the wheel off, while I was at it I got a pic, only one missing from your set.

Last edited by Scottw60; 10-05-2009 at 09:24 PM.
And here's another option for those of us who didn't want too break the seal:
https://www.crossfireforum.org/forum...light-fix.html
https://www.crossfireforum.org/forum...light-fix.html
Guys,
If you do not mind leaving the mounting point for the cap, you do not have to take the fog light assembly apart. The cap is very thin aluminum. It bends very easily. I used a small pair of needle-nose pliers and bent the cap slightly and just pulled it through the hole in the back of the fog light that the light bulb goes through. It was much easier than worrying about trying to reseal the light. Just a thought.
Cheers,
krzyFast
