
HID Install Lows and Fogs with Pictures

Thread Starter
|
Senior Member
Joined: Sep 2007
Posts: 8,015
Likes: 14
From: MOFN, AL, 70 miles from George

I'll try to make this short, but detailed.
pdf file now attached here: HID Installation Instructions.pdf
Tools I used:
45 deg Needle Nosed Pliers
7/8" Socket (for cutting Caps)
10mm Deep Wall socket w/ratchet
Wire Stripper/Crimper
Materials I used:
4 Male spade connectors
2 1/4" Stainless washers
2 M6 Stainless Locknuts
Preparation
I would be glad to answer any questions.
Here is a decent explanation of HID's and Halogens:
intellexual net � m k i v
Daniel Stern Lighting Consultancy and Supply
pdf file now attached here: HID Installation Instructions.pdf
Tools I used:
45 deg Needle Nosed Pliers
7/8" Socket (for cutting Caps)
10mm Deep Wall socket w/ratchet
Wire Stripper/Crimper
Materials I used:
4 Male spade connectors
2 1/4" Stainless washers
2 M6 Stainless Locknuts
Preparation
- Every bulb assembly I've seen comes with a grommet integrated. There are 2 types of wires involved: High Voltage (to the bulb) and Low Voltage (to the OEM connector). They all seem to have 2 extra unfinished holes for the 12VDC wires to reach the connector inside the headlight housing. Use a 1/16" drill bit to complete these holes.
- The Radiator overflow tank must be moved to gain access to the passenger side housing. It is very easy to move. Remove the 2 M6 nuts with a 10mm deep wall socket.
 Remove the Washer Fluid Level connector on the bottom. The release tab is on the side of the connector.
 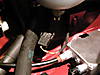 It can be stiff, just don't twist! Pull sraight back. The tank itself is held in place with a barb on the bottom which engages a rubber grommet. Once the nuts are removed, just put your hands underneath and pull/twist/rock the thing until the barb is free. It can seem very hard to do, but it DOES come off. Unclip the hose and move the tank to the center of the engine bay.Remove the caps from the back of the headlight housings you plan to install your HID's in. Clean them using WD40 or equivalent. Measure the INNER diameter: the size at the inside of the slot (NOT the outside of the whole grommet) of the pre-installed grommets on your new bulbs. (See Pictures). Mine were exactly 1". (See Pictures). Using an Exacto knife and an appropriate sized socket or other round object, cut a circular hole in the CENTER of the cap. (See Pictures). This will provide a watertight and attractive seal for the wires.
- First, and some find difficult, is pulling the connector from the back of the bulbs. If you look closely, you will see an "H" shaped area. I used a medium sized 45 deg bent-nosed needle pliers to grab the center of this "H" and pulled straight back with a little rocking action. DO NOT TWIST! DO NOT PULL ON THE WIRES! It comes off, but can fight a little.
- Next, undoing the bulb retaining clips is for some a bit baffling. On the low beams, the clip clamps at the bottom and swings UP. Press the very bottom of the clip and push to the side to unhook it from the retainer. Remove the bulb. Repeat for other side.
- To take advantage of the nice watertight grommets provided, one must thread the 2 High Voltage wires AND the grommet through the bulb retaining clip. This takes a little patience, but it works. for the low beam bulbs, you will be threading them UP through the clip.
 First, remove the protective plastic jar from the bulb. It is fragile, so don't bang it around. Slide the grommet all the way to the bulb end of the wires. Then, one at a time, push the connectors through the clip being careful not to unhinge the clip itself. When both wires are through, slide the grommet about mid-way up the wires. Push the grommet through just like a coin in a slot machine. It fits easily. If you have touched the bulb, even with the back of your hand, clean it gently with a cotton ball and alcohol.
 - Seating the bulbs can be a challenge. On the low beams, the "tab" points straight DOWN. It really doesn't "fall into place" like some say, it just sits a bit more flush. My tab was aligned with the wires so when the blue wire was up, it seated properly. Engage the retainer clip.
- Now we get to use the 2nd pair of little holes in the grommet. There is no way to push the male spade connectors through the little 1/16" holes without tearing the rubber, so I cut the connectors off, pushed the wires through, and installed new connectors.
 Basic stuff, but some may just want to cut small slits for them to push through. The male spade connectors push into the connector that you pulled from the back of the OEM bulb. RED (+) to SINGLE WIRE and BLACK (-) to DOUBLE WIRE. (See Pictures).Install modified cap on the grommet, sliding the edges of the hole in the cap into the slot around the edge of the grommet. Slide this assembly up the wires, push the OEM connector into a space inside the housing, and replace the cap as original.
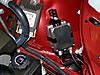
- I took some pictures showing a double (lows and fogs) installation of the ballasts. On the drivers side, this stack can, with a bit of hassle, be installed below the headlamp housing. There are even 2 holes that match the bracket perfectly. It would involve 2 people, one to work from below (through the foglight access panel in the wheelwell), and the other working in the engine bay. For a single (lows only) installation, I used the M6 stud on the wheelwell. On the passenger side, they can be stacked under the now removed Radiator Overflow tank. An M6 stud is provided.(See Pictures). Mine was a single. Pictures provided. In my gallery, they are labeled "HID Install".
I would be glad to answer any questions.
Here is a decent explanation of HID's and Halogens:
intellexual net � m k i v
Daniel Stern Lighting Consultancy and Supply
Last edited by Valk; Apr 8, 2010 at 10:05 PM. Reason: pdf file now attached with instructions and photos
Thread Starter
|
Senior Member
Joined: Sep 2007
Posts: 8,015
Likes: 14
From: MOFN, AL, 70 miles from George
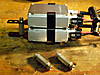
I'm going to add 4 photos at a time to save you some hassle:
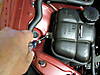
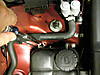
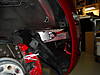
 Driver side ballast installed showing 4 wire feedthrough.
 Same
Same
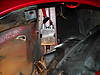
 Passenger ballast installed showing wire routing
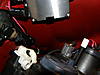
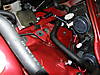
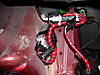
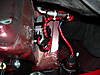
 Double (stacked) ballast. Driver's side. (Not under the housing. 1st choice)
Driver side ballast installed showing 4 wire feedthrough. Same Passenger ballast installed showing wire routingDouble (stacked) ballast. Driver's side. (Not under the housing. 1st choice)
Last edited by maxcichon; Oct 19, 2008 at 02:13 PM.
Thread Starter
|
Senior Member
Joined: Sep 2007
Posts: 8,015
Likes: 14
From: MOFN, AL, 70 miles from George
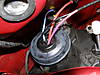 Cap with grommet installed
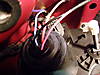 Same
Same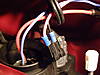 New spade lugs inserted in OEM connector
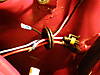 New spade lugs crimped in place
Last edited by maxcichon; Oct 19, 2008 at 02:15 PM.
Thread Starter
|
Senior Member
Joined: Sep 2007
Posts: 8,015
Likes: 14
From: MOFN, AL, 70 miles from George
Wires sripped for spade lugs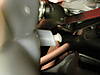 The infamous "barb" on the bottom of the Overflow Tank
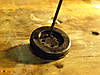 1/16" drill to clear 2nd holes
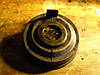 Showing a grommet installed in the modded cap
Last edited by maxcichon; Oct 19, 2008 at 02:17 PM.
Thread Starter
|
Senior Member
Joined: Sep 2007
Posts: 8,015
Likes: 14
From: MOFN, AL, 70 miles from George
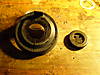 Modded cap and grommet Where to thread the wires and grommet
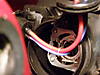 Sorta' same
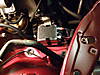 Double stacked ballasts, passenger side under Overflow Tank
Last edited by maxcichon; Oct 19, 2008 at 02:19 PM.
Thread Starter
|
Senior Member
Joined: Sep 2007
Posts: 8,015
Likes: 14
From: MOFN, AL, 70 miles from George
 Stacked assembly showing threaded spacers
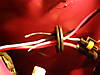
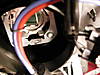 Fuzzy closeup of clip and wires
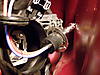 Bulb ready for insertion
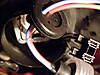 Sorta' same
Last edited by maxcichon; Oct 19, 2008 at 02:21 PM.
Thread Starter
|
Senior Member
Joined: Sep 2007
Posts: 8,015
Likes: 14
From: MOFN, AL, 70 miles from George
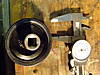 Socket and caliper for cap mod
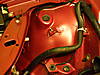 Cable tied hose out of the way
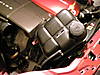 Where to put the Overflow Tank Washer Fluid Level connector
Last edited by maxcichon; Oct 19, 2008 at 02:23 PM.
Administrator / Senior Member / Retired
Joined: Jul 2007
Posts: 18,054
Likes: 1,540
From: Aurora , ILL
Great job Max.
I have saved it to my PC favorites section as well.
Even if just replacing the OEM bulbs this will be helpful.
Thanks,Valk
I have saved it to my PC favorites section as well.
Even if just replacing the OEM bulbs this will be helpful.
Thanks,Valk
Thread Starter
|
Senior Member
Joined: Sep 2007
Posts: 8,015
Likes: 14
From: MOFN, AL, 70 miles from George
Originally Posted by FP
Thanks Max. Thanks for your contributions to this forum.
Andrew, can we make this a sticky?
Andrew, can we make this a sticky?
I sure hope this helps!
I would REALLY like to redo this with embedded photos. In order.
I'm not too proud of the disjointed way it comes across.
BUT, thanks for the kudo's, gents!
Last edited by maxcichon; Oct 19, 2008 at 02:25 PM.
Joined: Mar 2008
Posts: 107
Likes: 0
From: Central Florida
I installed using these directions and I must say they are very helpful!
I did a couple things different though:
I used an 11/64 bit to drill the holes in the grommet that is on the hid bulb wires.
The hole is big enough that you can push the male plugs through (with a lilttle force) without having to cut them off and re-splice. The hole is still small enough to provide a waterproof seal.
I had no need to move the overflow tank. Perhaps my hands were small enough. It was never an issue for me.
I mounted my Ballasts in the same place but again I still had plenty of room under the tank to install it without moving it. You may want to give it a shot to save you some time.
Here is a quick pic with my phone. 6k bulbs.
Last edited by Buran; Nov 8, 2008 at 11:39 AM.
Thread Starter
|
Senior Member
Joined: Sep 2007
Posts: 8,015
Likes: 14
From: MOFN, AL, 70 miles from George
Originally Posted by Buran
I installed using these directions and I must say they are very helpful!
I did a couple things different though:
I used an 11/64 bit to drill the holes in the grommet that is on the hid bulb wires.
The hole is big enough that you can push the male plugs through (with a lilttle force) without having to cut them off and re-splice. The hole is still small enough to provide a waterproof seal.
I had no need to move the overflow tank. Perhaps my hands were small enough. It was never an issue for me.
I mounted my Ballasts in the same place but again I still had plenty of room under the tank to install it without moving it. You may want to give it a shot to save you some time.
Here is a quick pic with my phone. 6k bulbs.
I did a couple things different though:
I used an 11/64 bit to drill the holes in the grommet that is on the hid bulb wires.
The hole is big enough that you can push the male plugs through (with a lilttle force) without having to cut them off and re-splice. The hole is still small enough to provide a waterproof seal.
I had no need to move the overflow tank. Perhaps my hands were small enough. It was never an issue for me.
I mounted my Ballasts in the same place but again I still had plenty of room under the tank to install it without moving it. You may want to give it a shot to save you some time.
Here is a quick pic with my phone. 6k bulbs.
Glad it worked!
Thread Starter
|
Senior Member
Joined: Sep 2007
Posts: 8,015
Likes: 14
From: MOFN, AL, 70 miles from George
I'm bringing this back to life-kinda'.
Yesterday I installed HID foglights, matching the color temperature of the low beams (4300K) I wrote this thread about last month.
I also have "White" inverted-cone LED's installed in the parking lamps and clear side-marker lamps. This makes the entire front end white with a touch (the LED's) blue. Stealth (mirrored) bulbs for both the front and rear turn signals rounds it out. I really like the effect.
What I thought was going to be a slick "stacked" set of ballasts was not to be. The cables wouldn't reach, and I left my cable stretcher at the lab. I ended up opening the wheel shrouds (after removing the tires) and working from there. I used existing holes in the framework with stainless hardware to attach the ballast brackets.
A little more work, but it looks OK to me. Pictures follow:
Last edited by maxcichon; Mar 5, 2009 at 08:55 PM.
Joined: Oct 2008
Posts: 32
Likes: 0
From: Panama city beach Fl
Awesome post!!!
I'm going to exercise it and install a kit. I ordered these. I'll let ya know how it goes!
I did some research and feel these xenons were the best bet. Riken is a german vendor matched with mercedes and the kit is of a higher quaility.
on http://rikensport.com/
I'm going to exercise it and install a kit. I ordered these. I'll let ya know how it goes!
I did some research and feel these xenons were the best bet. Riken is a german vendor matched with mercedes and the kit is of a higher quaility.
on http://rikensport.com/

Forum Regular
Joined: Sep 2008
Posts: 334
Likes: 0
I have used 4 kits off of ebay, and they work great. and are very easy to install, once you can get to the passenger side. I would suggest you do that side first, as it is the more diffucult to get to. Try using something like robo grips, to lift the overflow resevoir from underneath, I tried to just pull it out, but 1 hour later, and the robo grips lifted it right out of the grommet. good luck, chris
And save your self a trip to the parts store, and pick up the m6 nuts. your going to need 4 most likely.
And save your self a trip to the parts store, and pick up the m6 nuts. your going to need 4 most likely.
Thread Starter
|
Senior Member
Joined: Sep 2007
Posts: 8,015
Likes: 14
From: MOFN, AL, 70 miles from George
Joined: Dec 2008
Posts: 49
Likes: 0
OK, maybe I'm daft, but I'm having a hard time with these two steps:
Removal of old bulbs
For step two, I can unhook the clip OK, but how do I removed the bulb? Does it go through the clip? Or does the connector first have to be removed(step 1) to get the bulb out?
Removal of old bulbs
- First, and some find difficult, is pulling the connector from the back of the bulbs. If you look closely, you will see an "H" shaped area. I used a medium sized 45 deg bent-nosed needle pliers to grab the center of this "H" and pulled straight back with a little rocking action. DO NOT TWIST! DO NOT PULL ON THE WIRES! It comes off, but can fight a little.
- Next, undoing the bulb retaining clips is for some a bit baffling. On the low beams, the clip clamps at the bottom and swings UP. Press the very bottom of the clip and push to the side to unhook it from the retainer. Remove the bulb. Repeat for other side.
For step two, I can unhook the clip OK, but how do I removed the bulb? Does it go through the clip? Or does the connector first have to be removed(step 1) to get the bulb out?